In Memory Of My Mom (CML) who Loved and collected owls.
Size 7 Needles
WW yarn - Brown, White, & Turquoise
Brown Yarn:
1. CO 26, knit across
2-11. Knit 1 row, Purl 1 Row
Long tail of brown yarn for sewing
White Yarn:
12-21. Knit 1 row, Purl 1 row
22. *K 2, k2 tog *repeat across (20 sts)
23. Purl across
24. *K 2 tog *Repeat across (10 sts)
Cut yarn leave long tail, and go to assemble
instructions below
Scarf Turquoise Yarn:
CO 4, knit across all row’s until length desired. Bind Off
Assemble:
run white yarn through 10 remaining sts on needle, pull snug.
Sew up seam matching white yarn and them brown yarn. Sew half of brown top, turn inside out and stuff, sew remaining top together. Finish off.
You can use buttons for eyes, or make your own as I did. Don’t forget to add orange beak
Sew scarf & eyes in place or hot glue them as I did
Welcome to "Jeanarie's Patterns"- (Blessing others One Stitch at a Time)
"Childrens Hospital Donation"
Childrens Hospital In Little Rock today.. There are over 400 Baby hats...
Saturday, December 21, 2019
Monday, December 2, 2019
Santa Bag (K)
As I told you before, I saw these all over but no pattern. Soooooo this is what I (JMSQ) did to create this Christmas Santa Bag {JMSQ 11/29/2019}
Size 7 needles
Red, White, & Flesh colored yarn.
I used WW yarn
I used WW yarn
White Yarn:
CO 52 stitches, Knit 16 - to - 18 rows DO NOT BIND OFF
Flesh Colored Yarn:
Knit 1 row, Purl 1 row (Repeat 4 more times for a total of 10 rows) DO NOT BIND OFF
White yarn:
Knit 6 rows DO NOT BIND OFF
Red Yarn:
Knit 1 row, Purl 1 row (Repeat 4 more times for a total of 10 rows) DO NOT BIND OFF
White yarn:
Knit 1 row, Purl 1 row, (Repeat 1 more time for a total of 4 rows) DO NOT BIND OFF
Knit 6 more rows and bind off leaving long tails for sewing seem and bottom of Christmas Bag.
Nose:
G hook, red yarn
G hook, red yarn
Ch 2, 10 hdc, join, ch 2, 2 hdc in next stitch, *1 hdc in next stitch, 2 hdc in next stitch, *repeat around, join leave long tail to sew into place
~or~ you can stuff nose, close it and hot glue it into place
Make other face features and glue them into place
Sunday, November 10, 2019
Christmas Tree's (C)
11/9/2019
This is not my pattern yet it is.
I saw several photo's of these Christmas Tree's yet no one had a pattern or link to share. So I took a photo of them and began to make one up that I liked, [thus my pattern
that I give to you free] (JMSQ)
Read: *** for placement on row 3 for Stem
Read: Note for option #2 on Tree Stem
G Hook - used also I used WW Yarn
TREE:
1.) ch 4, join to form ring, ch 2, 2 dc, ch 1, * 3 dc, ch 1,
* Repeat 1 more time. Join to top of ch 2
2.) Sl St "loosely" into ch 1 space, ch 2, 2 dc, ch 2,
3 dc, ch 1, *INTO NEXT ch 1 space, 3 dc, ch 2, 3 dc, ch 1,
*Repeat 1 more time, join to top of ch 2
3.) sl st "loosely" INTO ch 2 space, - ch 2, 3 dc, ch 1, 4 dc, *ch 1,
skip 1 st, sc in next st, ch 1, skip next st, ***4 dc in next ch 1 space,
ch 1, skip 1 st, sc in next st, ch 1, skip 1 st, 4dc, ch 1, 4 dc in next st,
*Repeat around, join to top of ch 2, finish off
***STEM:***
***Attach yarn with a sc just befor the ***4 dc, (Look at row 3 for the *** placement)
1 hdc in each of the 4 dc, 1 sc in st just after the dc's, finish off and tuck in tails.
NOTE: Option #2 for stem
you can work DC's instead of hdc, but I liked the way hdc looked best
Wednesday, July 24, 2019
Fiddle-Fidget Muffs (Loom)
Front & Back of Muff
Inside of Muff- I added fidgets to play with inside
This Fiddle/Fidget Muff was made from my 31 peg loom. E wrap,
continue working E wrap with 2 strands of yarn held together
until piece measures 20 1/2”; fold beginning row end up through
tube of muff and attach to loom, (like making brim on hat), then I
crocheted the two stitches together with a sc around. MEASURES 10”... finish off
Blue & purple I’m using as front, and rusty colored I’m using as inside
Now to decorate, (my favorite time), I like to decorate with
a few things inside as well as on both sides outside
Front of Muff
Back of Muff
Inside of Muff- I added fidgets to play with inside
This Fiddle/Fidget Muff was made from my 31 peg loom. E wrap,
continue working E wrap with 2 strands of yarn held together
until piece measures 20 1/2”; fold beginning row end up through
tube of muff and attach to loom, (like making brim on hat), then I
crocheted the two stitches together with a sc around. MEASURES 10”... finish off
Blue & purple I’m using as front, and rusty colored I’m using as inside
Now to decorate, (my favorite time), I like to decorate with
a few things inside as well as on both sides outside
Front of Muff
Back of Muff
Saturday, July 20, 2019
Mom's Fiddle-Fidget-Muff (C)
Mom so happy with her Fidget Muff
{My Precious Mother. July 20,2019}
Mom Just loves all the fun things.
Mom absolutely loved her Fidget Muff I made especially for her... July 20,2019
Photo's continue at bottom showing the steps I took
Mom’s Fiddle/Fidget Muff (C)
This Fidget muff was made in 2 plannels, 1.blue being the inside
liner, 2. white, orange & green outer piece.
Use stitch and yarn of your choice. I also put some things on
inside of muff to play with
H hook. Measures. 6” x 11”
2 strands of yarn held together throughout
Ch 1 does NOT count as stitch made
Make 2
1.) ch 40, join to form ring, ch 1, 1 hdc in each st around, join.
2 - 23.) ch1, 1 hdc in each st around, join, finish off
Decorate your Fidget muff now
With wrong sides together, insert liner into muff, line up your
stitches, join yarn with sc through both panels, 1 sc in each
st around, join and finish off
Now line stitches on opposite side and join with sc through
both panels, 1 sc in each st around. Finish off tuck in tails
Friday, March 15, 2019
Gift Bags (K)
JMSQ March 2019
Red - measures 4 1/2 “ X 5 1/2”
Yellow - measures 3 1/4” X 3 3/4”
6 Needles
With long tail Cast On
(Yellow) CO 30
(Red) CO 40
**NOTE:
Yellow work pattern to row 18,
then go to row 30 and continue
to end of pattern
Rows 1-3: knit across
Rows 4,6,8,10,12,14,16,18,20,22,24,26,28: Knit across
Rows 5,7,9,11,13,15,17,19,21,23,25,27,27,29: Purl across
Row 30: K 1, yo, k2 tog *repeat across
Row 31: Purl across
Rows 32-35: Knit Across
BUT ND OFF LEAVING LONG TAIL to sew both sides
together and bottom
After sewing seams together, Turn inside out and decorate as desired
Ties: I used a G Crochet Hook, and for the Red tie I chained 65, for the yellow one I chained 30, and weave it in and out of top of gift bag
Red - measures 4 1/2 “ X 5 1/2”
Yellow - measures 3 1/4” X 3 3/4”
6 Needles
With long tail Cast On
(Yellow) CO 30
(Red) CO 40
**NOTE:
Yellow work pattern to row 18,
then go to row 30 and continue
to end of pattern
Rows 1-3: knit across
Rows 4,6,8,10,12,14,16,18,20,22,24,26,28: Knit across
Rows 5,7,9,11,13,15,17,19,21,23,25,27,27,29: Purl across
Row 30: K 1, yo, k2 tog *repeat across
Row 31: Purl across
Rows 32-35: Knit Across
BUT ND OFF LEAVING LONG TAIL to sew both sides
together and bottom
After sewing seams together, Turn inside out and decorate as desired
Ties: I used a G Crochet Hook, and for the Red tie I chained 65, for the yellow one I chained 30, and weave it in and out of top of gift bag
Monday, November 26, 2018
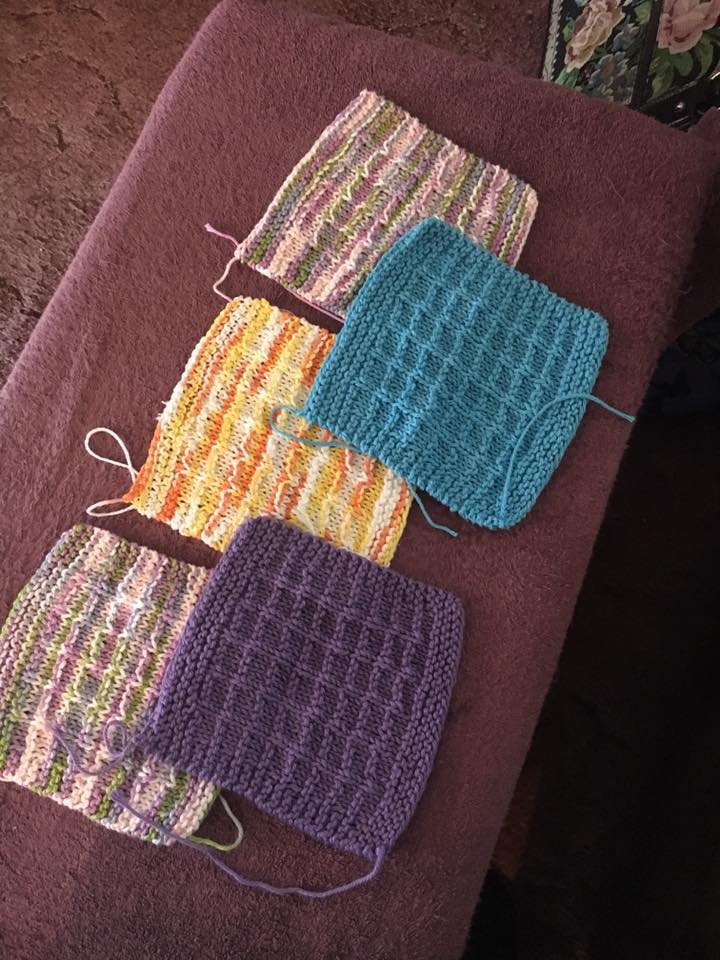
Open Blind DishCloth (K)
Open Blind Dish Cloth (K)
8 needles - Cotton
8 needles - Cotton
CO 29
1. K across
2. K 3, P 23, K 3
3. K across
4. K 6, P 1, *Repeat 3 more times, K 6
2. K 3, P 23, K 3
3. K across
4. K 6, P 1, *Repeat 3 more times, K 6
*Repeat row’s 1-4 *(7 more times)
Knit 6 rows, bind off
Tuesday, August 28, 2018
G-ma"s Favorite Dishcloth Lovie (K)
{My Version - JMSQ 8/28/2018}
G-ma"s Favorite Dishcloth Lovie
In Honor of our 1st Great Grandson Kade Logan
Needles 7-9 (I used size 8 for this pattern)
Redheart 4 ply WW yarn
1.) co 4 - knit across
2.) k2, yo, knit across
**{Repeat row 2 until you have 42-45 sts}
Begin decrease
3.) k1, k2tog, yo, k2tog, k to end
**Repeat row 3 until you have 10 sts on needles
***NOTE:
you can either knit all row's (Total of 34 rows),
or work 1 row knit, next row purl as I have done below.
To make it an easy pattern copy, I'll share what I did
AFTER row 17, I added my face and continued with pattern to row 34
Row's 1,3,5,7,9,11,13,15,17,19,21,23,25,27,29,31,33: Slip 1, knit across
Row's 2,4,6,8,10,12,14,16,18,20,22,24,26,28,30,32,34. Purl across
Bind off leaving extra long tail
Fold right sides of face together, whip stitch up side of head, weave
in and out of sts along top to opposite wide of head, whip stitch down
along side of head, {DO NOT FINISH OFF}
turn head piece inside out and smooth side seams, now stuff loosly and
begin to close with whip st along back of head to cloth
tuck in tails and finish off
**NOTE:
I added a bow (or ribbon) and pulled to give a neck feature, and put bows
in ears, ALWAYS triple knot bows to ensure babies can't open and choke.
G-ma"s Favorite Dishcloth Lovie
In Honor of our 1st Great Grandson Kade Logan
Needles 7-9 (I used size 8 for this pattern)
Redheart 4 ply WW yarn
1.) co 4 - knit across
2.) k2, yo, knit across
**{Repeat row 2 until you have 42-45 sts}
Begin decrease
3.) k1, k2tog, yo, k2tog, k to end
**Repeat row 3 until you have 10 sts on needles
***NOTE:
you can either knit all row's (Total of 34 rows),
or work 1 row knit, next row purl as I have done below.
To make it an easy pattern copy, I'll share what I did
AFTER row 17, I added my face and continued with pattern to row 34
Row's 1,3,5,7,9,11,13,15,17,19,21,23,25,27,29,31,33: Slip 1, knit across
Row's 2,4,6,8,10,12,14,16,18,20,22,24,26,28,30,32,34. Purl across
Bind off leaving extra long tail
Fold right sides of face together, whip stitch up side of head, weave
in and out of sts along top to opposite wide of head, whip stitch down
along side of head, {DO NOT FINISH OFF}
turn head piece inside out and smooth side seams, now stuff loosly and
begin to close with whip st along back of head to cloth
tuck in tails and finish off
**NOTE:
I added a bow (or ribbon) and pulled to give a neck feature, and put bows
in ears, ALWAYS triple knot bows to ensure babies can't open and choke.
Tuesday, August 21, 2018
Face Mask
Face Mask
Fast mask
Perfect for allergies, hospital’s, the people living where air is difficult etc.
H hook
Cotton (hobby lobby brand) or yarn. If using yarn ch 26-28 then work pattern
MEASURE after row 12, if it fits, finish off with ear ties
1.) ch 30, 1 hdc in 2nd st from hook, 1 hdc in each st across, ch 1, turn
2-14.) 1 hdc in each st across, ch 1 turn. Do not fasten off after row 14...
Ch 20 attach to corner on row 1, fasten off
Attach yarn to opposite corner, ch 20, attach to corner 1, fasten off
Wednesday, July 11, 2018
Children's Easy Neckwarmer (K)
7/11/2018
Children’s easy neck warmer
7 needles
WW 4 ply yarn
WW 4 ply yarn
NOTE:
I may try size 6 needles and co 76 and see how it fits pre-schoolers
CO 88
Rows1-30: K2, P2
Cast off sew side seam
As you can see this is stretchy enough to pull up over mouth and nose with bitter cold winters
Also these stretch big enough for small children up to maybe 10-12 yrs old
Friday, May 18, 2018
X-st Soap Sacks
Perfect for Blessing Boxes or for giving to the Homeless
Made of cotton or cotton blend so their soft enough to use as a wash cloth
yet sturdy enough to hang it in your shower to dry after use. Also just toss in
your washer & dryer for easy cleaning
H hook
1. Ch 5, join to form ring, ch 3, make 11 dc in ring, join to top of ch 3, (12 sts)
2. Ch 3, 1 dc in same st, 2 dc in each of next 2 sets, 3 dc in next st, *2 dc in
next 3 sts, 3 dc in next st. Repeat * 1 more time, join to top of ch 3 (27sts)
3-8. ch 3, 1 dc in each sts around, join,
9. ch 2, 1 hdc in each st around, join,
10. ch 2, *skip next st, 1 dc in next st, now work 1 dc in
st just skipped, (x st just made), *Repeat around, join,
11. Repeat row 9
12. ch 1, 1 sc in ch 1 space, sl st into next st, ch 14, join with a sl st in 1st ch, 1 sc in each of next 12 sts, ch 2, skip 2 sts, 1 sc in last 11 sts, join to to ch 1, finish off
NOTE: the ch 2 space is to slip your hanging hook through (Purple & yellow Sack Above), ,
Add a bar of soap still in its original package and give away.
Tuesday, April 3, 2018
Church Cradles
When our Granddaughters were young we called these cradle purses.
Now I like to call them church cradle's to keep little girls quiet in church. They each hold a 4” teddy bear or doll
Monday, January 8, 2018
Grandmas Mittens (C)
Hook Sizes: {DO NOT JOIN ROUNDS, PLACE MARKER}
E - ages 2-4
G - Ages 4-7
H - Ages 7 -10/12
NOTE: larger size in ( ), I use this size when making G hook 4-7 yrs of age
BODY:
1. ch 2, 5 (6) sc in 2nd chain from hook, (5 sts), (6 sts)
2. 1 sc in next st, PLACE MARKER IN THIS STITCH, now
work another sc in same st, 2 sc in each remaining st (10 sts), (12 sts)
3. 1 sc in next st, PLACE MARKER IN THIS STITCH, now
work another sc in same st, *1 sc in next st, 2 sc in next,
*Repeat around (15 sts) ( 18sts)
4. 1 sc in next st, PLACE MARKER IN THIS STITCH, now
work another sc in same st, *1 sc in each of next 2 sts,
2 sc in next, *Repeat around (20 sts), (24 sts )
5. 1 sc in next st, PLACE MARKER IN THIS STITCH, now
work another sc in same st, *1 sc in each of next 4 sts,
2 sc in next [when working with sts in ( ) 1 sc in last 3 sts]
*Repeat around (24 sts), (29 sts)
6-17. 1 sc in each st, **Remember to keep placing your
marker each row
18. 1 sc in next st, place marker, ch 6, skip next 6 sts,
1 sc in remaining sts to marker
19. 1 sc in each st and each chain (24 sts)**Remember to
keep placing your marker each row
20 - 25. 1 sc in each st, **Remember to keep placing your
marker each row, sl st into next st and fasten off UNLESS
your working your cuff with same color yarn
26-30. Join yarn in same st you sl st into from body of mitten;
*1 hdcfp, 1 hdcbp, *Repeat around sl st and fasten off
This cuff can be folded over body of mitten if reciever is small and will still fit nicely
THUMB:
1. join yarn in 1 sts along bottom, and each st , now work
1 sc in each st along the top. DO NOT JOIN (12 sts)
2-6. 1 sc in each st, remember to place marker each row (12 sts)
7. *1 sc2tog *repeat around, sl st and fasten off, ***leave long
tail to weave in and out along top to close, secure (6sts)
Friday, January 5, 2018
Mitten Lady's Magic Mittens
Children' s Mittens © Mitten Lady
http://mittenlady.com/mittenpattern
NOTE:
I use size 6 & 7 needles when making smaller mitten's, &
NOTE Changes: I omit rows 31 & 32 so this makes a smaller thumb:;
and I omit rows 45, 46, 47 & 48 to make the body smaller for the little mittens,
then I follow pattern below again as written...
LOVE THIS PATTERN!!!!!!!
I use size 8 needles for children up to maybe 12 yrs of age and follow pattern as written below...
~~~~~~~~~~~~~~~~~~~~~~~~~~~~~~
Using size 8 needles, Cast on 28 Stitches
1-10. k1,p1 ribbing (I do - k2, p2)
13. increase one in each of the first two stitches, then
knit to last two stitches, increase one in each of last
two stitches...32 Sts
14. P15 add marker, p2, add marker, p15
15. k15, increase one in each of next two stitches, k15
Row's 16,18,30.22,24. purl
17. K15, increase one in next stitch, k2, increase one
in next stitches, K15
19. K15, increase one in next stitch, k4, increase one
in next stitches, K15
21. K15, increase one in next stitch, k6, increase one
in next stitches, K15
23. K15, increase one in next stitch, k8, increase one
in next stitches, K15
25. remove markers in this row, K15, increase one in next
stitch, k10, increase one in next stitches, K15
26.Purl 26 turn
27.k10 turn
28.purl 10 turn
29.k10 turn
30.purl 10 turn
31.k10 turn
32.purl 10 turn
33.k2tog 5 times, thread needle through remaining 5 stitches, sew thumb
34.join yarn and finish row in purl
Row's 35, 37, 39, 41, 43, 45, 47: Knit all sts
Row's 36, 38, 40, 42, 44, 46, 48, 50, 52: Purl all sts
49.Knit 2 tog, Knit 2, repeat to end
51.Knit2 tog, Knit 1, repeat to end
53.knit 2 tog, repeat to end thread yarn through remaing
stitches and sew side seam of mitten
http://mittenlady.com/mittenpattern
NOTE:
I use size 6 & 7 needles when making smaller mitten's, &
NOTE Changes: I omit rows 31 & 32 so this makes a smaller thumb:;
and I omit rows 45, 46, 47 & 48 to make the body smaller for the little mittens,
then I follow pattern below again as written...
LOVE THIS PATTERN!!!!!!!
I use size 8 needles for children up to maybe 12 yrs of age and follow pattern as written below...
~~~~~~~~~~~~~~~~~~~~~~~~~~~~~~
Using size 8 needles, Cast on 28 Stitches
1-10. k1,p1 ribbing (I do - k2, p2)
13. increase one in each of the first two stitches, then
knit to last two stitches, increase one in each of last
two stitches...32 Sts
14. P15 add marker, p2, add marker, p15
15. k15, increase one in each of next two stitches, k15
Row's 16,18,30.22,24. purl
17. K15, increase one in next stitch, k2, increase one
in next stitches, K15
19. K15, increase one in next stitch, k4, increase one
in next stitches, K15
21. K15, increase one in next stitch, k6, increase one
in next stitches, K15
23. K15, increase one in next stitch, k8, increase one
in next stitches, K15
25. remove markers in this row, K15, increase one in next
stitch, k10, increase one in next stitches, K15
26.Purl 26 turn
27.k10 turn
28.purl 10 turn
29.k10 turn
30.purl 10 turn
31.k10 turn
32.purl 10 turn
33.k2tog 5 times, thread needle through remaining 5 stitches, sew thumb
34.join yarn and finish row in purl
Row's 35, 37, 39, 41, 43, 45, 47: Knit all sts
Row's 36, 38, 40, 42, 44, 46, 48, 50, 52: Purl all sts
49.Knit 2 tog, Knit 2, repeat to end
51.Knit2 tog, Knit 1, repeat to end
53.knit 2 tog, repeat to end thread yarn through remaing
stitches and sew side seam of mitten
http://mittenlady.com/mittenpattern
Saturday, December 16, 2017
Quick Scarf (K)
"JMSQ "Copyright 2017
Quick and simple scarf. Works up quickly
10 1/2 needles
Co 24 sets, knit 4 rows then follow pattern ...
1. Knit across
2. K 2, purl 20, k 2
3 & 4. Knit across
Continue to follow pattern rows 1-4 until desired length, k 4 rows & bind off
10 1/2 needles
Co 24 sets, knit 4 rows then follow pattern ...
1. Knit across
2. K 2, purl 20, k 2
3 & 4. Knit across
Continue to follow pattern rows 1-4 until desired length, k 4 rows & bind off
NOTE: you can co 20 sts and work pattern, I did 24 because this is for a man and I thought it would make it both wider and easier to fold in half
Subscribe to:
Posts (Atom)