"JMSQ "Copyright © 2016
I made this with Orange because Bunnies eat carrots... Smile
G & H Hooks
Bunny FuFu: G Hook
1.) ch 4, join, ch 2, 11 dc in ring, join (12 sts)
2.) ch 2, 2 dc in each st, join (24 sts)
3.) ch 2, *1 dc in st, 2 dc in next st, *Repeat, join (38 sts)
Row's 4-6.) ch 2, 1 dc in each st, join (38 sts)
Begin Decrease:
Row 7.) ch 2, *1 dc in same st, 2 dc tog,*Repeat, join (24 sts)
Row 8.) ch 2, *1 dc 2 tog, *Repeat, join (12 sts)
STUFF Head
9.) ch 1, *2 sc tog *Repeat, join (6 sts)
finish off leaving LONG TAIL to sew on lovie blankie
Ears: Make 2 (H Hook)
1.) ch 10, 1 dc in 2nd ch from hook, 1 dc in each st to end,
3 dc in last ch, turn and work along opposite side, i dc in
each st, 1 dc in base of beginning, join
2.) ch 2, 2 dc in each of nest 3 sts, 1 dc in next 4 sts,
2 dc in each of next 5 sts, 1 dc in next 4 sts, 2 dc in
last 2 sts. join
Fasten off leaving long tail to sew on bunny head
Curl Paws: Make 2 (G hook)
ch 15, 4 hdc in 2nd ch from hook, 4 hdc in each of next 3 sts, 3 hdc
in each remaining st up to last 2 sts, 1 hdc in each of last 2 sts,
fasten off leave long enough tail to tie on base of bunny head.
Add fase as desired, I made sleepy eyes & nose on this bunny
Lovie Blankie:
NOTE:
ALL ch's at beginning of rows count as a stitch, and from row 3 on,
slip into ch 2 space of V sts
Color A Soft White
Color B Orange
H Hook
Color A
1.)ch 4 join, ch 3, 11 dc inring, join to top of ch 3 (12 sts)
2.) CH 3, 2 dc in each st around, join to top of ch 3 (24 STS)
3.) ch 5, 1 dc in same st, skip next stitch, *1 dc, ch 2, 1 dc in next st,
[V st made], skip,next st, *Repeat around, join in 3rd st of ch 5 .
(12 V sts made)
*** slip into ch 2 space of V sts at the beginning
of each row unless directed to do otherwise
4.) slip into ch 2 space, 2 dc, ch 2, 2 dc in each V st around, join
to top of ch 3
5.) slip into ch 2 space, 3 dc, ch 2, 3 dc in each V st around, join
to top of ch 3
6.) slip into ch 2 space, 4 dc, ch 2, 4 dc in each V st around, join
to top of ch 3
7.) slip into ch 2 space, 4 dc, ch 3, 4 dc, ch 1 in each V st around,
join to top of ch 3
8.) slip into ch 2 space, 5 dc, ch 2, 5 dc, ch 1 in each V st around,
join to top of ch 3
Change to Color B
9.) With color B, **Join in any stitch, 1 dc in each st, 1 dc in ch 1 space,
1 dc in each st, 3 dc in ch 2 space. **Repeat around, fasten off
Change to Color A
Join in any stitch, *1 sc in each st, 3 sc in center point of of ch 3,
*Repeat around .Fasten off
Welcome to "Jeanarie's Patterns"- (Blessing others One Stitch at a Time)
"Childrens Hospital Donation"
Childrens Hospital In Little Rock today.. There are over 400 Baby hats...
Saturday, June 18, 2016
Friday, June 3, 2016
Jellyfish Lovie (C)
Measures just about 12"- 12 1/2"
This is the pattern for the Lovie Blankie, the pattern for the Jellyfish is at the bottom of this post...
NOTE:
ALL ch's at beginning of rows count as a stitch, and from row 3 on,
slip into ch 2 space of V sts
Color A Soft White
Color B Lime Green
H Hook
Color A
1.)ch 4 join, ch 3, 11 dc inring, join to top of ch 3 (12 sts)
2.) CH 3, 2 dc in each st around, join to top of ch 3 (24 STS)
3.) ch 5, 1 dc in same st, skip next stitch, *1 dc, ch 2, 1 dc in next st,
[V st made], skip,next st, *Repeat around, join in 3rd st of ch 5 . (12 V sts made)
*** slip into ch 2 space of V sts at the beginning of each row unless directed to
do otherwise
4.) slip into ch 2 space, 2 dc, ch 2, 2 dc in each V st around, join to top of ch 3
5.) slip into ch 2 space, 3 dc, ch 2, 3 dc in each V st around, join to top of ch 3
6.) slip into ch 2 space, 4 dc, ch 2, 4 dc in each V st around, join to top of ch 3
7.) slip into ch 2 space, 4 dc, ch 3, 4 dc, ch 1 in each V st around, join to top of ch 3
8.) slip into ch 2 space, 5 dc, ch 2, 5 dc, ch 1 in each V st around, join to top of ch 3
Change to Color B
9.) With color B, **Join in any stitch, 1 dc in each st, 1 dc in ch 1 space, 1 dc in each st,
3 dc in ch 2 space. **Repeat around, fasten off
Change to Color A
Join in any stitch, *1 sc in each st, 3 sc in center point of of ch 3, *Repeat around
Fasten off
Now is time to add your hand made toy to your Lovie... (Ideas - teddy bears, dolls, jelly Fish, etc.)
Find Jelly Fish Pattern Here:
http://www.1dogwoof.com/2016/05/crochet-jellyfish.html
As you can see there are many different way to dress up this little cutie, have fun and let your creative juices flow
NOTE:
ALL ch's at beginning of rows count as a stitch, and from row 3 on,
slip into ch 2 space of V sts
Color A Soft White
Color B Lime Green
H Hook
Color A
1.)ch 4 join, ch 3, 11 dc inring, join to top of ch 3 (12 sts)
2.) CH 3, 2 dc in each st around, join to top of ch 3 (24 STS)
3.) ch 5, 1 dc in same st, skip next stitch, *1 dc, ch 2, 1 dc in next st,
[V st made], skip,next st, *Repeat around, join in 3rd st of ch 5 . (12 V sts made)
*** slip into ch 2 space of V sts at the beginning of each row unless directed to
do otherwise
4.) slip into ch 2 space, 2 dc, ch 2, 2 dc in each V st around, join to top of ch 3
5.) slip into ch 2 space, 3 dc, ch 2, 3 dc in each V st around, join to top of ch 3
6.) slip into ch 2 space, 4 dc, ch 2, 4 dc in each V st around, join to top of ch 3
7.) slip into ch 2 space, 4 dc, ch 3, 4 dc, ch 1 in each V st around, join to top of ch 3
8.) slip into ch 2 space, 5 dc, ch 2, 5 dc, ch 1 in each V st around, join to top of ch 3
Change to Color B
9.) With color B, **Join in any stitch, 1 dc in each st, 1 dc in ch 1 space, 1 dc in each st,
3 dc in ch 2 space. **Repeat around, fasten off
Change to Color A
Join in any stitch, *1 sc in each st, 3 sc in center point of of ch 3, *Repeat around
Fasten off
Now is time to add your hand made toy to your Lovie... (Ideas - teddy bears, dolls, jelly Fish, etc.)
http://www.1dogwoof.com/2016/05/crochet-jellyfish.html
Wednesday, May 25, 2016
Placemats w/ Silverware Pockets
Photo is mine (JMSQ 5/25/2016)
This is NOT my idea, a precious lady "Binte Hawa" shared
this idea and her pattern for constructing it from a group on
facebook: (Yarn Wars FREE Crochet & Knit Community).
Binte's pattern as follows:
ch 50. 1 sc & 2 dc in same st, skip 2 sts *Repeat for 21 rows.
Make pocket separetly and attach to mat
This is just my take on the placemat w/silverware pocket
with my pattern.
J & H Hooks
Placemat: J Hook
1.) ch 57, (1 sc & 1 dc) in 3rd ch from hook, skip 1 st,
*1 sc & 1 dc in next st, skip next st, *Repeat across to last st,
1 sc in last st, ch 2, turn
2.) skip 1st st, *1 sc & 1 dc in nest st, skip next st, *Repeat
across to last stitch, 1 sc, ch 2 turn
Row's 3-30.) Repeat row 2, Fasten off, tuck in tail
Silverware Pocket: H hook
1.) Repeat row 1 from pattern above
2-8.) Repeat row 2 from pattern above,
DO NOT FASTEN OFF
9.) sc across top, finish off leaving LONG TAIL,
place on your mat, sew the 3 sides remaining,
tuck in tail
This is NOT my idea, a precious lady "Binte Hawa" shared
this idea and her pattern for constructing it from a group on
facebook: (Yarn Wars FREE Crochet & Knit Community).
Binte's pattern as follows:
ch 50. 1 sc & 2 dc in same st, skip 2 sts *Repeat for 21 rows.
Make pocket separetly and attach to mat
This is just my take on the placemat w/silverware pocket
with my pattern.
J & H Hooks
Placemat: J Hook
1.) ch 57, (1 sc & 1 dc) in 3rd ch from hook, skip 1 st,
*1 sc & 1 dc in next st, skip next st, *Repeat across to last st,
1 sc in last st, ch 2, turn
2.) skip 1st st, *1 sc & 1 dc in nest st, skip next st, *Repeat
across to last stitch, 1 sc, ch 2 turn
Row's 3-30.) Repeat row 2, Fasten off, tuck in tail
Silverware Pocket: H hook
1.) Repeat row 1 from pattern above
2-8.) Repeat row 2 from pattern above,
DO NOT FASTEN OFF
9.) sc across top, finish off leaving LONG TAIL,
place on your mat, sew the 3 sides remaining,
tuck in tail
Tuesday, March 29, 2016
Place Settings
I {JMSQ} don't read charts, so looking at the photo's this is what I came up with as a pattern.
Original pattern is Service Places crochet free pattern at
yarn patterns crochet blog
G hook - 15" around
F hook next time & I'll post measurments
**NOTES:
*Ch 4 on row 1 & ch 2 on each row count as 1st st
**V st - 2 dc, ch 1, 2 dc in same
*** Now I was running out of yellow yarn, so instead of 3 dc's,
ch 1 in each ch 1 space around, I alternated 2 dcs, ch 1 and the
next 3dc's, ch 1 around. Still worked up nicely
Shell Border
(1 dc before ch 1 space, 5 dc's in ch 1 space, 1 dc after ch 1
space for a total of 7 dc's for shell border)
~~~~~~~~~~~~~~~~~~~~~~~~~~~~~~~~~~~~~~~~~~~~~~~~~~
1.) ch 4, join to form circle, ch 4, *1 dc, ch 1,
*Repeat 10 more times in circle, join to 3rd ch of
ch 4 (12 dc's & ch 1's)
2.) sl st into ch 1 space, ch 2, 1 dc in same st,
ch 1, *2dc, ch 1 in each ch 1 space around, join to top
of ch 2
3.) sl st into ch 1 space, ch 2, 2 dc in same st,
ch 1, *3dc, ch 1 in each ch 1 space around, join to top of ch 2
4.)sl st into ch 1 space, ch 2, 1 dc, ch 1, 2dc, ch 1
in same st, *V st in each ch 1 space around, (2 dc,
ch1, 2 dc, ch 1) in each ch 1 space around.join to top
of ch 2
5.)sl st into ch 1 space, ch 2, 1 dc in same st, ch 1,
*2dc, ch 1 in "each" ch 1 space around, join to top of ch 2
6.)sl st into ch 1 space, ch 2, 2 dc in same st, ch 1,
*3dc, ch 1 in each ch 1 space around, join to top of ch 2
7.) Repeat row 6
8.) Repeat row 4
9.) Repeat row 2
10.) Repeat row 2
11.) sl st into ch 1 space, ch 2, 1 dc in same st, ch 1
(2dc's, ch 1 in this space), *3dc, ch 1 in next ch 1 space,
** 2 dc, ch 1 in next ch 1 space, 3 dc, ch 1 in next st,
*Repeat around join to top of ch 2
12.) Repeat row 11 - DO NOT FINISH OFF
Shell Border
13.)sl st to last dc "BEFORE" ch 1 space, 1 dc in this st,
5 dc in ch 1 space, 1 dc next st (7 total for shell), 1 sc
in next ch 1 space, *1 dc in last dc of this group "BEFORE"
ch 1 space, 5 dc in ch 1 space, 1 dc in next st (7dc's total),
1 sc in next ch 1 space *Repeat around, join to top of ch 2,
finish off and tuck in tails
Original pattern is Service Places crochet free pattern at
yarn patterns crochet blog
G hook - 15" around
F hook next time & I'll post measurments
**NOTES:
*Ch 4 on row 1 & ch 2 on each row count as 1st st
**V st - 2 dc, ch 1, 2 dc in same
*** Now I was running out of yellow yarn, so instead of 3 dc's,
ch 1 in each ch 1 space around, I alternated 2 dcs, ch 1 and the
next 3dc's, ch 1 around. Still worked up nicely
Shell Border
(1 dc before ch 1 space, 5 dc's in ch 1 space, 1 dc after ch 1
space for a total of 7 dc's for shell border)
~~~~~~~~~~~~~~~~~~~~~~~~~~~~~~~~~~~~~~~~~~~~~~~~~~
1.) ch 4, join to form circle, ch 4, *1 dc, ch 1,
*Repeat 10 more times in circle, join to 3rd ch of
ch 4 (12 dc's & ch 1's)
2.) sl st into ch 1 space, ch 2, 1 dc in same st,
ch 1, *2dc, ch 1 in each ch 1 space around, join to top
of ch 2
3.) sl st into ch 1 space, ch 2, 2 dc in same st,
ch 1, *3dc, ch 1 in each ch 1 space around, join to top of ch 2
4.)sl st into ch 1 space, ch 2, 1 dc, ch 1, 2dc, ch 1
in same st, *V st in each ch 1 space around, (2 dc,
ch1, 2 dc, ch 1) in each ch 1 space around.join to top
of ch 2
5.)sl st into ch 1 space, ch 2, 1 dc in same st, ch 1,
*2dc, ch 1 in "each" ch 1 space around, join to top of ch 2
6.)sl st into ch 1 space, ch 2, 2 dc in same st, ch 1,
*3dc, ch 1 in each ch 1 space around, join to top of ch 2
7.) Repeat row 6
8.) Repeat row 4
9.) Repeat row 2
10.) Repeat row 2
11.) sl st into ch 1 space, ch 2, 1 dc in same st, ch 1
(2dc's, ch 1 in this space), *3dc, ch 1 in next ch 1 space,
** 2 dc, ch 1 in next ch 1 space, 3 dc, ch 1 in next st,
*Repeat around join to top of ch 2
12.) Repeat row 11 - DO NOT FINISH OFF
Shell Border
13.)sl st to last dc "BEFORE" ch 1 space, 1 dc in this st,
5 dc in ch 1 space, 1 dc next st (7 total for shell), 1 sc
in next ch 1 space, *1 dc in last dc of this group "BEFORE"
ch 1 space, 5 dc in ch 1 space, 1 dc in next st (7dc's total),
1 sc in next ch 1 space *Repeat around, join to top of ch 2,
finish off and tuck in tails
Monday, February 29, 2016
Prayer Shawl Letter
"Comforting Others One Stitch At A Time"
"Wearing a Shawl is like recieving a Hug from God".
This is our opportunity to Bless you who may be Ill,
Hurt, Depressed, Lonely or in need of Spiritual Comfort
with our Prayer Shawls.
“Shawls… made for centuries universal and embracing,
symbolic of an inclusive, unconditionally loving, God.
They wrap, enfold, comfort, cover, give solace, mother,
hug, shelter and beautify. Those who have received these
shawls have been uplifted and affirmed, as if given wings
to fly above their troubles…”
-Written in 1998 by: Janet Bristow 2004
While making this prayer shawl is a spiritual practice which
embodies our thoughts and prayers for you.
Made in prayer, as prayed for durning the making of our
shawls, for prayer is covering you the reciever with GOD,
with our Blessings & Wishes from our hearts to your heart,
our shawls are then passed on hand-to-hand and heart-to-heart.
Our Prayer
May God’s grace be upon this shawl, warming, comforting,
enfolding and embracing. May this shawl be a safe haven…
a sacred place of security and well being sustaining and
embracing in good times as well as difficult ones. May You
be cradled in hope, kept in joy, graced with peace,
and wrapped in love.
Please know that Ron & I are keeping you and your precious
family deep within our prayers
Blessings Ron & Jean OzarkPs_91@yahoo.com
LAUNDERING: - Machine wash warm, gentle cycle, Tumble
dry low. Do not over dry. For best results on fringe,
hand wash, lay flat to dry, (ALWAYS wash separtly / alone)
never mix with other laundry either washing or drying)
Rita's Shawl
My latest shawl finished and delivered to it's new home (Rita Cole)
This is my Open Blind pattern
Praying Hands
Reverse Single Cross
When making this pattern, you CO 67 sts and work open blind pattern for 30 rows, then count off 10 sts from each end and place marker, this is where you will place the praying hands (between markers),continue with open blind pattern then work Praying hands between markers, then back to open blind. (** Read Note) and then do the same for the reverse Cross; count off 15 sts from each end and this is where you will add the reverse cross portion of this shawl pattern
**Note
This Shawl has a grand total of 320 rows - 160 is your half way point
``````````````````````````````````````
"Comforting Others One Stitch At A Time"
"Wearing a Shawl is like recieving a Hug from God".
This is our opportunity to Bless you who may be Ill,
Hurt, Depressed, Lonely or in need of Spiritual Comfort with our Prayer Shawls.
“Shawls… made for centuries universal and embracing,
symbolic of an inclusive, unconditionally loving, God. They wrap, enfold, comfort, cover, give solace, mother,
hug, shelter and beautify. Those who have received these
shawls have been uplifted and affirmed, as if given wings
to fly above their troubles…”
-Written in 1998 by: Janet Bristow 2004
embodies our thoughts and prayers for you.
shawls, for prayer is covering you the reciever with GOD,
with our Blessings & Wishes from our hearts to your heart,
our shawls are then passed on hand-to-hand and heart-to-heart.
Our Prayer
May God’s grace be upon this shawl, warming, comforting, enfolding and embracing. May this shawl be a safe haven…
a sacred place of security and well being sustaining and
embracing in good times as well as difficult ones. May You
be cradled in hope, kept in joy, graced with peace,
and wrapped in love.
Please know that Ron & I are keeping you and your precious
family deep within our prayers
Blessings Ron & Jean OzarkPs_91@yahoo.com
LAUNDERING: - Machine wash warm, gentle cycle, Tumble
dry low. Do not over dry. For best results on fringe, hand wash, lay flat to dry, (ALWAYS wash separtly / alone)
never mix with other laundry either washing or drying)
Monday, January 11, 2016
Knitted Gnome
http://plainandjoyfulliving.blogspot.com/2009/02/fun-knitting-gnome.html
This is NOT one of my own patterns but it beyond adorable.
(JMSQ 1/11/2016)
http://plainandjoyfulliving.blogspot.com/2009/02/fun-knitting-gnome.html
To get started:
Materials: 20 yards of worsted weight wool yarn for the body
color 5 yards of worsted weight wool yarn for the skin color
clean carded sheep's wool for stuffing yarn needle size 6
knitting needles (for worsted weight) or size appropriate
for weight of yarn
You can use any size needle and yarn to create different
size gnome babies!
First Leg:
Cast on 10 stitches, leaving about a 10" tail for sewing
up the leg
Knit 10 rows (garter stitch).
Cut yarn leaving a 5" tail.
Second Leg:
(push first leg to bottom of needles)
Cast on 10 stitches on same needle that first leg is on this
time leaving about a 15" tail.
Like first leg, knit 10 rows (garter stitch).
Body:
Now knit both legs together (all 20 stitches). This will form
the body.
Knit (garter stitch) for 16 rows
Head:
Now switch to the skin color - and knit 10 rows in the
stockinette stitch (this is one row garter, one row purl).
After you have finished the 10th row - bind of all 20 stitches.
Sew up the Body:
Start with the shorter piece of yarn on the leg and thread the
needle. Fold the leg in half to meet in the middle. (Wrong sides
together - the smooth part of the head will be on the inside)
Start with a running stitch around the bottom of the leg and
pull. Then stitch up the side of the leg.
Finish by making a knot with the other yarn end that is in the
middle and tuck yarn ends to the outside.
Now take the longer string at the end of the other leg and
thread yarn needle. Work just like the first leg except continue
stitching up the back of the gnome baby. When you reach the skin
color - tie off with the other colored yarn.
Turn body right side out.
Stuff body with wool. Stuff legs first. I use the end of the knitting
needle or crochet hook to get the wool in firmly. Stuff up to the
beginning of the head.
Now take the yarn that you used to knit up the back of the body
and make a running stitch between the body color and head color
to form the neck. Tie a knot.
Now tuck all the loose strings into the head and take the skin
color hanging yarn and thread needle. Sew up back of the head
only to the top. Cut body color loose string inside head.
Stuff head with wool.
Now use a running stitch around top of head and tie off with
other yarn string. Cut hanging yarns almost to the knot.
Arms:
Cast on 8 stitches and knit 8 rows cast off.
Sew up cast off edge with a running stitch and then sew up side.
Stuff Arm . Repeat for Arm 2.
Hat:
Cast on 22 stitches. Knit four rows in the stockinette stitch
(Knit one row, Purl one row) for four rows.
Now, knit two stitches together at the beginning and end of
each knit row (every other row).
Continue this until there is only one stitch left. Cut yarn
long (about 20") and pull through loop.
Put yarn in yarn needle and sew up back of hat. Let the bottom
of the hat roll up a bit for the brim and finish sewing around
head. and then attach to side of body.
http://plainandjoyfulliving.blogspot.com/2009/02/fun-knitting-gnome.html
This is NOT one of my own patterns but it beyond adorable.
(JMSQ 1/11/2016)
http://plainandjoyfulliving.blogspot.com/2009/02/fun-knitting-gnome.html
To get started:
Materials: 20 yards of worsted weight wool yarn for the body
color 5 yards of worsted weight wool yarn for the skin color
clean carded sheep's wool for stuffing yarn needle size 6
knitting needles (for worsted weight) or size appropriate
for weight of yarn
You can use any size needle and yarn to create different
size gnome babies!
First Leg:
Cast on 10 stitches, leaving about a 10" tail for sewing
up the leg
Knit 10 rows (garter stitch).
Cut yarn leaving a 5" tail.
Second Leg:
(push first leg to bottom of needles)
Cast on 10 stitches on same needle that first leg is on this
time leaving about a 15" tail.
Like first leg, knit 10 rows (garter stitch).
Body:
Now knit both legs together (all 20 stitches). This will form
the body.
Knit (garter stitch) for 16 rows
Head:
Now switch to the skin color - and knit 10 rows in the
stockinette stitch (this is one row garter, one row purl).
After you have finished the 10th row - bind of all 20 stitches.
Sew up the Body:
Start with the shorter piece of yarn on the leg and thread the
needle. Fold the leg in half to meet in the middle. (Wrong sides
together - the smooth part of the head will be on the inside)
Start with a running stitch around the bottom of the leg and
pull. Then stitch up the side of the leg.
Finish by making a knot with the other yarn end that is in the
middle and tuck yarn ends to the outside.
Now take the longer string at the end of the other leg and
thread yarn needle. Work just like the first leg except continue
stitching up the back of the gnome baby. When you reach the skin
color - tie off with the other colored yarn.
Turn body right side out.
Stuff body with wool. Stuff legs first. I use the end of the knitting
needle or crochet hook to get the wool in firmly. Stuff up to the
beginning of the head.
Now take the yarn that you used to knit up the back of the body
and make a running stitch between the body color and head color
to form the neck. Tie a knot.
Now tuck all the loose strings into the head and take the skin
color hanging yarn and thread needle. Sew up back of the head
only to the top. Cut body color loose string inside head.
Stuff head with wool.
Now use a running stitch around top of head and tie off with
other yarn string. Cut hanging yarns almost to the knot.
Arms:
Cast on 8 stitches and knit 8 rows cast off.
Sew up cast off edge with a running stitch and then sew up side.
Stuff Arm . Repeat for Arm 2.
Hat:
Cast on 22 stitches. Knit four rows in the stockinette stitch
(Knit one row, Purl one row) for four rows.
Now, knit two stitches together at the beginning and end of
each knit row (every other row).
Continue this until there is only one stitch left. Cut yarn
long (about 20") and pull through loop.
Put yarn in yarn needle and sew up back of hat. Let the bottom
of the hat roll up a bit for the brim and finish sewing around
head. and then attach to side of body.
http://plainandjoyfulliving.blogspot.com/2009/02/fun-knitting-gnome.html
Thursday, January 7, 2016
Monday, December 28, 2015
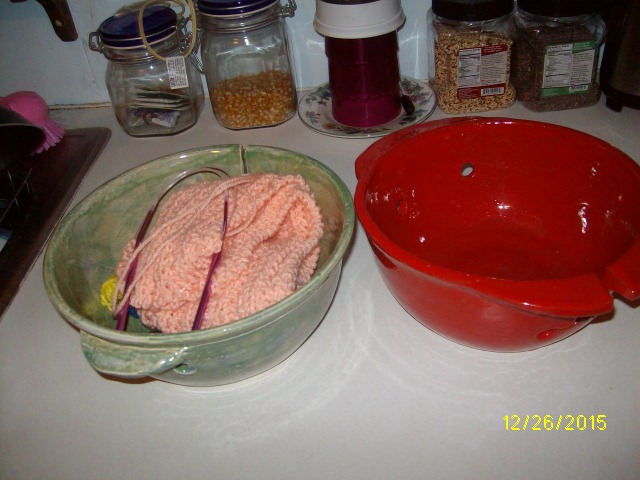
Yarn Bowls
Yarn Bowls © Joe Ottendorf
Last year when yarn bowls came out and all the knitters and
crocheters wanted one, I also wanted one, but knew we couldn't
afford one. They were selling anywhere from $20.- to &55.- & $65.-
and that my friends will buy alot of grocery's.
Christmas 2014
Every Christmas, My brother & wife come to spend Christmas
with Mom (for those of you who don't know, My Mom lives next
door to us) and they brought a friend with them (Joe Ottendorf).
They called me over and Joehad brought me a green yarn bowl and
presented it to me for Christmas. I was on top of the world because
I had wanted one and couldn't justify spending the money on one.
Joe makes them from pottery and I fell in love with my yarn bowl...
I told Joe I would treasure it always and thanked him and have used
my bowl 24/7 for the entire year, and when I thought of Joe's
gift I've sent special Prayers Heaven ward in his behalf..
Christmas 2015
Well yeasterday my brother (Lanny & wife Delores) came down
from Branson to spend the day with Mom again, and yes they brought
Joe with them again. Mom called me over there again (I try to stay at
home so Lanny can have some one on one time alone with Mom when
he comes to visit as I do when my Sister (Stacy) comes to visit). I went
over and Joe presented me with another yarn bowl, this time is Brick
Oven Red and just as beautiful as my green one. Again I thanked him
for his loving gift and said I'd treasure it always,
For someone who wanted a yarn bowl, and never said anything to
anyone about wanting one, God knew my heart and used Joe to Bless
me not once but twice with yarn bowls... Thank You Jesus
I'm thinking I'll use my green bowl for my knitting, and my red one
for Crocheting, Maybe... smile, or maybe both or knitting, only the
Lord knows...
Joe Ottendorf makes and sells his Pottory Yarn Bowls (made by
hand here in the Ozarks - Look on the bottom of bowls, you'll see
Joe's name and Made in the Ozarks along with the year he made it) in
Craft Stores in Branson, soif your wanting one, You'd be Blessing a
"Vet", as well as Blessing a "Hillbilly" here and from the Ozarks.
Look for Joe's Pottory Yarn Bowls and I thank you inadvance for
your support
Last year when yarn bowls came out and all the knitters and
crocheters wanted one, I also wanted one, but knew we couldn't
afford one. They were selling anywhere from $20.- to &55.- & $65.-
and that my friends will buy alot of grocery's.
Christmas 2014
Every Christmas, My brother & wife come to spend Christmas
with Mom (for those of you who don't know, My Mom lives next
door to us) and they brought a friend with them (Joe Ottendorf).
They called me over and Joehad brought me a green yarn bowl and
presented it to me for Christmas. I was on top of the world because
I had wanted one and couldn't justify spending the money on one.
Joe makes them from pottery and I fell in love with my yarn bowl...
I told Joe I would treasure it always and thanked him and have used
my bowl 24/7 for the entire year, and when I thought of Joe's
gift I've sent special Prayers Heaven ward in his behalf..
Christmas 2015
Well yeasterday my brother (Lanny & wife Delores) came down
from Branson to spend the day with Mom again, and yes they brought
Joe with them again. Mom called me over there again (I try to stay at
home so Lanny can have some one on one time alone with Mom when
he comes to visit as I do when my Sister (Stacy) comes to visit). I went
over and Joe presented me with another yarn bowl, this time is Brick
Oven Red and just as beautiful as my green one. Again I thanked him
for his loving gift and said I'd treasure it always,
For someone who wanted a yarn bowl, and never said anything to
anyone about wanting one, God knew my heart and used Joe to Bless
me not once but twice with yarn bowls... Thank You Jesus
I'm thinking I'll use my green bowl for my knitting, and my red one
for Crocheting, Maybe... smile, or maybe both or knitting, only the
Lord knows...
Joe Ottendorf makes and sells his Pottory Yarn Bowls (made by
hand here in the Ozarks - Look on the bottom of bowls, you'll see
Joe's name and Made in the Ozarks along with the year he made it) in
Craft Stores in Branson, soif your wanting one, You'd be Blessing a
"Vet", as well as Blessing a "Hillbilly" here and from the Ozarks.
Look for Joe's Pottory Yarn Bowls and I thank you inadvance for
your support
Tuesday, December 8, 2015
JMSQ's Earwarmers
"JMSQ "Copyright © 2015
9 Needles
CO 16
1.) Knit 1 row
2.) k4, p2, k4, p2, k4
Repeat row's 1 & 2 for a total of 100 rows,
then Knit across & Bind Off
Turn right sides together, sew edges together, now you
can make an I-Cord or wrap long tail around seam to
make a bow. I made an I Cord long enough to wrap
around and tie securly
Black one with I Cord, Brown one with wrap around
Wednesday, November 25, 2015
Christmas Balls (2 Patterns) (K)
Christmas Balls © Julie Smith 11/2015
2 Needle method (no needle size given)
CO 13 sts
kfb of each st to end of row (26 sts)
Row's 1,3,5,7,9 : knit across
Row's 2,4,6,8,10: purl across
Change color:
knit 4 rows,
knit next row
purl next row,
knit next row,
purl next row
*K2 tog *repeat across
With long tail, loop through remaining sts,
(I'd crochet a hanging loop of 14 sts now) then whip st
along side seam, stuff and sew bottom closed
Christmas Balls © JMSQ 11/2015
{KNITTING IN THE ROUND}
4.5 double pointed needles
(Leave long tail) CO 13 sts - place 4 sts on 1 needle,
5 sts on next needle, 4 sts on last needle, place marker
kfb [knit front & back] of each st to end of row.(26 sts)
knit 10 rows
Change color:
knit 1 row
Purl 2 rows
knit 5 rows.
*K2tog, *Repeat around,
*Leave long tail, and weave through sts remaining
on needle, pull tight and secure.
I ch 14 (F or G hook)and join forming a loop for
hanging on a tree
Make eyes & mouth on ball of your choice
With long tail on beginning co 13, weave in and out along bottom of ball, stuff with fiber
fill and pull tight, secure and fasten off
2 Needle method (no needle size given)
CO 13 sts
kfb of each st to end of row (26 sts)
Row's 1,3,5,7,9 : knit across
Row's 2,4,6,8,10: purl across
Change color:
knit 4 rows,
knit next row
purl next row,
knit next row,
purl next row
*K2 tog *repeat across
With long tail, loop through remaining sts,
(I'd crochet a hanging loop of 14 sts now) then whip st
along side seam, stuff and sew bottom closed
Christmas Balls © JMSQ 11/2015
{KNITTING IN THE ROUND}
4.5 double pointed needles
(Leave long tail) CO 13 sts - place 4 sts on 1 needle,
5 sts on next needle, 4 sts on last needle, place marker
kfb [knit front & back] of each st to end of row.(26 sts)
knit 10 rows
Change color:
knit 1 row
Purl 2 rows
knit 5 rows.
*K2tog, *Repeat around,
*Leave long tail, and weave through sts remaining
on needle, pull tight and secure.
I ch 14 (F or G hook)and join forming a loop for
hanging on a tree
Make eyes & mouth on ball of your choice
With long tail on beginning co 13, weave in and out along bottom of ball, stuff with fiber
fill and pull tight, secure and fasten off
Sunday, November 8, 2015
Elf For The Shelf
These are adorable, I just love this pattern and want to make them for everyone...
http://www.ravelry.com/patterns/library/elf-for-the-shelf
Saturday, October 31, 2015
Homeless Packs
Homeless Packs
These are 2 different types of homeless packs you can put together to give to those who are less fortunate & or homeless.
The top photo show a great pack to keep in your car (1 for each person in your family) just in case of an emergency. One never knows when you might have a need for this and you would thrilled to have something to nibble on if broken down waiting for help to come along.
Wednesday, October 7, 2015
2 Crocheted Hairnets
Crocheted Hair Net – {PATTERN #1 - #2 Below}
Round 1:
Start with 5 chain (ch) and join with a slip stitch (sl st) to form a
ring
Round 2:
4ch (this counts as the first double crochet (dc) now & throughout)
1dc in same place as sl st (effectively behind the join, forming a
V), ch **2dc in next st, ch 1dc in next st, ch {you can crochet into the
space instead of the stitch} repeat (rep) from ** to end of row (15dc)
join with sl st
Round 3:
4ch 1dc in same place as sl st ch 1dc, ch in each of next 2st
**2dc in next st, ch 1dc, ch in each of next 2st rep from ** to end
of row (20dc) join with sl st
Round 4:
4ch 1dc in same place as sl st ch 1dc, ch in each of next 3st
**2dc in next st, ch 1dc, ch in each of next 3st rep from ** to end
of row (25dc) join with sl st
Continue increasing like this until the hair net is the diameter for
you. Then you need to do 1dc in each st around the row. After this
you decrease (dec). I generally do 8dc then dec 9 & 10 for the first
row. Then I do about 5dc and dec 6 & 7 for the next row. It really
depends on the size of the hair net as to how you dec.
Once you have finished, you can crochet in a hair band or tie off and
thread elastic through stitching the ends together once it has been
woven through the last row.
~~~~~~~~~~~~~~~~~~~~~~~~~~~~~~~
PATTERN #2
Crocheted Hair Net
Round 1 Start with 5 chain (ch) and join with a slip stitch (sl st) to form a ring
Round 2 4ch (this counts as the first double crochet (dc) now & throughout)
1dc in same place as sl st (effectively behind the join, forming a V), ch
**2dc in next st, ch 1dc in next st, ch {you can crochet into the space instead of the stitch}
repeat (rep) from ** to end of row (15dc)
join with sl st
Round 3 4ch 1dc in same place as sl st ch
1dc, ch in each of next 2st
**2dc in next st, ch 1dc, ch in each of next 2st
rep from ** to end of row (20dc)
join with sl st
Round 4 4ch 1dc in same place as sl st ch
1dc, ch in each of next 3st
**2dc in next st, ch 1dc, ch in each of next 3st
rep from ** to end of row (25dc)
join with sl st
Continue increasing like this until the hair net is the diameter for you. Then you need to do 1dc in each st around the row. After this you decrease (dec). I generally do 8dc then dec 9 & 10 for the first row. Then I do about 5dc and dec 6 & 7 for the next row. It really depends on the size of the hair net as to how you dec.
Once you have finished, you can crochet in a hair band or tie off and thread elastic through stitching the ends together once it has been woven through the last row.
Round 1:
Start with 5 chain (ch) and join with a slip stitch (sl st) to form a
ring
Round 2:
4ch (this counts as the first double crochet (dc) now & throughout)
1dc in same place as sl st (effectively behind the join, forming a
V), ch **2dc in next st, ch 1dc in next st, ch {you can crochet into the
space instead of the stitch} repeat (rep) from ** to end of row (15dc)
join with sl st
Round 3:
4ch 1dc in same place as sl st ch 1dc, ch in each of next 2st
**2dc in next st, ch 1dc, ch in each of next 2st rep from ** to end
of row (20dc) join with sl st
Round 4:
4ch 1dc in same place as sl st ch 1dc, ch in each of next 3st
**2dc in next st, ch 1dc, ch in each of next 3st rep from ** to end
of row (25dc) join with sl st
Continue increasing like this until the hair net is the diameter for
you. Then you need to do 1dc in each st around the row. After this
you decrease (dec). I generally do 8dc then dec 9 & 10 for the first
row. Then I do about 5dc and dec 6 & 7 for the next row. It really
depends on the size of the hair net as to how you dec.
Once you have finished, you can crochet in a hair band or tie off and
thread elastic through stitching the ends together once it has been
woven through the last row.
~~~~~~~~~~~~~~~~~~~~~~~~~~~~~~~
PATTERN #2
Crocheted Hair Net
Round 1 Start with 5 chain (ch) and join with a slip stitch (sl st) to form a ring
Round 2 4ch (this counts as the first double crochet (dc) now & throughout)
1dc in same place as sl st (effectively behind the join, forming a V), ch
**2dc in next st, ch 1dc in next st, ch {you can crochet into the space instead of the stitch}
repeat (rep) from ** to end of row (15dc)
join with sl st
Round 3 4ch 1dc in same place as sl st ch
1dc, ch in each of next 2st
**2dc in next st, ch 1dc, ch in each of next 2st
rep from ** to end of row (20dc)
join with sl st
Round 4 4ch 1dc in same place as sl st ch
1dc, ch in each of next 3st
**2dc in next st, ch 1dc, ch in each of next 3st
rep from ** to end of row (25dc)
join with sl st
Continue increasing like this until the hair net is the diameter for you. Then you need to do 1dc in each st around the row. After this you decrease (dec). I generally do 8dc then dec 9 & 10 for the first row. Then I do about 5dc and dec 6 & 7 for the next row. It really depends on the size of the hair net as to how you dec.
Once you have finished, you can crochet in a hair band or tie off and thread elastic through stitching the ends together once it has been woven through the last row.
Snood / Hairnet
Snood / Hairnet
Materials: worsted weight yarn, size H crochet hook, 24” cord elastic
Round 1: Chain 6 and join with a slip stitch in the first chain to form a ring, chain 4 (first double crochet and 1 chain), make 11 double crochets with chain 1 between into the ring, join with a slip stitch in the 3rd chain of the first chain 4.
Round 2: Slip stitch into the next chain 1 span, chain 5 (first double crochet and 2 chains), double crochet in the next chain-1 span, chain 2, *double crochet in the next chain-1 span, chain 2*, repeat from * in each chain-1 span. Join with a slip stitch in the 3rd chain of the first chain-5.
Round 3: Slip stitch into the next chain 2 span, chain 6 (first double crochet and 3 chains), double crochet in the next span, chain 3, *double crochet, chain 3)*, repeat from * in each span. Join with a slip stitch in the 3rd chain of the first chain-6. (12 double crochets with chain-3 spans between)
Round 4: Slip stitch into the center of the next chain-3 span, single crochet in the span, chain 6, *single crochet in the next chain-3 span, chain 6*, repeat from * in each span. Join with slip stitch in the single crochet of the first span.
Rounds 5 through 10: Repeat Round 4, adding 1 chain to each span in every other round; rounds 5 & 6 - chain 7, rounds 7 & 8 – chain 8, rounds 9 & 10 - chain 9.
Round 11: Slip stitch in the first 3 chains of the next chain-9 span, single crochet in the span, chain 8, skip 3 chains and single crochet in the next chain of same span, chain 8 * single crochet in 3rd stitch of next chain-9 span, chain 8 skip 3 chains, single crochet in the next chain of same span, chain 8* repeat from * in each span. Join with a slip stitch in the single crochet of the first chain-8 span. (24 chain-8 spans)
Round 12: Slip stitch to the center of the next chain-8 span, single crochet, chain 9, *single crochet in the center of the next chain-8 span, chain 9*, repeat from * in each span. Join with a slip stitch in the single crochet of the first chain-9 span.
Round 13: Repeat Round 12, adding 1 chain to every span.
Round 14: Slip stitch to center of next chain-10 span, single crochet, chain 5, *single crochet in the center of the next chain-10 span, chain 5*, repeat from * in each span. Join with a slip stitch in the single crochet of the first chain 5span. (25 chain-5 spans)
Round 15: Securely tie ends of cord elastic to form a circle, adjusting for comfort. Slip stitch into next chain 5 span, chain 1, 3 single crochets in the same span, working over the cord elastic, *3 single crochets in next chain*, repeat from * around working over elastic Join with a slip stitch in the first single crochet. Fasten off and weave in yarn ends.
Materials: worsted weight yarn, size H crochet hook, 24” cord elastic
Round 1: Chain 6 and join with a slip stitch in the first chain to form a ring, chain 4 (first double crochet and 1 chain), make 11 double crochets with chain 1 between into the ring, join with a slip stitch in the 3rd chain of the first chain 4.
Round 2: Slip stitch into the next chain 1 span, chain 5 (first double crochet and 2 chains), double crochet in the next chain-1 span, chain 2, *double crochet in the next chain-1 span, chain 2*, repeat from * in each chain-1 span. Join with a slip stitch in the 3rd chain of the first chain-5.
Round 3: Slip stitch into the next chain 2 span, chain 6 (first double crochet and 3 chains), double crochet in the next span, chain 3, *double crochet, chain 3)*, repeat from * in each span. Join with a slip stitch in the 3rd chain of the first chain-6. (12 double crochets with chain-3 spans between)
Round 4: Slip stitch into the center of the next chain-3 span, single crochet in the span, chain 6, *single crochet in the next chain-3 span, chain 6*, repeat from * in each span. Join with slip stitch in the single crochet of the first span.
Rounds 5 through 10: Repeat Round 4, adding 1 chain to each span in every other round; rounds 5 & 6 - chain 7, rounds 7 & 8 – chain 8, rounds 9 & 10 - chain 9.
Round 11: Slip stitch in the first 3 chains of the next chain-9 span, single crochet in the span, chain 8, skip 3 chains and single crochet in the next chain of same span, chain 8 * single crochet in 3rd stitch of next chain-9 span, chain 8 skip 3 chains, single crochet in the next chain of same span, chain 8* repeat from * in each span. Join with a slip stitch in the single crochet of the first chain-8 span. (24 chain-8 spans)
Round 12: Slip stitch to the center of the next chain-8 span, single crochet, chain 9, *single crochet in the center of the next chain-8 span, chain 9*, repeat from * in each span. Join with a slip stitch in the single crochet of the first chain-9 span.
Round 13: Repeat Round 12, adding 1 chain to every span.
Round 14: Slip stitch to center of next chain-10 span, single crochet, chain 5, *single crochet in the center of the next chain-10 span, chain 5*, repeat from * in each span. Join with a slip stitch in the single crochet of the first chain 5span. (25 chain-5 spans)
Round 15: Securely tie ends of cord elastic to form a circle, adjusting for comfort. Slip stitch into next chain 5 span, chain 1, 3 single crochets in the same span, working over the cord elastic, *3 single crochets in next chain*, repeat from * around working over elastic Join with a slip stitch in the first single crochet. Fasten off and weave in yarn ends.
Subscribe to:
Posts (Atom)