"Childrens Hospital Donation"

"Childrens Hospital Donation"
This is the load of Baby Hats, Blankies, Teddy's Bears & Dolls we took to
Childrens Hospital In Little Rock today.. There are over 400 Baby hats...

Friday, January 13, 2012

Brittanie's Afghan

                                Measures 43" X 52"

Afghan was made for our Granddaughter Brittanie, who contacted me on
facebook and asked me to make her a special afghan. I said what colors
do you want Brittanie, she said Hot Floresent Pink & Purple, Lime Green
and black.  These colors were as close as I could get at time I purchased
the yarn. This is honeydew green because they didn't have the lime green
when I bought yarn.

 This truly is pretty if it wern't for the black's..  However having said that
kids seem to like the black so I added as little as I could get away with...


                             Pattern can be found at:
http://jeanariespatterns.blogspot.com/2010/11/moms-special-lap-ghan.html

Monday, January 2, 2012

Ezekiel's Blankie

                                        "JMSQ "Copyright Oct. © 2011
                             Ezekiel is Hebrew - Meaning - "Strength Of God"


Bernat Baby Yarn      Measure's 18" x 25"
10 Needles

2 st markers
(PM) = Place Markers
~~~~~~~~~~~~~~~~~~~~~

Blankie Instructions:

CO 70

Row's 1-10: Knit across

Row 11: k5, (PM), k60, (PM), K 5
Row 12: K5, P60, K5

Row's 13, & 15, Knit Across
Row's 14, & 16: K5, P60, K5

Row's 17-20: knit across

Row's 21 - 120: ***REPEAT "PATTERN ROW'S 11-20" [IN ORDER]  UNTIL ROW 121

Row 121: Knit across
Row 122: k5, p60, k5

Row 123: knit across
Row 124: k5, p60, k5

Row 125: knit across
Row 126: k 5, (Remove st. marker), p60, (remove st marker), k5,

Row's 127-136: Knit Across
Bind off

Friday, December 30, 2011

Christmas Gifts

Made this for Jesse for Christmas, It turned out so awesome,

Pattern can be found @  http://www.redheart.com/free-patterns/calypso-cardigan


                                          Made this for Sydney

                                         Made these for Gavin & Katlin

                                         Made this set for Thomas

                                         Made these for TOPS AR55 gift basket

                                         Made this set for Brea

                                         Made this set for Jan

                                                   Made this set for Rhonda

                                         Made this for Stephanie (our neighbor)


                                          Made for Jesse to go with her Calypso


ALL patterns are here in my files on the right hand side of the screen FREE for you to enjoy

Thursday, December 22, 2011

Stephanie's Christmas Gift


Finished this set last evening, It's for the girl that lives across the street (Stephanie) that is 13 or 14 yrs of age. The hat & scarf patterns can be found below in my patterns (on the right side of the screen). The gloves, well I bought these at Wal-Mart and last night I sat down and crocheted a scalloped trim around each of them so this would be a complete set, keeping her head, neck & hands warm... Merry Christmas Stephanie

Now to surprise her with my fun time "Secret Santa surprise", I'll wrap it up and sneak over there and leave it on her door step for her to find with the sticker to read,  To: Stephanie   -    From: Santa's Helper

Wednesday, December 21, 2011

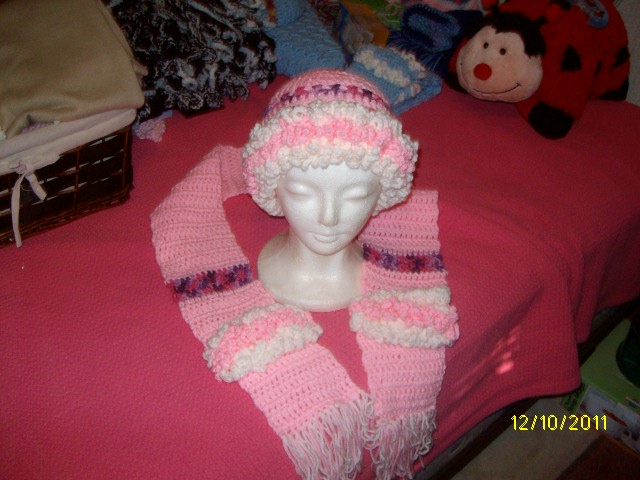
Fun Fur Scarf & Hat Set

                               {In Honor of our Precious Rhonda}
                                 "JMSQ "Copyright Nov. © 2011


                                ~~~~ Hat Pattern ~~~
Redheart WW yarn 
J & F Hook's
~~~~~~~~~~~~~~~
(Sts Used: sc, sl st, dc, ch,  & BL's = Back Loop's Only, FL's = Front Loop's Only)

SPECIAL X Sts:
skip next st, 1 dc in next st, 1 dc in stitch just skipped X st just made. Each X st
takes 2 sts to complete

~~~~~~~~~~~~~~~
 With J hook

Row 1: ch 4, sl st in first ch to form ring. Ch 3, 11 dc in ring. (12 sts)
Join with a sl st in top of ch 3.

Row 2: Ch 3, 1 dc in same st, 2 dc in each st around. (24 sts)

Row 3: Ch 3 (dc in next dc, 2 dc in next dc) 12 times - (36 sts)

Row 4: Ch 3 (dc in next 2 dc, 2 dc in next dc) 12 times - (48 sts)

Row 5: ch 3, 1 dc in each of next 2 sts, 2 dc in next st, *1 dc in each of
next 3 sts, 2 dc in next st, *Repeat around, join (60 sts)


NOTE:
You now have 2 options for this hat, I worked this green hat with
Option #2, but you decide which is best for you.


OPTION #1:
Row 6-10: Ch 3, dc in each dc around, join.


OPTION #2:
Row 6: ch 3, 1 dc in each st around, join

Row 7: ch 3, skip next st, 1 dc in next st, 1 dc in stitch just skipped X st
just made, work X sts around to end, 1 dc in last at


Row 8: Repeat row 6
Row 9: Repeat row 7
Row 10: Repeat row 6
  

Row 11-14: ch 1, 1 sc in BL's around, join, finish off after row 14

~~~~~~~~~~~~
FUN FUR TRIM: Change to F Hook

Row 1: in front row of row 14, join with a sl st, ch 10, sl st in same st, ch 10,
*sl st in next st, ch 10, sl st in same st, ch 10, *Repeat around, join & finish off

Row 2: in front row of row 12, join with a sl st, ch 10, sl st in same st, ch 10,
*sl st in next st, ch 10, sl st in same st, ch 10, *Repeat around, join & finish off

Row 3: in front row of row 10, join with a sl st, ch 10, sl st in same st, ch 10,
*sl st in next st, ch 10, sl st in same st, ch 10, *Repeat around, join & finish off


             ~~~~~~~~~ SCARF PATTERN~~~~~~~~~~~~
 
~~~~~~~~~~~~~
SPECIAL STS:
BL's = make st in back st only
FL's = make st in front st only
~~~~~~~~~~~~~~~~~~~~~~~~~~~~~~~~

H & F hook's
~~~~~~~~~~~~~~
H hook
Row 1: ch 16, dc in second ch from hook and in each st across, turn (15 dc)

Row 2-6: ch 3, 1 dc in each st across, turn (16 dc)


Row 7: ch 3, 1 dc (BL's only) in each st across, turn
Row 8: ch 3, 1 dc (FL's only) in each st across, turn
Row 9: ch 3, 1 dc (BL's Only) in each st across, turn


Row's 10-90 : ch 3, 1 dc in each st across, turn (16 sts)

Row 91: Repeat row 7
Row 92: Repeat row 8
Row 93: Repeat row 9                    

Row's 94-99 : Repeat row 10
Finish off after row 99


~~~~~~~~~~~~~~~~~~~~~~~~~~~~~~~
FUN FUR TRIM: Change to F Hook

Row 1: in front st of row 7, join with a sl st, ch 10, sl st in same st, ch 10,
*sl st in next st, ch 10, sl st in same st, ch 10, *Repeat around, join & finish off

Row 2: in front st of row 8, join with a sl st, ch 10, sl st in same st, ch 10,
*sl st in next st, ch 10, sl st in same st, ch 10, *Repeat around, join & finish off

Row 3: in front st of row 9, join with a sl st, ch 10, sl st in same st, ch 10,
*sl st in next st, ch 10, sl st in same st, ch 10, *Repeat around, join & finish off

REPEAT on other side of scarf:

Fun Fur Scarf

                           {In Honor of our Precious Rhonda}
                            "JMSQ "Copyright Nov. © 2011


~~~~~~~~~~~~~
SPECIAL STS:
BL's = make st in back st only
FL's = make st in front st only
~~~~~~~~~~~~~~~~~~~~~~~~~~~~~~~~
H & F hook's
~~~~~~~~~~~~~~

H hook
Row 1: ch 16, dc in second ch from hook and in each st across, turn (15 dc)

Row 2-6: ch 3, 1 dc in each st across, turn (16 dc)

Row 7: ch 3, 1 dc (BL's only) in each st across, turn
Row 8: ch 3, 1 dc (FL's only) in each st across, turn
Row 9: ch 3, 1 dc (BL's Only) in each st across, turn

Row's 10-90 : ch 3, 1 dc in each st across, turn (16 sts)

Row 91: Repeat row 7
Row 92: Repeat row 8
Row 93: Repeat row 9                    

Row's 94-99 : Repeat row 10
Finish off after row 99

~~~~~~~~~~~~~~~~~~~~~~~~~~~~~~~
FUN FUR TRIM: Change to F Hook

Row 1: in front st of row 7, join with a sl st, ch 10, sl st in same st, ch 10,
*sl st in next st, ch 10, sl st in same st, ch 10, *Repeat around, join & finish off

Row 2: in front st of row 8, join with a sl st, ch 10, sl st in same st, ch 10,
*sl st in next st, ch 10, sl st in same st, ch 10, *Repeat around, join & finish off

Row 3: in front st of row 9, join with a sl st, ch 10, sl st in same st, ch 10,
*sl st in next st, ch 10, sl st in same st, ch 10, *Repeat around, join & finish off

REPEAT on other side of scarf:

Monday, November 28, 2011

Camilla's Faith Scarf

                                    "JMSQ "Copyright Nov. © 2011
                        
                                      This Scarf is a Prayer Scarf

Named after 2 books I've recently read By: Allison Pittman.
Book 1: For Time and Eternity; By: Allison Pittman
Book 2: Forsaking All Others : By: Allison Pittman

This scarf looks like train tracks to me, "One's life journey";
And thus the name came to be, "Camilla's Faith",
on Side One A her journey to Utah with her new husband,
On Side One B, her trip home to MO. where she reunites
with her parents, On side Two A Camilla's return to Utah
to re-claim her children, on side Two B her return trip home
to Mo.. This story is about "Sister Wife's". Excelent reading
and highly reccomended.


10 1/2 Needles

CO 16
Row's 1-4 knit across

Row's 5 - 240 : knit 4, k2tog, yo, knit 4, k2tog, yo, knit last 4

Row's 241 - 244 : knit & Bind off after row 244
Add fringe to end.

NOTE:
white scarf is done with same pattern only with sports yarn,
long enough to run along top of my blouces, sewn together and
folded in half, soft around my neck... "Love it"

Camilla's Faith Set

                                "JMSQ "Copyright Nov. © 2011

Redheart WW yarn  -  Adult Hat
J & F Hook's
~~~~~~~~~~~~~~~
(Sts Used: sc, sl st, dc, ch,  & BL's = Back Loop's Only, FL's = Front Loop's Only)
SPECIAL X Sts:
skip next st, 1 dc in next st, 1 dc in stitch just skipped X st just made. Each X st
takes 2 sts to complete
~~~~~~~~~~~~~~~

With J hook
Row 1: ch 4, sl st in first ch to form ring. Ch 3, 11 dc in ring. (12 sts)
Join with a sl st in top of ch 3.

Row 2: Ch 3, 1 dc in same st, 2 dc in each st around. (24 sts)

Row 3: Ch 3 (dc in next dc, 2 dc in next dc) 12 times - (36 sts)

Row 4: Ch 3 (dc in next 2 dc, 2 dc in next dc) 12 times - (48 sts)

Row 5: ch 3, 1 dc in each of next 2 sts, 2 dc in next st, *1 dc in each of
next 3 sts, 2 dc in next st, *Repeat around, join (60 sts)

NOTE:
You now have 2 options for this hat, I worked this green hat with
Option #2, but you decide which is best for you.

OPTION #1:
Row 6-10: Ch 3, dc in each dc around, join.

OPTION #2:
Row 6: ch 3, 1 dc in each st around, join
Row 7: ch 3, skip next st, 1 dc in next st, 1 dc in stitch just skipped X st
just made, work X sts around to end, 1 dc in last at
Row 8: Repeat row 6
Row 9: Repeat row 7
Row 10: Repeat row 6
  

Row 11-14: ch 1, 1 sc in BL's around, join, finish off after row 14


FUN FUR TRIM: Change to F Hook
Row 1: in front row of row 14, join with a sl st, ch 10, sl st in same st, ch 10,
*sl st in next st, ch 10, sl st in same st, ch 10, *Repeat around, join & finish off

Row 2: in front row of row 12, join with a sl st, ch 10, sl st in same st, ch 10,
*sl st in next st, ch 10, sl st in same st, ch 10, *Repeat around, join & finish off

Row 3: in front row of row 10, join with a sl st, ch 10, sl st in same st, ch 10,
*sl st in next st, ch 10, sl st in same st, ch 10, *Repeat around, join & finish off

~~~~~~~~~~~~~~
                              CAMILLA's FAITH SCARF
                        
                             This Scarf is a Prayer Scarf

Named after 2 books I've recently read By: Allison Pittman.
Book 1: For Time and Eternity; By: Allison Pittman
Book 2: Forsaking All Others : By: Allison Pittman

This scarf looks like train tracks to me, "One's life journey";
And thus the name came to be, "Camilla's Faith",
on Side One A her journey to Utah with her new husband,
On Side One B, her trip home to MO. where she reunites
with her parents, On side Two A Camilla's return to Utah
to re-claim her children, on side Two B her return trip home
to Mo.. This story is about "Sister Wife's". Excelent reading
and highly reccomended.

10 1/2 Needles

CO 16
Row's 1-4 knit across

Row's 5 - 240 : knit 4, k2tog, yo, knit 4, k2tog, yo, knit last 4

Row's 241 - 244 : knit & Bind off after row 244
Add fringe to end.

Ribbed Slippers

This is my all time favorite slipper pattern. It is NOT one of my patterns, but my all time favorite, These are slippers I make for Christmas each year.

This is the original site this pattern could be found at, HOWEVER, it is closed down now, so I'm sharing from my printed copy...
http://web.archive.org/web/20071017070947/http://www.marloscrochetcorner.com/ribbed+slipper.html

~~~~~~~~~~

These slippers fit my feet with sock on and I wear a size 9. (Read not at bottom of page) If you wear a different size (as I JMSQ do)  you will need to either decrease or increase the number of rows on round 4-17. These slippers are very warm and the ribbing at the top keeps your ankles warm too. Enjoy.

~~~~~~~~~~
H hook
FPDC = means Fron Post Double Crochet
BPDC = means Back Post Double Crochet
~~~~~~~~~

Directions:
ch 4, join with a sl st  to for  ring

Round 1: ch 2, work 11 hdc in ring, (12) join with a sl st to top of ch 2, NOTE: Beginning ch 2 counts as first hdc here and throughout

Row 2: ch 2, hdc in same st as joining, work 2 hdc in each st around (24), join with a sl st to top of ch 2

Row 3: ch 2, hdc in next 2 sts, 2 hdc in next st, *hdc in next 3 sts, 2 hdc in next st, *repeat *around, join with a sl st to top of ch 2

Row 4-17: ch 2, hdc in each st around, join with a sl st to top of ch 2 (30)

NOTE: you are now working in rows, you will ch 2 and turn at the end of each row

Row 18: ch 2, hdc in next 25 sts, DO NOT work anything in the last 4 sts, ch 2 turn (26 sts)

Row 19-25: HDC IN EACH ST ACROSS, CH 2 TURN (26)
HDC DECREASE (HDC DEC): - yo hook, insert hook in next st, pull up a loop, insert hook in next st, pull up a loop, yo hook and pull through all 4 loops and on hook

Row 26: hdc in next 10 sts, (hdc dec in next 2 sts)2 times, hdc in next 11 sts, ch 2 turn

Row 27: hdc in next 9 sts, (hdc dec in next 2 sts) 2 times, hdc in next 10 sts, ch 2 turn
Row 28: hdc in each st across

RIBBING:
Row 29: join first st to last st of round 28 together with a slip st, ch 3 evenly around the top of the opening of
the slipper, join with a sl st to top of ch 3

Row 30: ch 3, *FPDC in next st, BPDC in next st, *continue around, join to top of ch 3

Row 31-32: ch 3, Repeat row 30

Fasten off, leaving a length of yarn long enought to sew up back of slipper.

NOTE: add a couple extra rows of ribbing for higher ribs around your ankle for warmth


NOTE:I use a H hook for the men in our home & I use a G hook for the ladies in our home. Also I work 4 rows less of row 17 for one of the ladies in our home

Tuesday, November 15, 2011

Christmas Cocoon Set

                                      "JMSQ "Copyright Nov. © 2011
                                               (13" w X 20"long)

J & F hook      (3 mo - 12 mo)
Red color A, Christmas Ombre color B, white color C
~~~~~~~~~~~~
NOTE:
Work ALL sts in space between sts where indicated.
Ch 2 at beginning of each round does not count as a st.
BL's = Back Loops Only; FL's = Front Loops Only
~~~~~~~~~~~~~~~~~~~~~~~~~~
SPECIAL ST: - Popcorn St:
1.Work 5 double crochet (dc) stitches in the same stitch.
2.Drop the loop from your hook.
3.Insert your hook from front to back under the top 2 loops of the first
double crochet of the group.
4.Grab the dropped loop with your hook and pull it through the stitch.
ch 1, skip next st,
~~~~~~~~~~~~~~~~~~~~~~~~~~
SPECIAL ST: - Fun Fur St:
in front row of row 22 (sc row), join with a sl st, ch 10, sl st in same st,
ch 10, *sl st in next st, ch 10, sl st in same st, ch 10, *Repeat around,
join & finish off
~~~~~~~~~~~~~~~~~~~~~~~~~~
SPECIAL St:  - X St
skip next st, 1 dc in next st, 1 dc in stitch just skipped X st just made. Each X st
takes 2 sts to complete
~~~~~~~~~~~~~~~~~~~~~~~~~

                                               COCOON BODY - J Hook
ch 4, join to form ring.

Row 1: Ch 2, work 10 dc in ring, slip stitch to top of ch 2.
(10 sts) *Reminder, the ch 2 does NOT count as a st

Row 2: Ch 2, dc in first dc, dc in next space between
dcs, *dc in next dc, dc in next space between dcs; repeat
from * around, join to top of ch 2. (20 sts)

Row 3: Ch 2, *dc in next space, 2 dc in next space;
repeat from * around, join to top of ch 2.(30 sts)

Row 4: Ch 2, *dc in next 2 spaces, 2 dc in next space;
repeat from * around, join to top of ch 2. (40 sts)

Row 5: Ch 2, *dc in next 3 spaces, 2 dc in next space;
repeat from * around, join to top of ch 2. (50 sts)

Row 6:  Ch 2, *dc in next 4 spaces, 2 dc in next space;
repeat from * around, join to top of ch 2. (60 sts)

Row 7: Ch 2, dc in each space around, join to top of
ch 2. (60 sts)

Row's 8-20: Repeat Round 7

Join color B,
Row 21: Repeat row 7
Row 22: Repeat row 7 ONLY with SC instead of dc in BL's Only
Row 23: Repeat row 7

NOTE: Change to F Hook
NOW it is easier to work Fun Fur (Pattern Above in Special Sts) Now
without the weight of the rest of this cocoon, so in FL's of row 22
Only work Fun Fur around, join & finish off

Change to J Hook
Join Color A
Row's 24-37: Repeat row 7

Join Color C  -  BORDER:
Row 38: ch 1, sc in space between sts around, join

Row 39: ch 2, *skip next st, work popcorn st (Pattern above in Special
Sts) in next st, ch 1, *Repeat around, Join & fasten off


                                     Christmas Gnome/Elf Hat Pattern:

Red Colar A, Christmas Ombre Color B, White Color C
H Hook

With color C
Row 1:Ch 4, join with a sl st to form a ring.ch 2, 8 dc in ring, join
to top of ch 2 (9 sts)

Row 2: ch 2, 1 dc in BL's each st around, join to top of ch 3 (9 sts)
With Color A
Row 3: ch 2, dc in 1 dc, *2 dc in 1 dc, dc in next 2 dc, rep from *,
join to top of ch 2 (12 sts)

Row's 4, 6, 8, & 10, : ch 2, 1 dc in each st around, join

Row 5: Repeat row 3.(16 sts)

Row 7: Repeat row 3. (21 sts)

Row 9: Repeat row 3. (28 sts)

Row 11: Repeat row 11. (37 sts)

Row 12: Repeat row 3: (49 sts)  13

Row's 13, 15, & 17 : ch 2, 1 dc in each st around, join (49 sts)

Row 14: ch 2, Work X st as above in Special Sts.  

Row 16: ch 2, Work X st as above in Special Sts.  

change to color B,
Row 18:  1 sc in BL's only around; fasten off

change to F hook Color B
In FL's only, *sl st into any st, ch 3, sl st in next st,
*Repeat around, join & fasten off

Change to F hook & color C,
attach to FL's only of row 2, sl st, ch 2 in each st around,
fasten off

Ear Flaps:
Fold hat in half with seam in middle of back of hat, from the
"inside of hat" count 10 sys, join  with sl st, ch 2, 1 dc in
same st, *2 dc in next st,, *Repeat 2 more time (8 sts), skip
2 sts, sl st in next st, turn, 2 dc in each st across, skip 2
sts, sl st in next st, fasten off (16 sts)

Repeat for other ear flap

TIE's:
with 3 ft. of yarn, in the middle of ear flap, (8th st)
fold yarn in half, slip loop through st, hook your crochet hook in loop and begin chaining both strings together, finish off

Repeat for second tie

Saturday, November 5, 2011

Fun Fur Hat


                                  "JMSQ "Copyright Nov. 4, © 2011

                         {In Honor of my Sister-In-Love Deolores = Deo}

Red -Heart WW yarn  -  Adult Hat

J & F Hook's
~~~~~~~~~~~~~~~
(Sts Used: sc, sl st, dc, ch,)  
(BL's = Back Loop's Only, & FL's = Front Loop's Only)

SPECIAL X Sts:
skip next st, 1 dc in next st, 1 dc in stitch just skipped X st just made. Each
X st takes 2 sts to complete
~~~~~~~~~~~~~~~

With J hook
Row 1: ch 4, sl st in first ch to form ring. Ch 3, 11 dc in ring. (12 sts)
Join with a sl st in top of ch 3.

Row 2: Ch 3, 1 dc in same st, 2 dc in each st around. (24 sts)

Row 3: Ch 3 (dc in next dc, 2 dc in next dc) 12 times - (36 sts)

Row 4: Ch 3 (dc in next 2 dc, 2 dc in next dc) 12 times - (48 sts)

Row 5: ch 3, 1 dc in each of next 2 sts, 2 dc in next st, *1 dc in each of
next 3 sts, 2 dc in next st, *Repeat around, join (60 sts)


NOTE:
You now have 2 options for this hat, I worked this green hat with
Option #2, but you decide which is best for you.

OPTION #1:
Row 6-10: Ch 3, dc in each dc around, join.

OPTION #2:
Row 6: ch 3, 1 dc in each st around, join

Row 7: ch 3, skip next st, 1 dc in next st, 1 dc in stitch just skipped X st
just made, work X sts around to end, 1 dc in last at

Row 8: Repeat row 6

Row 9: Repeat row 7

Row 10: Repeat row 6
  

Row 11-14: ch 1, 1 sc in BL's around, join, finish off after row 14


FUN FUR TRIM: Change to F Hook
Row 1: in front row of row 14, join with a sl st, ch 10, sl st in same st, ch 10,
*sl st in next st, ch 10, sl st in same st, ch 10, *Repeat around, join & finish off

Row 2: in front row of row 12, join with a sl st, ch 10, sl st in same st, ch 10,
*sl st in next st, ch 10, sl st in same st, ch 10, *Repeat around, join & finish off

Row 3: in front row of row 10, join with a sl st, ch 10, sl st in same st, ch 10,
*sl st in next st, ch 10, sl st in same st, ch 10, *Repeat around, join & finish off

Friday, November 4, 2011

Granny Baby Hat

                        "JMSQ "Copyright Nov. © 2011
              {In Honor of my Sister-In-Love Christine - Chrissy}

Fits 3-9 Months

H & F Hooks

(Stitches Used: SC, DC, FL's = FRONT LOOPS ONLY)

With H hook
Row 1: Ch 4, join to form ring, ch 3, 11 dc in ring, join (12 sts)

Row 2: ch 3, 1 dc in same st, 2 dc in each st around, join (24 sts)

Row 3: ch 3, 2 dc in next st, * 1 dc in next st, 2 dc in next st,
*Repeat around, join (36 sts)

Row 4: ch 3, 1 dc in next st, 2 dc in nsxt st, * 1 dc in each next
2 sts, 2 dc in next st, *Repeat around (48 sts)

Row 5: ch 3, *1 dc in next 7 sts, 2 dc in next st, (*repeat 5 more times),
join (54 sts)

Row 6: 1 hdc in each st around, join

Row 7: ch 3, 1 dc in same st, ch 1, skip 2 sts, 2 dc in next st, ch 1 *skip 2 sts,
2 dc in next st, ch 1,  *Repeat around, join

Row 8-10:, sl st into ch 1 space, ch 3, 1 dc in same space, ch 1, *(2 dc, ch 1)
in each ch 1 space around, *Repeat, join to top of ch 3

Row 11: ch 1, 1 sc in each st & ch 1 space around, join & fasten off (54 sts)

Change to F Hook - WORKING IN FL's ONLY

Row 12: join with sl st, ch 3, skip 1 st, sl st into next st, *ch 3, skip next st,
sl st into next st, *Repeat around, join and finish off

Thursday, October 27, 2011

Ozark Trinket Box

 "JMSQ "Copyright Oct. © 2011
{In Memory of Aunt "Tante" Lois}
Aunt Lois went home to Glory Oct.15th, 2011

    
WW Yarn         E & G Hook's

Materials:
1 - 8oz. cool whip bowl
1 - 6" cardboard circle (Optional) Read NOTES
1 - 11" Fashion doll w/ legs removed
15 pearl beads (optional)
Darning Needle

St's. Used:
Sc, Hdc, Dc, [BL = back loops only, FL = Front Loops only]
2 dc, ch 1, 2 dc (shell made)
~~~~~~~~~~~~
NOTE's:
It is easier to work ruffles on outside of trinket box bottom & Ruffles
BEFORE constructing them together 

The reason the row's are made in BL's is so you can get creative and
use these rounds to attach your ruffles. [WORK RUFFLES BEFORE COMPLETING PATTERN]

Using cardboard gives you a flat bottom, not using cardboard makes a nice pillow
bottom, both work nicely with Trinket Box.
~~~~~~~~~~~
ALL Trim ROW's:
ALL trim is worked with an "E hook":
join with a sl st, ch 3, *skip next st, sl st into next st, ch 3
*Repeat around, join and fasten off
~~~~~~~~~~~
With G hook

BOTTOM - "Outside" OF TRINKET Box:
ch 4, join to form ring, ch 3

Row 1: 12 dc in ring, join ch 2

Row 2: 1 hdc in same st as joining, 2 hdc in each st around, join,
ch 3 (26 sts)

Row 3: 2 dc in next st, *[1 dc in next st, 2 dc in next st] *Repeat
around, join, ch 2 (39 sts)

Row 4: *[hdc in next st, 2 hdc in next st] *Repeat around, join,
ch 3 (58 sts)
*WORK REMAINDER ROW'S IN BL ONLY

Row's 5, 7, 9 & 11: 1 dc in each st around, join, ch 2
Fasten off after row 11

Row's 6, 8, & 10: 1 hdc in each st around, join, ch 3

~~~~~~
BOTTOM - "Inside" OF TRINKET Box:
Repeat row's 1-9 above, only do "NOT" work BL only on rows 5-9
**
with wrong sides facing eachother, place cool whip bowl into center
of outside piece,  now place inside piece inside the bowl, match tops
and sl st along edge in BL's Only, join & fasten off.

~~~~~~~~
RUFFLES:
Bottom Ruffle #1
Row 1: With inside of trinket chest facing you, Attach yarn to Front Loop of
row 7, ch 3, skip 1 st, 2 dc, ch 1, 2 dc in next st (shell made),
*[ skip  1 st, 1 dc in next st, skip 1 st, 2 dc, ch 1, 2 dc in next st]
*Repeat this around, join to top of ch 3

Row 2: ch 3, repeat row 1 of Ruffle

Bottom Ruffle #2
Row 1: Attach yarn to Front Loop of row 10, ch 3, skip 1 st, 2 dc, ch 1, 2 dc in
next st (shell made), *[ skip  1 st, 1 dc in next st, skip 1 st, 2 dc,
ch 1, 2 dc in next st] *Repeat this around, join to top of ch 3

Row 2: ch 3, repeat row 1 of Ruffle

Row 3: ch 3, *skip 1 st, 1 dc in next st, (2 dc, ch 1, 2 dc shell made), in
next st, 1 dc in next st, skip 1 st, 1 dc in next st, *Repeat around, join and
fasten off

ALL trim is worked with an "E hook":
join with a sl st, ch 3, *skip next st, sl st into next st, ch 3
*Repeat around, join and fasten off

~~~~~~
Lid Top:  Change to  E Hook

Bodice:
Row 1: ch 15, 1 sc in 2nd ch from hook, sc in each st across,
turn (14 sc) (right side)

Row 2: ch 1, 2 sc in 1 st, in each st across to end, 2 sc in last st, turn (16 sc)

Row 3: ch 1, sc in first 4 sts, 2 sc in next st,  sc in next 6 sts,
2 sc in next st, sc in last 4 sts, turn ( 18 sts)

Row 4: ch 1, sc in next 6 sts, 2 sc in next st, sc in next 4 sts, 2 sc in
next st, sc in last 6 sts, turn (20 sts)

Row 5: ch 1, sc in next 6 sts, (2 sc in next st, sc in next 6 sts) 2 times,
 turn (22 sts)

Row 6: ch 1, sc in first 6 sts, hdc in next, 2dc in next 8 sts, hdc in next,
sc in last 6 sts , turn, (30 sts)

Row 7: ch 1, sc in first 7 sts, (sc next 2 tog) 8 times, sc in last 7 sts,
turn (22 sts)

Row 8: ch 1, sc in first 5 sts, ch 8 (armhole) skip next 2 sts, sc in next
8 sts, ch 8 (for armhole), skip next 2 sts, sc in last 5 sts, turn, Fasten
Off (34 sts and chains)

Row 9: working in BL's, join contrasting color,ch 3, *2 dc in next st, 1 dc
in next st *Repeat across, Fasten Off

Row 10: Join yarn, *ch 3, skip next st, sl st into next st, *Repeat Across,
Fasten Off

Work Trim in FL's sts on rows above:
ALL trim is worked with an "E hook":
join with a sl st, ch 3, *skip next st, sl st into next st, ch 3
*Repeat around, join and fasten off

~~~
Skirt: Change back to G Hook
Row 1: with right side of Bodice facing you, join with sc in
first st, 1 sc in each st across, join to 1 st to form a ROUND
** WORKING IN BL's until I tell you otherwise

Row 2: ch 3, 2 dc in first st, 3 dc in each st around, join

Row 3: ch 3, 1 hdc in each st around, join

Row 4: ch 3, 2 dc in next st, *[dc in next st, 2 dc in next st]
*Repeat around, join

Row 5: ch 3, hdc in first st, hdc in next 2 sts, [2 hdc in next st, hdc
in next 2 sts] *Repeat around, join

No longer working in BL's, Now using normal stitches.

SKIRT:
Row 6:Working in FL's of row 5, ch 3, skip next st, 
[2 dc, ch 1, 2 dc all in same st] skip next st, * 1 dc in next, skip 1 st,
[2 dc, ch 1, 2 dc in next st] skip 1 st, *Repeat around, join to top of ch 3
Working in rounds now

Row 7: ch 3, Repeat row 6

Row 8: ch 3, skip next st, [3 dc, ch 1, 3 dc in next st], skip next st,
*1 dc in next st, skip next st, [3 dc, ch 1, 3 dc in next st], skip next st,
*Repeat around, finish off

TRIM:
ALL trim is worked with an "E hook":
join with a sl st, ch 3, *skip next st, sl st into next st, ch 3
*Repeat around, join and fasten off

~~~~~~~~
Bodice / Pillow Bottom  - G Hook
Row 1: ch 4, join to form ring, ch 2, 11 dc in ring, join (12 sts)

Row 2: ch 2, 1 hdc in same st as ch, 2 hdc in each st aroung, join (24 sts)

Row 3: ch 2, *2 dc in next st, 1 dc in next st, *Repeat around, join

Row 4: ch 2, 1 hdc in same st as ch, *2 hdc in next st, 1 hdc in next st,
*Repeat around, join

Row 5: ch 2, 1 dc in next 2 sts, 2 dc in next st, * 1 dc in next 3 sts,
2 dc in next st.*Repeat around, join

Row 6: ch 1, 1 sc in next 3 sts, 2 sc in next st, *1 sc in next 4 sts,
2 sc in next st, *Repeat around, Join, (DO NOT FASTEN OFF)


Construction:
place wrong sides together with Bodice top, sl st BL's of row 5, 1/2 around,
slip in cardboard, sl st another 1/4 way around and firmly stuff, sl st to
end, join and tuck in tail

~~~~~~~~~~~
Hat:   E Hook
Row 1: ch 4, join to form ring, 11 dc in ring, join (12 dc)

Tow 2: ch 3, dc in first st, 2 dc in each st around, join (24 dc)

Row 3: [BL's] ch 2, hdc in each st around, join (24 hdc's)

Row 4: [BL's} [ch 3, sl st in ext st], around,

Row 5 & 6: ch 3, *sl st in next ch space, ch 3, *Repeat around, join
Fasten off after row 6

TRIM:
ALL trim is worked with an "E hook":
join with a sl st, ch 3, *skip next st, sl st into next st, ch 3
*Repeat around, join and fasten off

Thursday, October 6, 2011

Linda's Christmas Stocking

   These are some of the Stockings I've made from this pattern over the years. Stocking on right is smaller, perfect for Headstart

   This is NOT one of my {"JMSQ"} original patterns, This is an older pattern, my copy is dated back to 03... and I am un-able to get it to open from the archives of Riverly.
   This is a perfect stocking pattern and I want to share with you. 2 sizes, one large and the smaller one (right side of photo)  perfect for headstart program

                       My "JMSQ"s changes in this pattern are noted in (  )


This pattern works up quickly and looks great. I like to use the same
color for the toe and heel and then do stripes through out as the need
or want arises. It makes the stocking look more interesting and uses
up a lot of scrap Christmas yarn.

MATERIALS:
Assorted Christmas colors of WW Yarn

G hook (I use an H hook)

Note: The toe color could be changed after row 4 to the body color of stocking.

INSTRUCTIONS:
Ch 4, join with sl st to form ring. ch 3

Row 1: 12 dc in ring, join with sl st to top of ch 3

Row 2: 2 dc in each dc around, join with sl st to top of ch 3

Row 3: 2 dc in 1st dc, *1 dc in next dc, 2 dc in next dc, *repeat around
ending with 1 dc in last dc and join as before. Ch 3

Row 4-12: 1 dc in each dc around. Join as before and ch 3
**(change color for heel after row 4)


Change For Heel:

Rwo 13: 1 dc in each dc to within last 12 dc.. ch 3 and turn

Row 14-19: Repeat row 13 by doing 1 dc in each dc of heel row. Fasten off,
fold heel in half right sides together and sew up the back of heel for the
seam.

Change for body:
Attach yarn to heel at seam line, ch 3

Row 1: 1 dc in joining and 13 more evenly spaced around heel rows to 1st
free dc of in steep, dc in each in step dc; 14 dc evenly spaced around heel
rows. Join with a sl st to 1st dc. ch 3

Row 2-21:
1 dc in each dc. Join as before and ch 3 making sure to do a ch 10 for
hanging in the position you want it in the last row. Fasten off and weave
in the ends.

(*NOTE:)
Because I use an H hook, I "JMSQ" work this same pattern to row 12,
THEN I change colors the last 4 rows for trim Plus 1 row for ruffle

~~~~~~~~~
* {SMALLER PATTERN FOR HEADSTART STOCKING}
*HERE IS THE SAME PATTERN BUT EDITED TO MAKE IT SMALLER
AND MORE MANAGABLE STOCKING FOR HEAD START

Phyllis' Christmas Stocking

Materials:
Assorted Christmas colors of WW yarn

H hook

Note: the toe color could be changed after row 4 tot he body color.

ch 4, join with a sl st to form ring. ch 3

Row 1:8 dc in ring (I make 10 dc), join with a sl st to top of ch 3

Row 2: 2 dc in each dc around, join as before. ch 3

Row 3: 2 dc in 1st dc, *1 dc in next dc, 2 dc in next dc, *Repeat
around ending with 1 dc in last dc and join as before. ch 3

Row 4-11: 1 dc in each dc. Join as before and ch 3 (24 dc + 1 ch 3)

change for heel:
Row 12: 1 dc in each dc to with last 10 dc (11 dc). ch 3 and turn

Row 13-16 (17): Repeat fir 12 by doing 1 dc in each dc of heel row.
Fasten off and fold heel in half right sides together and sew up the
back of heel for the seam

change for body:

attach yarn to heel at seam line. ch 3
Row 1: 1 dc in joining and 28 more evenly spaced around. Join with
sl st to 1 dc . ch 3

Row 2-15 (12): 1 dc in each dc. Join as before and ch 3 making sure
to do a ch 10 for hanging in the position you want it in the last
row. Fasten off and weave in ends.
(*Note: I work trim after row 12)
Last few rows you can change to personalize the stocking by doing
a popcorn stitch or even a loopy stitch or even sc so that you can
embroider a name on the stocking

*Note
Row 3: I ("JMSQ") add my X's & O's around


Original Stocking  © Created By: Linda Bohrn
http://www.ravelry.com/patterns/library/lindas-?christmas-stocking

Monday, October 3, 2011

Baby Dress 1

                             "JMSQ "Copyright Sept. © 2011

I made a dress for 5 of our 6 granddaughters years ago from this pattern of sorts, only their dress'es were big enough for 5 yrs old.. We took them to church in their new dress'es and Pastor Jake noticed the dress'es and just loved them. Our youngest granddaaughter, I made a pinnapple dress out of thread and it was also georgous,,, JMSQ
~~~~~~~~~~~~~~

Bernat baby yarn  2 buttons 1/2 "
Size 3-9 months
G hook

Instructions:

Dress Bodice :
Row 1: Ch 56, sc in 2nd ch from hook, sc in next 5 ch, 3 sc in next ch, (corner made )
* sc in next 13 ch, 3 sc in next ch ( corner made ); rep from * 2 more times, sc in
last 6 ch, turn (63 sts).

Rows 2 - 7: Ch 2, *hdc in each st across with 3 hdc in each centre corner st,
*Repeat to end turn,

Row 8: ch 2, 1 hdc in each st to center of corner st, 1 hdc in center st,
ch 1, skip 29 sts, 1 hdc in next st (center of corner st), 1 hdc in eact st to
next center st of corner, ch 1, skip 29 sts, 1 hdc in next center st of corner,
1 hdc in each st to end, ch 1 JOIN to 2nd st of ch 2 with sl st.

Row 9: ch 2, 1 hdc in each st across including ch 1 space , join (58 sts) 

Row's 10 - 12: ch 2, 1 hdc in each st around, join

Row 13: ch 3, *sk 1 st, [2 dc, ch 1, 2 dc] in next st (shell made), skip 1 st,
1 dc in next st, *Repeat around, ending with dc in last st, join to top of ch 3

Row's 14 - 16: Repeat row 13

Row 17: ch 2, *skip 1 dc, 1 dc in next st, [shell in shell EXCUPT CH 2 INSTEAD OF 1],
1 dc in next st, skip 1 dc, 1 dc in next st, *Repeat around, join to top of ch 3

NOTE:
Repeat this row if you want your dress longer [I would have added 2, 3 or 4 more rows,
but ran short of yarn], then finish with Broder row

BORDER:
ch 3, 1 dc in each of next 3 dc's, [ 1 dc, 3 trdc, 1 dc all in ch 2 space of shell],
1 dc in each of next 3 dc's, sl st in next st, **1 dc in each of next 3 dc's,
[1 dc, 3 trdc, 1 dc in center ch 2 space of shell], 1 dc in each of next
3 dc's, sl st in next st, **REPEAT AROUND, join to top of ch 3, fasten off

Arm Trim:
Attach yarn, sc around arms, join & fasten off

Neck Trim:
Ataach yarn in 1 st of back neck, sc to corner, 3 sc in corner,* sc to next corner,
 3 sc in corner *REPEAT to back of neck, DO NOT FASTEN OFF, going along back opening
sc in first st, ch 2 (button holes), sc in next st, sc in next 2 sts, ch 2 (button holes), sc in remaining sts,
and up opposite side of dress, join & fasten off

Sew bottons on opposite side of dress