"Childrens Hospital Donation"

"Childrens Hospital Donation"
This is the load of Baby Hats, Blankies, Teddy's Bears & Dolls we took to
Childrens Hospital In Little Rock today.. There are over 400 Baby hats...

Monday, November 26, 2012

Stacy's 8" Stocking

"SLS"Copyright © 2012
 
                   Stacy's 8" Stocking


f hook

Row 1:) ch 25, 1 hdc in 3rd st from hook, 1 hdc in each st., 2 hdc in last st, turn, 1 hdc in same sts (3 total) and up other side of chain, 1 hdc in base of ch, then join to top of the ch,

Row 2-7:) ch 2, 1 dc in each st across, Join. Slst in 8 sts to close toe of boot, do not fasten off.
Row: 8) Ch2 Hdc in ea remaining st around boot leg.
Row 9-13:) ch 2, 1 dc in st around, join with slst to finish rounds.

Row 14:) Ch2, 1 hdc in each st around, join & fasten off

Row 15:) Attach white and ch 2, 1 hdc in each st around, join
Row 17:) Ch 2, dc in each st around join.
Row 18:) Ch 2, 1 hdc in each st around join, ch 14 (hanger), join to st, and fasten off, tuck in ends.


Measurements:

Toe: 6" wide

Body: 8" tall

Plus loop for hanging


Stocking Ornament Pattern:
http://jeanariespatterns.blogspot.com/2010/11/stocking-ornament.html

Sunday, November 25, 2012

Ozark Trinket Box


                                                  Ozark Trinket Box

Different style of dress and worked in Christmas Colors...

Pattern can be found at: Ozark Trinket Box (C)
http://jeanariespatterns.blogspot.com/2011/10/otb.html

Tuesday, November 20, 2012

X & O Scoodie (C) (Q-Girls)

  "JMSQ "Copyright © 2012
                                            {In Honor of  The Q-Girls}
                        
J & K Hook
Redheart WW yarn - 1 skein 7 oz

With K hook, ch 151 loosely, switch to J hook

Row 1: 1 dc in 3 ch from hook, *1 dc in each st across, turn

Row 2: ch 2, 1 dc in 1st st (in ch 2 space), *skip next st,
1 dc in next st, 1 dc in st just skipped (X st compleded),
*Repeat across ending with 1 dc in last st, turn.

Row 3: ch 2, 1 dc in 1st st (in ch 2 space), 1 dc in each st across, turn

Row's 4,6,8,10,12,14,16: Repeat row 2

Row's 5,7,9,11,13,15,& 17: Repeat row 3

Row 18: ch 1, *sl into next st, ch 1 *Repeat across, finish off

HOODIE:
Fold in half with right side inside facing eachother, join with a
sc in top of scoodie, sc in both st's together down about 12" to
form hoodie, fasten off & tuck in tail

X & O Scarf (C)

                                        "JMSQ " Copyright © 2012

                                       {In Honor of the Dr. Dawn Phelps}
Dr. Phelps went above and beyond to help me. I can't thank You enough.. God's Blessings upon you always...JMSQ

J & K Hook
Redheart WW yarn 7 oz

With K hook, ch 151 loosely, switch to J hook

Row 1: 1 dc in 3 ch from hook, *1 dc in each st across, turn

Row 2: ch 2, 1 dc in 1st st (in ch 2 space), *skip next st,
1 dc in next st, 1 dc in st just skipped (X st compleded),
*Repeat across ending with 1 dc in last st, turn.

Row 3: ch 2, 1 dc in 1st st (in ch 2 space), 1 dc in each st across, turn

Row's 4,6,8: Repeat row 2

Row's 5,7,9: Repeat row 3
finish off & tuck in tails

Monday, October 29, 2012

Kids Roll Top Hats

                                     Kids Roll Top Hat   Fits 3-10 yrs

                                                  {In Honor of Deo}
                                             "JMSQ "Copyright © 2012


NOTE 1:
I am using the same number of sts that I use on family
knitted hats for children these ages, only thing different is the
number of rows "BECAUSE" you'll roll up several rows
(thus creating the roll top hat)

10 1/2 Needles
CO 60 sts:

Row's 1-28: knit across (about 6")
Begin Decrease:
Row 29: *k5, k2tog; *repeat, turn
Row 30:: k
Row 31: *k4, k2tog, *repeat, turn 
Row 32: k
Row33: *k3, k2tog, *repeat, turn
Row34: k
Row 35: *k2, k2tog, *repeat, turn 
Row 36: k
For fun, I changed to green yarn for the last 4 rows:
Row 37: *k1, k2tog, *repeat, turn
Row 38: k
Row: 39 *k2tog, *repeat, turn
Row: 40 k

Cut yarn, leaving long tail. Thread through tapestry needle
and thread through each rem st on needle, pull tight on crown,
whip st down seam, tunk in tails

Thursday, October 11, 2012

Chunky Monkey's Zipper Pulls (Sock Monkey's)

                                                 {In Honor of Lance}
                                            "JMSQ "Copyright © 2012


Smaller ones on legs, PERFECT for:
zipper pulls, decorating your back packs, attaching to your favorite purse,
key rings, necklaces, toys, Great stocking stuffers

~~~~~~~~~~~~~~~~~~~~~~~~~~~~~~~~~~~~~~~~~~~~~~~~~~~~~~~~
G hook          About 4" tall

~~~~~~~~~~~~~~~~~~~~~~~~~~~~~~~~~~~~~~~~~~~~~~~~~~~~~~~~

NOTE 1: (Do Not Join at end of each row, but place marker unless
I marked to join)

NOTE 2: (Make head & ears same color)

NOTE 3: (Row 1 on "head" is the chin of the monkey, ~&~ , row 15
is the top of head)

NOTE 4: if adding key ring or zipper pull attachments, add them
to hat after adding fringe and before sewing to head...
~~~~~~~~~~~~~~~~~~~~~~~~~~~~~~~~~~~~~~~~~~~~~~~~~~~~~~~~~~~

HEAD:(Do Not Join at end of each row, but place marker)
Row 1: ch 3, join to form ring, ch 1, 6 sc in ring, place marker
(6 sts)

Row 2: 2 sc in each st around, move marker up, (12 sts)

Row 3: *1 sc in next st, 2 sc in next st, *Repeat around,
move marker up (18 sts)

Row 4: *1 sc in each of next 2 sts,  2 sc in next st,
*Repeat around, move marker up (24 sts)

Row's 5-12: 1 sc in neach st around, move marker up at end
of each row (24 sts)

BEGIN DECREASE:
Row 13:  * 1 sc in next 4 sts, decrease over next 2 sts,
*Repeat around, move marker  up (20 sts)

Row 14: * 1 sc in next 3 sts, decrease over next 2 sts,
*Repeat around, move marker up (16 sts)

Row 15: * 1 sc in next 2 sts, decrease over next 2 sts,
*Repeat around, finish off & tuck in tail (12 sts)


HAT: (JOIN each row)
Row 1: ch 4, join to form ring, ch 2, 9 hdc in ring, join (9 sts)

Row 2: ch 2, 1 hdc in same st, 2 hdc in each st around, join. (18 sts)

Row 3: ch 2, 2 hdc in next st, *1 hdc in next st, 2 hdc in next st,
*Repeat around, join (27 sts)

Row 4: ch 1, 1 sc in each st around, join & finish off leaving
long tail to join to top of head (27 sts)


MUZZLE: (Do Not Join at end of each row, but place marker)
Row 1: ch 3, join to form ring, ch 1, 6 sc in 2nd ch from hook,
Do NOT join, place marker (6sts)

Row 2: 2 sc in each st around, move marker (12 sts)

Row 3: *1 sc in next st, 2 sc in next st, *Repeat around,
move marker, (18 sts)

Row 4: 1 sc in each st around, JOIN, finish off leaving long
tail to sew on face

EARS: (mAKE 2)
CH 3, Make 8 dc IN 3rd ch from hook, DO NOT JOIN, TURN,
ch 1,  sl st in each st across, finish off leaving long tail to sew
on side of head


ASSEMBLY:
WITH RED YARN:
make mouth across center of muzzle piece, also with red make
fringe/hair on top of hat.

**NOTE** ALSO, if adding key ring or zipper pull attachments,
now is the time to add them to hat, after adding fringe and before
sewing to head...


WITH BLACK YARN:
Cound 10 rows from chin of head piece towards top, this is
where I placed X's for eyes


STUFF head, ((REMEMBER to stuff hat & muzzle before
finished sewing)) sew on muzzle to head piece, now sew
hat to top of piece, sew both ears into place

Monday, October 8, 2012

Sock Monkey

This is what I've been working on over the weekend. ADORABLE doesn't begin to express how adorable this truly is...


Pattern can be found here:
http://www.redheart.com/free-patterns/sock-monkey-and-baby-hat

Wednesday, September 19, 2012

Lazy Dazy Slouch

                                Purple slouch is Simply Soft yarn (K hook)

                            Depending upon the yarn your using: J or K hook

                              Colorful slouch in RedHeart WW yarn (J hook)

Row 1: ch 5, join to form ring, ch 2, 15 dc in ring, join (16 sts)

Row 2: ch 2, 1 dc in same st as joining, 2 dc in each st around, join (32 sts)

Row 3: *1 dc in next 3 sts, 2 dc in next st. *Repeat, 1 dc in each st, ending
with a dc in back side of ch 2, join

Row 4: ch 2, 2 dc in next st, *1 dc in each of next 2 sts,  2 dc in next st,
*Repeat 5 more times, 1 dc in each st, ending with a dc in back side of ch 2, join

Row 5: ch 2, i dc in next st, 2 dc in next st, *1dc in each of next 4 sys,
2 dc in next st.*Repeat 7 times, 1 dc in each st, ending with a dc in back
side of ch 2, join

Row 6: ch 2, 2 dc in next st, *1 dc in each of next 4 sts, 2 dc in next st,
*Repeat 9 times, 1 dc in each st, ending with a dc  in back side of ch 2, join

{Here I changed colors for 2 rows, but this is optional}

Row 7:ch 2, 1 dc in neach of next 4 sts, 2 dc in next st, *1 dc in each of
next 8 sts, 2 dc in next st, *Repeat 5 times, 1 dc in each st, ending
with a dc in back side of ch 2, join

Row 8: ch 2, 1 dc in each of next 2 sts, 2 dc in next st, *1 dc in next 8 sts,
2 dc in next st, *Repeat 6 times, 1 dc in last 7 sts, 1 dc in back side of
ch 2, join

Row's 9-11: ch 2, 1 dc in each st, ending with a dc in back side of ch 2, join

{BEGIN DECREASE ROWS}
Row 12: ch 2, 1 dc in each of next 4 sts, dec over next 2 sts, * 1 dc in each
of next 6 sts, dec. over next 2 sts *Repeat 7 times, 1 dc in each st, ending
with a dc in back side of ch 2, join

Row 13: ch 2, 1 dc in each of next 2 sts, dec. over next 2 sts, *1 dc in each
of next 6 sts, dec. over next 2 sts, *Repeat 7 times, 1 dc in each st, ending
with a dc in back side of ch 2, join

Row 14: ch 2, 1 dc in next st, dec. over next 2 sts, *1 dc in each of next
6 sts, dec. over next 2 sts, *Repeat 6 times, 1 dc in next 4 sts, dec over
next 2 sts, 1 dc in back of ch 2, join

Row 15: ch 2, 1 dc in next st, dec. over next 2 sts, *1 dc in each of next
6 sts, dec over next 2 sts, *repeat 5 times, i dc in next 4 sts, dec over
next 2 sts, 1 dc in back of ch 2, join

Row 16: ch 2, 1 dc in next 2 sts, dec. over next 2 sts, *1 dc in each of
next 6 sts, dec. over next 2 sts, *Repeat 3 times, 1 dc in next 4 sts,
dec. over next 2 sts, 1 dc in back of ch 2, join

Row 17: ch 2, 1 dc in each of next 4 sts, dec over next 2 sts, *1 dc in
each of next 6 sts, dec. over next 2 sts, *Repeat 3 times, 1 dc in next
4 sts, dec over next 2 sts, 1 dc in back of ch 2, join (40 sts)

Row 18: ch 1, 1 sc in each st around, join & fasten off

Friday, August 24, 2012

My Buddy an Baby Bunting Doll's

                        "JMSQ "Copyright © 2012

Both these sweet dolls can be found here in my Misc. patterns.. Enjoy


My Buddy Doll (C)
http://jeanariespatterns.blogspot.com/2012/08/mbd.html


My Baby Bunting Doll (C)
http://jeanariespatterns.blogspot.com/2012/08/mbbd.html

Thursday, August 23, 2012

My Baby Bunting Doll


                                   "JMSQ "Copyright © 2012

                                       "Without her Bonnet"

measures without hat 11 3/4" - 12"

G Hook           
F Hook used for trim only

Special Sts Used:
Shell: 1 sc, ch 1, 1 sc in same st.
BLO = back loops only
~~~~~~~~~~~~~~~~~~
NOTE 1:
ch 1 at beginning of each row does NOT count as st

NOTE 2:
Using white or flesh color for head, hands & feet area
~~~~~~~~~~~~~~~~~~
G Hook throughout pattern unless otherwise noted:

Head:
Row 1: ch 3 join to form ring, ch 1, 6 sc in ring, join (6 sts).

Row 2: ch 1, 2 sc in each st around. (12 sts )

Row 3: ch 1, *1 sc in next st, 2 sc in next st. *Repeat around, join (18 sts)

Row 4: ch 1, *1 sc in each of next 2 sts, 2 sc in next st. *Repeat around, join (24 sts)

Row 5: ch 1, *1 sc in each of next 3 sts, 2 sc in next st, *repeat around, join (30 sts)

Row 6: ch 1, 1 Sc in each st, around. (30 sts)

Row 7: ch 1, 1 sc in each of next 4 sts, 2 sc in next st. *Repeat around, join (36 sts)

Row 8: Repeat row 6

Row 9: ch 1, *1 sc in each of next 5 sts, 2 sc in next st, *Repeat around, join (42 sts)

Row 10: Repeat row 6 

Row 11: ch 1, * 1 sc in each of next 6 sts, 2 sc in next st, *Repeat around, join (48 sts)

Row's 12-14: Repeat row 6 .... DO NOT FINISH OFF

Begin Decrease:
Row 15: ch 1, *1 sc in each of next 6 sts, "dec. 1 sc over next 2 sts",  *Repeat around, join (42 sts)

Row 16: ch 1, *1 sc in each of next 5 sts, "dec. 1 sc over next 2 sts",  *Repeat around, join (36 sts)

Row 17: ch 1, *1 sc in each of next 4 sts, "dec. 1 sc over next 2 sts", *Repeat around, join (30 sts)

Row 18: ch 1, *1 sc in each of next 3 sts, "dec. 1 sc over next 2 sts", *Repeat around, join (24 sts)

Row 19: ch 1, *1 sc in each of next 2 sts, "dec. 1 sc over next 2 sts", *Repeat around, join (18 sts)

Row 20: ch 1, 1 sc in each st around, join with a sl st. & finish off (18 sts)

FACE:
NOW is the best time to add face. I flattened my head so where I did
"sl st" is center back
with black yarn I made X's for eyes on row 8...  [Secure ends of yarn]
With red yarn I did a slant for corner of mouth on row 12, then 3 streight
 lines for mouth on row 13, then another slant on row 12 [secure ends of yarn]


Dress Top:
join yarn with sl st in 2nd ch to the right from finish off point,

Row 1: ch 1, 1 sc in next 5 sts, [shell st, 1 sc, ch 1, 1 sc] in next st, 1 sc in
next 2 sts, [shell 1 sc, ch 1, 1 sc] in next st, 1 sc in ext 5 sts (front of shirt),
[shell 1 sc, ch 1, 1 sc] in next st, 1 sc in next 2 sts, [shell 1 sc, ch 1, 1 sc],
in next st, join

Row's 2-7: ch 1, *1 sc in each st, "SHELL in center of Shell" *Repeat around.

Row 8: ch 1, 1 sc in each st to 1st shell, with hook in hand 1 sc in center of
both this shell and next shell together (Arm hole made), 1 sc in each st to
next shell st, 1 sc in center of both shells together, (arm hole made), 1 sc
to beginning , join (34 sts)

Row's 9-16: ch 1, 1 sc in each st around, join (34 sts)
Fasten off after row 16


ARMS:  Join yarn, with sl st,
Row's 1-7: ch 1, 1 sc in each st around, join.. Fasten off after row 7

NOTE: with white or flesh colored yarn
Row 8: attach with with a sl st, 1 sc BLO in each st around, join

Row 9: ch 1, 1 sc in each st around, join & finish off
Repeat for other arm
Hold both pieces together and sl st closed

Trim on arm's:
F Hook, On un-used loops of row 8, join with sl st, ch 1, sl st in
next st, ch 1, *Repeat around, join & fasten off

G Hook
Bunting Dress:
Row 1: join with sl st, ch 2, *1 hdc in 6 sts, 2 hdc in next st.
*Repeat around, join
Row 2: ch 2, 1 hdc in each st around, join
Row 3: ch 2, *1 hdc in 7 sts, 2 hdc in next st, *Repeat around, join
Row 4: Repeat row 2
Row 5: ch 2, *1 hdc in 8 sts, 2 hdc in next st, *Repeat around, join
Row 6: Repeat row 2
Row 7: ch 2, *1 hdc in 9 sts, 2 hdc in next st, *Repeat around, join
Row's 8-11: Repeat row 2, & fasten off at end of row 11

STUFF HEAD, ARMS & UPPER BODICE

Row 12: fold in half, join with sl st, ch 1, 1 sc in each st across going
through both front & back pieces together **{Before final closing
finish filling doll} finish off

Row 13: join with sl st, ch 1, *5 dc in next st, skip next st, sc in next st
*Repeat across, ending with a sl st closed, Finish off & tuck in tails

                                    Back of Bonnet
Bunting Bonnet:
*NOTE: Ch 2 DOES count as a st.

ch 5, join to form ring

Row 1: ch 2, 11 dc in ring, join (12 sts)

Row 2: ch 2, 1 dc in same st, 2 dc in each st around, join (24 sts)

Row 3: ch 2, 2 dc in next st, *1 dc in next st, 2 dc in next st *Repeat a
round. Join

Row 4: ch, 1 dc in each st to last 8 sts, (leave last 8 sts un-worked), turn

Row 5: ch 2, 1 dc in each st, turn

Row 6: Repeat row 5

Row 7: ch 2, 1 hdc in each st down side, along bottom, and up other side,
**1 hdc in BLO in front of bonnet, join

Row 8: ch 2, 1 hdc along both sides & bottom of bonnet ONLy (Do NOT work
along front..)


TRIM On top of Bonnet:
F Hook - join with sl st in 1st un-worked st on row 7, ch 1, *sl st in
next st, ch 1 *Repeat across front


Chain / Tie: G Hook
ch 75, I sl st on 2dc st and along tie, HOWEVER, I believe it will be
easier to thread & tie if just chain is done without anything else.
Weave tie in & out of every st along side, back, and up side, tie in a
bow along front neck

Wednesday, August 22, 2012

My Buddy Doll

                                         "JMSQ "Copyright © 2012

{This "lil boy doll" is in honor of our oldest son Ronnie}.
When he was a boy he asked for a my buddy doll that had come out
(Hasboro made this doll in 1985). It was awesome and just what boys
that age needed was a close friend who they could trust and talk to
and not get them into trouble. SO, In honor of all the boys in this
hugh world, here's my version of My Buddy... enjoy

G Hook    Measures 11 3/4" - 12"

Special Sts Used:
Shell: 1 sc, ch 1, 1 sc in same st.

~~~~~~~~~~~~~~~~~~
NOTE:
ch 1 at beginning of each row does NOT count as st

Head:
Row 1: ch 3 join to form ring, ch 1, 6 sc in ring, join (6 sts).

Row 2: ch 1, 2 sc in each st around. (12 sts )

Row 3: ch 1, *1 sc in next st, 2 sc in next st.
*Repeat around, join (18 sts)

Row 4: ch 1, *1 sc in each of next 2 sts, 2 sc in next st.
*Repeat around, join (24 sts)

Row 5: ch 1, *1 sc in each of next 3 sts, 2 sc in next st,
*repeat around, join (30 sts)

Row 6: ch 1, 1 Sc in each st, around. (30 sts)

Row 7: ch 1, 1 sc in each of next 4 sts, 2 sc in next st.
*Repeat around, join (36 sts)

Row 8: Repeat row 6

Row 9: ch 1, *1 sc in each of next 5 sts, 2 sc in next st,
*Repeat around, join (42 sts)

Row 10: Repeat row 6 

Row 11: ch 1, * 1 sc in each of next 6 sts, 2 sc in next st,
*Repeat around, join (48 sts)

Row's 12-16: Repeat row 6 .... DO NOT FINISH OFF
**(If head is to large for you work less rows of row 6)

Begin Decrease:
Row 17: ch 1, *1 sc in each of next 6 sts, "dec. 1 sc over next 2 sts", 
*Repeat around, join (42 sts)

Row 18: ch 1, *1 sc in each of next 5 sts, "dec. 1 sc over next 2 sts", 
*Repeat around, join (36 sts)

Row 19: ch 1, *1 sc in each of next 4 sts, "dec. 1 sc over next 2 sts",
*Repeat around, join (30 sts)

Row 20: ch 1, *1 sc in each of next 3 sts, "dec. 1 sc over next 2 sts",
*Repeat around, join (24 sts)

Row 21: ch 1, *1 sc in each of next 2 sts, "dec. 1 sc over next 2 sts",
*Repeat around, join (18 sts)

Row 22: ch 1, 1 sc in each st around, join with a sl st. & finish off (18 sts)


FACE:
NOW is the best time to add face. I flattened my head so where I did "sl st" is
center back
 With black yarn I made X's for eyes on row 8...  [Secure ends of yarn]
With red yarn I did a slant for corner of mouth on row 12,
then 3 streight lines for mouth on row 13, then another slant
 on row 12 [secure ends of yarn]


Shirt:
join yarn with sl st in 2nd ch to the right from finish off point,
Row 1: ch 1, 1 sc in next 5 sts, [shell st, 1 sc, ch 1, 1 sc] in next st, 1 sc in
next 2 sts, [shell 1 sc, ch 1, 1 sc] in next st, 1 sc in ext 5 sts (front of shirt),
[shell 1 sc, ch 1, 1 sc] in next st, 1 sc in next 2 sts, [shell 1 sc, ch 1, 1 sc],
in next st, join

Row's 2-7: ch 1, *1 sc in each st, "SHELL in center of Shell" *Repeat around.

Row 8: ch 1, 1 sc in each st to 1st shell, with hook in hand 1 sc in center of
both this shell and next shell together (Arm hole made), 1 sc in each st to
next shell st, 1 sc in center of both shells together, (arm hole made), 1 sc
to beginning , join

Row's 9-16: ch 1, 1 sc in each st around, join


ARMS:  Join yarn, with sl st,
Row's 1-9: ch 1, 1 sc in each st around, join.. Fasten off after row 12,
Hold both pieces together and sl st closed
Repeat for other arm


*** Stuff head firmly but not to firm, and stuff both arms while bottom
of doll is still open


LEGS:
***You should have 36-40 sts now, if you have 40 sts, then do 1 sc in 10
instead of 9, then work along opposite side for leg opening...

Row 1: Join yarn at front "side" of doll, ch 1, 1 sc in 9 sts, turn and do 9 sc
up back side of body, join (leg hole) (18 sts) - (20 sts)

Row's 2-12: ch 1, 1 sc in each st around, join, Fasten off after row 12
Repeat for other leg.


Stuff body & legs, fold leg opening together and sl st closed, tuck in tails


HAT: {Red Beret Hat}
**As memory reminds me, I believe Ronnie's Buddy had a red
baseball cap, I'll make up a cute red hat for this doll.. If you choose
to use one, you might want to stitch it on the head to keep it from being lost

ch 4, join to form ring
Row 1: ch 2, 10 dc in ring, join (10 sts)
Row 2: ch 2, 2 dc in each st around, join (20 sts)
Row 3: ch 2, 1 dc in next st, 2 sc in next st *Repeat around, join
Row 4: ch 2, 1 sc BLO in each st around, fasten off

Friday, August 17, 2012

Drawstring Bags -N- Backpacks

                                         "JMSQ "Copyright © 2012

Both outside bag's are Back-Packs; Center bag is purse style.. ALL 3 bags will be used for my "Emergengy Winter Kits". As you can see from the photo, the bags are BIG so they will hold alot of things items. When I get our emergency winter kits finished and put together, I will share a photo of finished project.


k Hook
Sts Used: sc, hdc, X st, sl st
WW yarn - 2 strings held together throughout pattern

NOTE 1: ch 1 does NOT count as st. ***ALWAYS work 1 sc
in ch 1 space as 1st st

NOTE 2: you can do this pattern without changing colors, I just listed
the changes I did in order to show you where to make the changes if desired
~~~~~~~~~~~~~~~~~~~~~~~~~~~~~~~~~

Color A:
Row 1: ch 4, join to form ring, ch 1, 8 sc in ring, join (8 sts)
Row 2: ch 1, 2 sc in each st around, join (16 sts)
Row 3: ch 1, *1 sc in next st, *2 sc in next st, *Repeat around (24 sts)
Row 4: ch 1, *1 sc in next 2 sts, *2 sc in next st, *Repeat around (32 sts)
Row 5: ch 1, *1 sc in next 3 sts, *2 sc in next st, *Repeat around (40 sts)
Row 6: ch 1, *1 sc in next 4 sts, *2 sc in next st, *Repeat around (48 sts)
Row 7: ch 1, *1 sc in next 5 sts, *2 sc in next st, *Repeat around (56 sts)
Row 8: ch 1, *1 sc in next 6 sts, *2 sc in next st, *Repeat around (64 sts)
Row 9: ch 1, *1 sc in next 7 sts, *2 sc in next st, *Repeat around (72 sts)
Row 10: ch 1, *1 sc in next 8 sts, 2 sc in next st *Repeat around (80 sts)
Row 11-17: ch 1, 1 sc in each st around, join (80 sts)

Color B:
Row 18: ch 1, 1 sc in each st around, join
Row 19: ch 2, skip first st, 1 hdc in next st, 1 hdc in st just
skipped (X st completed) *Repeat around, join
Row 20: Repeat row 18
Row 21: Repeat row 19
Row 22: Repeat row 18

Color A:
Row 23-28: Repeat row 17
Row 29, ch 1, *1 sc in next 2 sts, ch 2, skip 2 sts, 1 sc in next 2 sts, *Repeat around, join
Row 30: ch 1, *1 sc in each st, 2 sc in ch 2 space, *Repeat around
Row's 31-32: ch 1, 1 sc in each st around, Join
Row 33: ch 1, [sl st, ch 1] in each st around, join & fasten off


**NOTE: 2 Options for finishing cords. As you can see from photo I made
backpacks, however my next one I'm using the purse cords instead


BackPack Cord:  {LOOK AT PHOTO FOR CORD PLACEMENT}
ch 170, sl st in each st, finish off with long tail
with FRONT facing you, Weave through opening on
row 30 to center back on both sides, Now take boths
ends down "back" to beginning of row 18, slip one
end through to wrong side, now do the same with
the other end making sure to have maybe 2 or 3 sts
in-between the 2 cords, secure firmly together
inside the bakpack, turk in tails


Purse Tie Cords: Make 2
ch 130 leaving long cords

Weave 1 cord through opening on row 18 attach ends together,
weave 2nd cord opposite of first cord, attach ends together
gentle pull both cords opposite of eachother and tie into a
lovely bow at top of bag, OR slips both cords over your shoulder
and use as a "BIG" purse

Friday, August 3, 2012

Wm. Henery's Blankie

 "JMSQ "Copyright © 2012

This Blankie got it's name from a book I read called:
William Henery is a Good Name
By: Cathy Golike
~~~~~~~~~~~~~~~
Yarn used:
Off white yarn - Lionbrand 1 pounder yarn
Blue yarn - Red_Heart WW 4 ply
~~~~~~~~~~~~~~~
This is the same pattern I used for my Joseph's Shawl

CO 69 sts   10 1/2 needles

Row's 1-3: k across
Row's 4-5: k3, p3, *repeat across
Row's 6-8: p across
Row 9: k across
Row 10: p across
Repeat row's 1-10 (14 more times) (total 15 times)

Friday, July 20, 2012

Q-Family Gloves

                                        "JMSQ "Copyright © 2012
                                               Cuff Option #2
I hook  [Redheart ww yarn]

****{IMPORTANT - READ NOTE after row 27}

(Make 2)
Row 1: ch 5, 2 sc in 2nd ch from hook, sc in next 2 ch'2,
3 sc in last ch, working on opposite side of ch, 1 sc in 
next 3 ch's, DO NOT JOIN, place marker (10 sts)

Row 2: 2 sc in each of next 2 sts, 1 sc in next 3 sts,
2 sc in each of next 2 sts, 1 sc in last 3 sts. DO NOT JOIN (14 sts)

Row 3: 2 sc in each of next 3 sts, 1 sc in next 4 sts,
2 sc in each of next 3 sts, 1 sc in next 4 sts (20 sts)

Row 4: 1 sc in each of next 2 sts, 2 sc in each  of next 2 sts,
1 sc in next 8 sts, 2 sc in each of next 2 sts, 1 sc in
last 6 sts DO NOT JOIN (24 sts)

Row's 5-20: 1 sc in each st around. DO NOT JOIN (24 sts)

Row 21: 1 sc in in each of next 2 sts, 2 sc in next st, ch 5,
skip 3 sts, 2 sc in nxt st, 1 sc in each st to marker.
DO NOT JOIN (28 sts)

Row 22: 1 sc in each st & each of the ch 5 around to marker.
DO NOT JOIN (28 sts)

Row 23-27: 1 sc in each st to marker. (DO NOT JOIN) (28 sts)

NOTE:
Do not finish off after row 27 if your going to do option 1 or 2 for your cuff. Finish off if your going to do option 3 and follow directions below for cuff

                                         Cuff Option #3

~~~~~~~~~~Cuff's  Options ~~~~~~~~~~~~~~~
Option 1:
Now you can continue to work 1 sc in each st to end row 32 &
fasten off (You can make your cuff longer by repeating row 27)


Option 2:  (Pink Gloves above)
Row 28-29: 1 sc in each st to marker, (28 sts)
Row 30: *skip next st, 1 hdc in next st, 1 hdc in st just skipped
(X st just made), *Repeat around to marker, (14 X sts)
Row's 31-32: 1 sc in each st, join at end of row 32 & fasten off

Option 3:  (Orange Gloves above)
fold glove in half, thumb forward, find center of back and join yarn
Row 28: 1 hdc in each st around, join
Row 29-31: *1 fphdc in first st, 1 bphdc in next st, *repeat around, join
finish off after row 31
~~~~~~~~~~
Thumb:
Row 1: join with sc (counts as 1 sts) in any st in thumb opening,
1 sc in each st around DO NOT JOIN, Place marker (12 sts)

Row's 2-9: 1 sc in each st to marker (12 sts)

Row 10: *1 sc DECREASE over next 2 sts, *Repeat around, (6 sts)
JOIN & fasten off
~~~~~~~~

NOTE 2:
For Ron's gloves,  I'll use a J hook, .

The gloves will be beautiful with using multi / Ombre colored
yarns or simply changing colors along the way

Wednesday, June 27, 2012

Open Blind Blankie

                                        "JMSQ "Copyright © 2012
Open Blind Baby Hat is the same pattern as the blankie.
Pattern can be found here:
Open Blind Baby Hat
http://jeanariespatterns.blogspot.com/2013/02/ob.html


10 Needles   (Measures 20" X 30")
CO 67


Boarder:
Rows 1-4: Knit Across

Pattern:
Row 2: Knit across
Row 3: Knit 4, purl to last 4 sts, Knit 4
Row 4: Knit across
Row 5: Knit 7, *P1, K3; Repeat* to last 7, Knit

Repeat row's 2-5 - ***(Total of 32 sets of pattern)

Boarder:
Repeat Rows 1-4, bind off

Thursday, June 21, 2012

Jospeh's Shawl

                                               Genesis 37:3 (KJV)
Now Israel loved Joseph more than all his children, because he
(Joseph) was the son of his old age; and he (Israel)  made him
(Joseph) a coat of many colours.


The different colors and textures of the various yarns
makes an interesting shawl. Every Joseph shawl
is unique & a surprise!

If you are using sport weight yarn or baby wt. yarn use
2 strands held together.

Shawl's meansument 60" long X 20" wide
This shawl is knitted on the long side which will measure 60",
you need to measure as you knit along and Bind off at 20"

The reason " I " use white between each row of color is because I hope my shawls share God light, My thinking is the white is a reflections of God's Light & Love...

~~~~~~~~~~~~~~~~~~~~~~~~~~~~~~~~~~~~~~~
*NOTE:
I always CO with size 13 needles, then switch over to size 11 for
working the shawl pattern.


NOTE:
I CO 51 sts, place a marker, CO 51 more sts, place another
marker, CO last 51 sts... Reason for placing markers is simply
this, if I drop a stitch, "I Know" there are 51 st's between
each marker so I know from which section I dropped it to pick
it back up.
~~~~~~~~~~~~~~~~~~~~~~~~~~~~

This is my favorite combination of stitches for Joseph's Shawl.

11 Needles, CO 153

Color yarn:
Row's 1-3:  k across
Row's 4-5:  k3,  p3 across
Row's 6-8:  p across

Swith to white yarn
Row 9:  k across
Row 10: p across

Repeat these row's until your shawl measures 20" Bind off


Here's another fun idea, if you belong to a "Prayer Shawl"
group, maybe someone could start a shawl (knit or crochet),
and pass it off to one of your members to work on for a week's
time, doing her own thing, and praying over each st as she
works along, then when she returns the shawl at your next
meeting date, the next lady takes it, add's her yarn and
special touch, & pattern to it, and so on and so forth, until
it finally is returned to the origninal one who started it,
she can either finish the shawl, or take her turn then pass
it along.

Each member does their own pattern idea's, add's some of their
own yarn, and prayers to the shawl. Each shawl is completly
"UNIQUE" and fun to recieve


~OR~
if you don't want to hand over your shawl for a weeks time,
how about passing it around the table, let all the members of
your Prayer Shawl group lay their hands on it and pray over
it & if you want they each can knit or crochet a row of two
on it, The possabilities are endless here, Most important
thing is PRAYER & to enjoy your talent as your Blessing others


{  "JMSQ "Copyright © 2012 }

Wednesday, June 20, 2012

Sharon's - Joseph's Shawl

                     (Sharon Bell © 2012)
             Sharon mamabear3058@yahoo.com

I USED THE CARON SIMPLY SOFT YARN.
CASTED ON 300 STITCHES.KNITTED EVERY ROW.
10 ROWS COLOR, 2 ROWS BLACK, 10 ROWS COLOR. ETC.


I RECOMMEND A SIZE 10 TO 11 NEEDLE AND OF COURSE USE A CIRCULAR NEEDLE, DUE TO THE AMOUNT OF STITCHES.

I KNOW 300 STITCHES SEEM LIKE A LOT OF STITCHES BUT THIS GIVES A NICE WIDE SHAWL THAT CAN BE WRAPPED FOR WARMTH.


Used with Permission from Sharon, if you have any questions regarding this pattern, please feel free to contact Sharon at mamabear3058@yahoo.com

Wednesday, May 16, 2012

CupCake Hats

                                   "JMSQ "Copyright © 2012


   H & J Hooks
2 colors of yarn

J Hook - Color A
Row 1: ch 4, join to form ring, ch 2, 13 dc in ring, join to
top of ch 2 (14 sts)

Row 2: ch 2, 1 dc in same st, 2 dc in each st around, join to
top of ch 2 (28 sts)

Row 3: ch 2, 1 dc in next st, 2 dc in next st, * 1 dc in next 2 sts,
2 dc in next st, *Repeat around, join to top of ch 2 (37 sts)

Row 4: ch 2, 1 dc in same st, *1 dc in next 3 sts, 2 dc in next st,
*Repeat around, join to top of ch 2, (47 sts) finish off

Color B
Row 5: join with a sc in any st, 1 sc in each st around, join (47 sts)

Row 6: ch 2, 1 dc in BLP's (back loops only ) each st around (47 sts)

Row 7: ch 2, 1 fpdc in each of next 2 sts, 1 bpdc in each of next 2 sts
*Repeat around, join to top of ch 2 (47 sts)

Row 8-10: Repeat row 7 (47 sts) * Read Note

Row 11: Repeat row 7 only with hdc instead of dc. (47 sts)

*NOTE:
if you want your lil hat longer, just continue with repeating row 7


TRIM: Color B - H hook
Join in any st, ch 2, 4 dc in same st, skip next st, 1 ch in next st, * skip next st, 5 dc in next st,
skip next st, sc in next st, *Repeat around, join and fasten off

Optional: Make tassle and add to top of hat

Lil Candle Covers


These lil candle are from the dollar store, small and great for several things after candle has been enjoyed. Fresh Spices, Bobbie Pins, Cre-mains, Seeds, etc. These covers make them nice for giving as gifts.
~~~~~~~~~~~~~~
SPECIAL STITCH: X ‘s & O’s Stitch:
skip 1 sts, 1 dc in next, then work 1 dc “BEHIND”
dc you just worked and into the front of st just skipped.
~~~~~~~~~~~~~~

H & F Hooks
WW Yarn
~~~~~~~~~~~~~
H hook
Row 1: ch4, join to frm ring, ch 2, 11 dc in ring, join to top

Row 2: ch 2, 1 dc in same st as ch, 2 dc in each st around, join (24 dc)

Row 3: ch 1, 1 sc in each st around in BL's Only, join (24 sc)

Row 4: 1 dc in each st around, join

Row 5: ch 2, *skip 1 sts, 1 dc in next, then work 1 dc “BEHIND”
dc you just worked and into the front of st just skipped.
* X st around, 1 dc in last st, join

Row 6: Repeat row 4

Row 7: Repeat row 5

Row 8: 1 hdc in each st around, join (24 hdc)

Row 9: 1 hdc in BL's Only around, join &  Finish off


TRIM: F Hook
Row 1: In FL's of row between row 8 & 9, join with sl st, ch 2,
sl st into front loop of next st, *ch 2, sl st in front
loop of next st... *Repeat around join and fasten off

Row 2: Top of row 9, join with sl st, ch 2, sl st in next st, ch 2, *
Repeat around, join & fasten off

Ch 60 with F hook, feed through "TOP" of row 8 around, tie in bow

Friday, April 27, 2012

Zarah Rose Shawl


Zarah Rose Shawl
I named this shawl after characters from a book I'm reading
Saving Hope  By: Margaret Daley


10  1/2 Needles
Lionbrand 1 pound yarn (cream)

Instructions:
Cast on 63 sts.
Knit 6 rows.

Pattern:
Row 1 (and all WS/odd rows): K3 P57 K3
Row 2: K7; (YO; SSK; K3) repeat to last 4 sts; K4
Row 4: K5; (K2Tog; YO; K1; YO; SSK; K1) repeat to last 4 sts; K4
Rows 6 and 8: K all sts.

Row 10: (K4; YO; SSK) repeat to last 5 sts; K5
Row 12: K5; (YO; SSK; K1; K2Tog; YO; K1) repeat to last 4 sts; K4
Rows 14 and 16: K all sts.

***Work these 16 rows in order  (18 times total)

Knit 6 rows. Bind off.

Weave in ends. Add fringe

Traveling Gnome's

On the 11th of April our Daughter Rhonda and I had an opportunity to go up to Eureka Springs and stay the night at the Crestent Hotel. I was so excited to be a part of this but it was the evening before we left that I was invited to go and I had "no" gnome's made up for traveling, and we were leaving first thing in the morning and I had no time to whip one up for our trip.

    Rhonda and I had such a fun time, just being together and being silly.

However I had no gnomes to leave our house keeper with her tip and I felt a lil sad about that. So when I got home I began to make a few up to have ready for this summer's fun trips.

Ron & I always leave one in the hotel with our tips for the house keeper to find and enjoy along with a note of Thanks for the wonderful clean room, and explaining to our housekeeper how much our gnomes love travel and having their photo taken and the responsability of naming the gnome was now hers as the gnome's new owner.

The 3 gnomes above are ready to go for a fun filled travel. One is going this up coming week as Ron and I prepare to slip away for a lil relaxing away from work and such.


My gnome pattern can be found at:
JMSQ's Version of a Simply A Gnome Pattern 
http://jeanariespatterns.blogspot.com/2010/11/simple-gnome.html


Hope you have fun sharing a few gnomes on your summer get-a-ways & making some wonderful memories

Friday, April 20, 2012

Merry Heart T-Bib

                                 "A merry heart doeth good like a medicine."
                                              Proverbs 17:22a (KJV)

A T-Bib is a bib that pulls over your babies head, NO buttons or ties.
One piece and so easy to use...

~~~~~~~~~~~~
This pattern was made from Sugar & Cream "COTTON".

NOTE: DO NOT PUT IN LAUNDRY DAMP:
As with "ALL" cotton, make sure you hang to air dry after use or it will
mold and you'll have a hard time getting the stink out of cloth
~~~~~~~~~~~
7 Needles

CO 64 sts *(leave a long tail to sew collar together)

Row's 1-6: k2, p2, across

~~~~~~~~~~~~~~
Row 7: [your now going to BIND OFF the FIRST 13 STS, k2, p2,
these sts as you bind them off]
k38, k2, p2 across (51 STS)
Row 8: [your now going to BIND OFF the FIRST 13 STS, k2, p2,
these sts as you bind them off]
k4, p30, k4 (38sts)
~~~~~~~~~~~~~~


Row's 9, 11, 13, 15, 17, 19, 21, 23, 25, 27, 29, 31, 33, 35,
37, 39, 41, 43, 45, 47, 49, 51,[ALL ODD Row's: KNIT ACROSS]


Row 10: k4, p6, k5, p8, k5, p6, k4

Row 12: k4, p4, k9, p4, k9, p4, k4

Row 14: k4, p3, k4, p3, k4, p2, k4, p3, k4, p3, k4

Row 16: k4, p2, k4, p5, k8, p5, k4, p2, k4

Row 18: k4, p2, k4, p6, k6, p6, k4, p2, k4

Row 20: k4, p2, k4, p8, k2, p8, k4, p2, k4

Row 22: k4, p2, k4, p18, k4, p2, k4

Row's 24-30: Repeat row 22

Row 32: k4, p3, k4, p16, k4, p3, k4

Row 34: k4, p4, k4, p14, k4, p4, k4

Row 36: k4, p5, k4, p12, k4, p5, k4

Row 38: k4, p6, k4, p10, k4, p6, k4

Row 40: k4, p7, k4, p8, k4, p7, k4

Row 42: k4, p8, k4, p6, k4, p8, k4

Row 44: k4, p10, k4, p2, k4, p10, k4

Row 46: k4, p11, k8, p11, k4

Row 48: k4, p12, k6, p12, k4

Row 50: k4, p14, k4, p14, k4

Row 52: k4, p30, k4
Row 53-56: k across ...bind off turn right sides together, whip st the two ends of collar together [securly]
Tuck in tails

side view

Wednesday, April 18, 2012

Mother's Love T-Bib

This is called Mother's Love. It has a single row of X's & O's at the top "only" next to the collar, so that baby's spit  up doesn't get onto clothes.
A T-Bib is a bib that pulls over your babies head, NO buttons or ties. One piece and so easy to use.

~~~~~~~~~~~~~~~~~~~~~~~~~~~~~~~~~
"T Bib Neck Pattern idea" came from  Suzetta @
All Suzy's patterns can be found at:
http://suzies-yarnie-stuff.blogspot.com/
Please take a few moments and check out some of Suzy's patterns.
She put in much time & love in creating her patterns.
~~~~~~~~~~~~~~~~~~~~~~~~~~~~~~~~~~

H Hook
Tapestry needle

Special Sts used:
X st: skip 1 st, dc in next st, 1 dc over front & into st just
skipped (X st just made)


This pattern was made from Sugar & Cream "COTTON".

NOTE: DO NOT PUT IN LAUNDRY DAMP:
As with "ALL" cotton, make sure you hang to air dry after use or it will
mold and you'll have a hard time getting the stink out of cloth

SIZE:
Approximately 7.5 inches wide by 8.5 inches long. 


T-NECK:
Row 1:  Ch 7, sc in 2nd ch from hook remaining 5 chs.  Ch 1, turn.  (6 sc)
Rows 2-46:  Sc in the back loop across.  Ch 1, turn.  (6 sc)
Joining: Holding beginning row together with last row, sl st through back 
loop of row just completed and unused loop of beginning ch. 
This is the wrong side.  Ch 1, turn right side out. ~DO NOT FINISH OFF~


Mother's Love BIB Pattern: { 2012 @ JMSQ}
Row 1: Working over beginning tail.  Sc in the side of 25 rows.   (25 sc)

Row 2, ch2, *skip 1 st, dc in next st, 1 dc over front & into st just skipped
(X st just made), Repeat across (14 X sts plus ch 2)
Row 3: ch 2, hdc in 1st st, and in each st across

Row 4: ch 2,1 dc in 1st st and in each st across
Row 5: ch 2, hdc in 1st st, and in each st across

Repeat row 4 & 5 (5 more times)
Row 15: Repeat row 3

Row 16: ch 1, skip 1st, **5 dc in next st, skip next st, sl st in next st, skip
next st, **Repeat across ending with a sl st in last st, finish off (6 shells)

Tuesday, April 17, 2012

GranO's T Bib


A T-Bib is a bib that pulls over your babies head, NO buttons or ties. One piece and so easy to use

~~~~~~~~~~~~~~~~~~~~~~~~~~~~~~~~~~
"T Bib Neck Pattern idea" came from  Suzetta @
All Suzy's patterns can be found at:
http://suzies-yarnie-stuff.blogspot.com/
Please take a few moments and check out some of Suzy's patterns.
She put in much time & love in creating her patterns.
~~~~~~~~~~~~~~~~~~~~~~~~~~~~~~~~~~

H Hook
Tapestry needle

This pattern was made from Sugar & Cream "COTTON".


*NOTE: DO NOT PUT IN LAUNDRY DAMP:
As with "ALL" cotton, make sure you hang to air dry after use or it will
mold and you'll have a hard time getting the stink out of cloth

SIZE:
Approximately 7.5 inches wide by 8.5 inches long. 

T-NECK:
Row 1:  Ch 7, sc in 2nd ch from hook remaining 5 chs.  Ch 1, turn.  (6 sc)

Rows 2-46:  Sc in the back loop across.  Ch 1, turn.  (6 sc)
Joining: Holding beginning row together with last row, sl st through back 
loop of row just completed and unused loop of beginning ch. 
This is the wrong side.  Ch 1, turn right side out. ~DO NOT FINISH OFF~


                                                    {Side View folded in half}

                                GranO's BIB Pattern: {April 2012 @ JMSQ}

Row 1: Working over beginning tail.  Sc in the side of 25 rows. (25 sc)

Row's 2-17: ch 3, skip 2 sts, *(1 sc & 1 dc in next st), skip next st,
                   *Repeat to end of row, sc in last st, ch 2, turn

Row 18: ch 1, *skip next st, 5 dc in st, sl st in next st, *Repeat to end,
                       sl st in last st, finish off

Tuesday, March 27, 2012

TOPS - Prayer Shawl

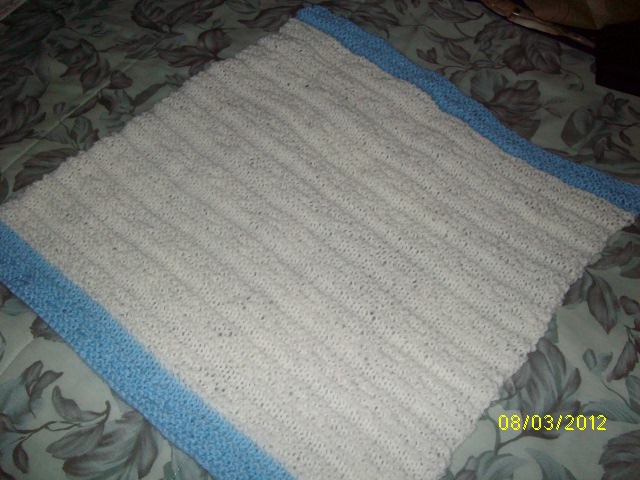
This is the Prayer Shawl I made for our TOPS (AR #55) group to be raffled off in June at out Fun Days event. So plan on joining us and have a great time.

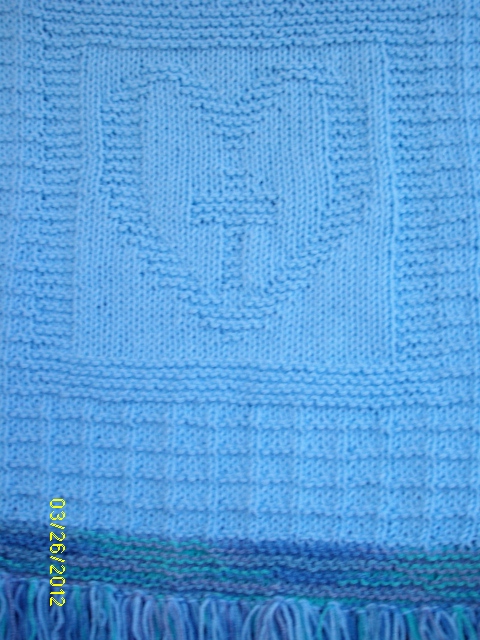
One end has the Praying Hands on it and the other end has the Heart with Cross inside. This shawl will also have a Special TOPS charm sewn into the fringe so the winner of this raffle with always have a constant reminder of God's Almighty Love for her and a charm reminder of what TOPS can do for her.


This is a combination of 3 patterns. The Open Blind Shawl,
The Praying Hands cloth, & the Jesus in my Heart Cloth
Patterns..

The Shawl is called Open Blind Shawl and can be found here:
http://jeanariespatterns.blogspot.com/2010/11/open-blind.html

Praying Hands can be found here: (Used with permission)
http://www.knitwits-heaven.com/

Loving Heart with Cross inside can be found here:
http://jeanariespatterns.blogspot.com/2012/02/jimh.html

This is how I put them together to creat this beautiful shawl.

10 1/2 Needles
WW Yarn
2 stitch markers
PM = Place Markers
~~~~~~~~~~~~~~~~~~

CO 67
Row's 1-10: Knit across

Row 11: Knit across
Row 12: Knit 4, purl to last 4 sts, Knit 4
Row 13: Knit across
Row 14 : Knit 7, P1, K3; p1, * Repeat (k3, p1, to last 7, Knit)

Repeat row's 11-14  4 more times in order

                                            adding Praying Hands Here

Row 31: k10, (p1, k1, to last st before marker, p1 last st), k10
Row 32: k4, p6, (p1, k1, to last st before marker, p1 last st), p6, k4
Row 33: k10, (p1, k1, to last st before marker, p1 last st), k10
Row 34: k7, p1, k2, p1, k1, p43, k1, p1, k2, p1, k7

Row 35: k10,  p1, k1, p1,  k41, p1, k1, p1, k10
Row 36: k4, p6, p1, k1, p16, k3, p8, k2, p14, k1, p1, p6, k4
Row 37: k10, p1, k1, p1, k12, p4, k5, p6, k14, p1,
        k1, p1, k10
Row 38: k7, p1, k2, p1, k1, p15, k1, p4, k2, p4, k1, p2, k3, p11,
        k1, p1, k2, p1, k7

Row 39: k10, k1, p1,k8, p3, k3, p2, k2, p3, k3, p4, k13,
        p1, k1, p1, k10
Row 40: k4, p6, p1, k1, p12, k2, p4, k2, p3, k2, p2, k2, p4,
        k2, p8, k1, p1, p6, k10
Row 41: k10,  p1, k2, p1, k1, p1, k6, p2, k4, p2, k2, p2, k3,
        p2, k6, p2, k10, p1, k1, p1, k10
Row 42: k7, p1, k2, p1, k1, p10, k2, p8, k2, p3, k2, p2, k2,
        p4, k2, p6, k1, p1, k2, p1, k7

Row 43: k10, p1, k1, p1,[k4, p2 2x times], k2, p2, k4, p1, k10,
        p1, k9, p1, k1, p1, k10
Row 44: k4, p6, p1, k1, p10, k1, p3, k3, p1, k4, p5, k2, p2,
        [k2, p4, 2x times], k1, p1, p6, k4
Row 45: k10, p1, [k4, p2, 2x times], k3, p1, k5, [p3, k1, 2x times],
        p2, k1, p2, k9, p1, k1, p1, k10
Row 46: k7, p1, k2, p1, k1, p11, k3, p8, k1, p2, k2, p1, k2, p2, k2,
        k1, p1, p3, k2, p2, k1, p1, k2, p1, k7

Row 47: k10, p1, k2, p2, k3, p2, k4, p2, k3, p2, k10, p3, k10, p1,
        k1, p1, k10
Row 48: k4, p6, p1, k1, p12, k1, p10, k2, p5, k1, p4, k2, p4, k1,
        p1, k1, p1, p6, k4
Row 49: k10, p1, k2, p1, k3, p2, k4, p2, k6, p3, k5, p4, k11, p1,
        k1, p1, k10
Row 50: k7, p1, k2, p1, k1, p11, k4, p4, k4, p8, k2, p4, k5, p1,
        k1, p1, k2, p1, k7

Row 51: k10, p1, k3, p2, k5, p2, k11, p3, k6, p2, k9, p1, k1,
        p1, k10
Row 52: k4, p6, p1, k1, p9, k2, p6, k2, p14, k2, p4, k2, p2, k1,
        p1, p6. k4
Row 53: k10, p1, k4, p6, k16, p2, k5, p2, k8, p1, k1, p1, k10
Row 54: k7, p1, k2, p1, k1, p8, k2, p6, k2, p17, k3, p5, k1, p1,
        k2, p1, k7

Row 55: k10, p1, k1, p1, k8, p2, k15, p1, k7, p2, k6, p1, k1, p1, k10
Row 56: k4, p6, p1, k1, p6, k2, p7, k2, p14, k2, p10, k1, p1, p6, k4
Row 57: k10, p1, k1, p1, k9, p2, k14, p2, k7, p2, k5, p1, k1, p1, k10
Row 58: k7, p1, k2,p1, k1, p5, k2, p7, k2, p15, k2, p10, k1, p1,
             k2, p1, k7

Row 59: k10, p1, k1, p1, k9, p2, k15, p2, k7, p2, k4, p1, k1, p1, k10
Row 60: k4, p6, p1, k1, p4, k2, p7, k2, p16, k2, p10, k1, p1, p6, k4
Row 61: k10, p1, k1, p1, k9, p2, k16, p2, k8, p1, k3, p1, k1, p1, k10
Row 62: k7, p1, k2, p1, k1, p3, k2, p7, k1, p17, k2, p11, k1, p1,
        k2, p1, k7

Row 63: k10, p1, k1, p1, k10, p2, k17, p2, k6, p2, k4, p1, k10
Row 64: k4, p6, p1, k1, p2, k2, p7, k2, p17, k2, p11, k1, p1, p6, k4
Row 65: k10, p1, k1, p1, k10, p2, k18, p1, k5, p1, k1, p2, k3, p1, k10
Row 66: k7, p1, k2,p1, k1, p1, k2, p2, k2, p4, k1, p18, k2, p11, k1,
             p1, k2, p1, k7

Row 67: k10, p1, k1, p1, k11, p2, k17, p1, k4, p2, k2, p2, k2, p1, k10
Row 68: k4, p6, p1, k1, p1, k2, p2, k2, p3, k2, p17, k2, p12, k1, p1,
        p6, k4
Row 69: k10, p1, k1, p1, k11, p2, k13, p1, k3, p2, k4, p2, k1, p2, k2,
        p1, k10
Row 70: k7, p1, k2, p1, k1, p1, k2, p1, k1, p5, k1, p3, k2, p12, k2,
        p13, k1, p1, k2, p1, k7

Row 71: k10, p1, k1, p1, k12, p2, k9, [p1, k3, 2x times], p2, k4,
        p1, k1, p2, k2, p1, k10
Row 72: k4, p6, p1, k1, p1, k2, p1, k1, p4, k1, p3, k2, p2, k2,
        p9, k2, p13, k1, p1, p6, k4
Row 73: k10, p1, k1, p1, k12, p2, k3, p2, k1, p1, k3, p1, k2,
        p2, k3, p2, k2, p2, k1, p2, k2, p1, k10
Row 74: k7, p1, k2, p1, k1, p1, k2, p1, k2, p2, k1, p3,
        [k2, p2, 2x times], k2, p1, k2, p3, k2, p13, k1, p1, k2, p1, k7

Row 75: k10, p1, k1, p1, k13, p2, k3, p2, k1, p1, k3, p1, k2, p2, k3, p2,
        k1, p1, k2, p2, k2, p1, k10
Row 76: k4, p6, p1, k1, p1, k2, p4, k1, p3, [k2, p2, 2x times], k2, p1,
        k1, p4, k2, p14, k1, p1, p6, k4
Row 77: k10, p1, k1, p1, k13, p2, k4, p2, k1, [p1, k3, 3x times], p2,
        k3, p2, k2, p1, k10
Row 78: k7, p1, k2, p1, k1, p1, k2, p3, k1, p3, [k2, p2, 2x times],
        k2, p1, k2, p15, k1, p1, k2, p1, k7

Row 79: k10, p1, k1, p1, k15, p2, k1, p3, [k2, p2, 2x times], k2, p1,
        k3, [p2, k2, 2 x times]. p1, k10
Row 80: k4, p6, p1, k1, p2, k1, p2, k2, p2, k2, p2, k1, p3, k1, p2,
        k2, p1, k3, p17, k1, p1, p6, k4
Row 81: k10, p1, k1, p1, k21, p1, [k2, p2, 2x times] k2, p1, k2,
        p2, k1, p2, k3, p1, k10
Row 82: k7, p1, k2, p1, k1, p2, k2, [p1, k2, 3x times]
        [p2, k2, 2x times] p22, k1, p1, k2, p1, k7

Row 83: k10, p1, k1, p1, k22, [p2, k2, 2x times], p1, k2, p3,
        k2, p1, k4, p1, k10
Row 84: k4, p6, p1, k1, p3, k1, [p2, k2, 2x times], p1, k2,
        p2, k2, p24, k1, p1, p6, k4
Row 85: k10, p1, k1, p1, k24, p2, k2, [p2, k1, 3x times],
        p2, k2, p1, k1, p1, k10
Row 86: k7, p1, k2, p1, k1, p3, [k2, p1, 4x times], k2,
        p26, k1, p1, k2, p1, k7

Row 87: k10, p1, k1, p1, k26, [p2, k1, 3x times], k2, p1,
        k3, p1, k1, p1, k10,
Row 88: k4, p6, p1, k1, p4, k1, p2, k1, p3, k4, p28, k1,
        p1, p6, k4
Row 89: k10, p1, k1, p1, k28, p5, k1, p1, k1, p2, k3,
        p1, k1, p1, k10
Row 90: k7, p1, k2, p1, k1, p7, k4, p32, k1, p1, k2, p1, k7

Row 91: k10, p1, k1, p1, k41, p1, k1, p1, k10
Row 92: k4, p6, p1, k1, p43, k1, p1, p6, k4
Row 93: k10, [p1, k1 to last st before marker, p1], k10
Row 94: k7, p1, k2, [p1, k1, to last st. before marker, k1,],
        k2, p1, k7

NOTE: You will remove markers on this row
Row 95: k10, [p1, k1, to last st. before marker, k1,], k10
Row 96: Repeat row 12
Row 97: Repeat row 13
Row 98: Repeat row 14

Repeat Row's 11-14 (23 more times)
DO NOT BIND OFF


                                 {Heart is worked from the top down}

Row 191: k across
Row 192: k4, p11, k38, p10, k4
Row 193: k across
Row 194: k7, p1, k3, p1, k3, k38, k2, p1, k3, p1, k7

Row 195: k across
Row 196: k4, p11, k38, p10, k4
Row 197: k across
Row 198: k7, p1, k3, p1, k3, [PM, k38, PM], k2, p1, k3, p1, k7

Row 199: k across
Row 200: k4, p11, k4, p6, k5, p8, k5, p6, k4, p10, k4
Row 201: k across
Row 202: k7, p1, k3, p1, k3, k4, p4, k9, p4, k9, p4, k4, k2,
         p1, k3, p1, k7

Row 203: k across
Row 204: k4, p11, k4, p3, k4, p3, k4, p2, k4, p3, k4, p3, k4
         p10, k4
Row 205: k across
Row 206: k7, p1, k3, p1, k3, k4, p2, k4, p5, k8, p5, k4, p2,
         k4, k2, p1, k3, p1, k7

Row 207: k across
Row 208: k4, p11, k4, p2, k4, p6, k6, p6, k4, p2, k4, p10, k4
Row 209: k across
Row 210: k7, p1, k3, p1, k3, k4, p2, k4, p7, k4, p7, k4, p2,
         k4, k2, p1, k3, p1, k7


Row 211: k across
Row 212: k4, p11, k4, p2, k4, p8, k2, p8, k4, p2, k4, p10, k4
Row 213: k across
Row 214: k7, p1, k3, p1, k3, k4, p2, k4, p18, k4, p2, k4, k2,
         p1, k3, p1, k7

Row 215: k across
Row 216: k4, p11, k4, p2, k4, p8, k2, p8, k4, p2, k4, p10, k4
Row 217: k across
Row 218: k7, p1, k3, p1, k3, k4, p2, k4 p8, k2, p8, k4, p2, k4,
         k2, p1, k3, p1, k7

Row 219: k across
Row 220: k4, p11, k4, p2, k4, p5, k8, p5, k4, p2, k4, p10, k4
Row 221: k across
Row 222: k7, p1, k3, p1, k3, k4, p2, k4, p5, k8, p5, k4, p2,
         k4, k2, p1, k3, p1, k7

Row 223: k across
Row 224: k4, p11, k4, p3, k4, p4, k8, p4, k4, p3, k4, p10, k4
Row 225: k across
Row 226: k7, p1, k3, p1, k3, k4, p4, k4, p6, k2, p6, k4, p4,
         k4, k2, p1, k3, p1, k7

Row 227: k across
Row 228: k4, p11, k4, p5, k4, p5, k2, p5, k4, p5, k4, p10, k4
Row 229: k across
Row 230: k7, p1, k3, p1, k3, k4, p6, k4, p4, k2, p4, k4 p6, k4,
         k2, p1, k3, p1, k7

Row 231: k across
Row 232: k4, p11, k4, p7, k4, p3, k2, p3, k4, p7, k4, p10, k4
Row 233: k across
Row 234: k7, p1, k3, p1, k3, k4, p8, k4, p2, k2, p2, k4, p8,
         k4, k2, p1, k3, p1, k7

Row 235: k across
Row 236: k4, p11, k4, p10, k4, p2, k4, p10, k4, p10, k4
Row 237: k across
Row 238: k7, p1, k3, p1, k3, k4, p11, k8, p11, k4, k2, p1, k3, p1, k7

Row 239: k across
Row 240: k4, p11, k4, p12, k6, p12, k4, p10, k4
Row 241: k across
Row 242: k7, p1, k3, p1, k3, k4, p14, k2, p14, k4, k2, p1, k3, p1, k7

Row 243: k across
Row 244: k4, p11, k4, p30, k4, p10, k4
Row 245: k across
Row 246: k7, p1, k3, p1, k3, k38, k2, p1, k3, p1, k7

Row 247: k across
Row 248: k4, p11, k38, p10, k4
Row 249: k across
Row 250: k7, p1, k3, p1, k3, k38, k2, p1, k3, p1, k7

Row 247: k across
Row 248: k4, p11, k38, p10, k4
Row 249: k across
Row 250: k7, p1, k3, p1, k3, [Remove Markers] k38, k2, p1, k3, p1, k7

Repeat row's 11-14 (5 times)

Knit last 10 rows, Bind off add fringe

Monday, February 27, 2012

Jesus In My Heart

                                         "JMSQ "Copyright © 2012
This Prayer Cloth was designed for a "Special Prayer Shawl" I'm creating for our TOPS group to be actioned off in June 2012. I'm pleased with the way it turned out.. Hope you enjoy

This cloth was made with Red-Heart WW Yarn, but you can use any
color of solid cotton to make for a dish cloth is you desire

9 3/4" X 10"         7 Neeldes

CO 38

Row 1-8: Knit across

Row 9: Knit across
Row 10: k4, p30, k4

Row's 11, 13, 15, 17, 19, 21, 23, 25, 27, 29,
31, 33,  35, 37, 39, 41, 43, 45, 47, 49, 51,
KNIT ACROSS


Row 12: k4, p14, k2, p14, k4

Row 14: k4,  p12, k6, p12, k4

Row 16: k4, p11, k8, p11, k4

Row 18: k4, p10, k4, p2, k4, p10, k4

Row 20: k4, p8, k4, p2, k2, p2, k4, p8, k4

Row 22: k4, p7, k4, p3, k2, p3, k4, p7, k4

Row 24: k4, p6, k4, p4, k2, p4, k4, p6, k4

Row 26: k4, p5, k4, p5, k2, p5, k4, p5, k4

Row 28: k4, p4, k4, p6, k2, p6, k4, p4, k4

Row 30: k4, p3, k4, p4, k8, p4, k4, p3, k4

Row 32: k4, p2, k4, p5, k8, p5, k4, p2, k4

Row 34: k4, p2, k4, p8, k2, p8, k4, p2, k4

Row 36: k4, p2, k4, p8, k2, p8, k4, p2, k4

Row 38: k4, p2, k4, p18, k4, p2, k4

Row 40: k4, p2, k4, p8, k2, p8, k4, p2, k4

Row 42: k4, p2, k4, p7, k4, p7, k4, p2, k4

Row 44: k4, p2, k4, p6, k6, p6, k4, p2, k4

Row 46: k4, p2, k4, p5, k8, p5, k4, p2, k4

Row 48: k4, p3, k4, p3, k4, p2, k4, p3, k4, p3, k4

Row 50: k4, p4, k9, p4, k9, p4, k4

Row 52: k4, p6, k5, p8, k5, p6, k4,


Row 53: Knit Across
Row 54: k4, p30, k4

Row's 55-62: Knit Across & Bind Off