"Childrens Hospital Donation"

"Childrens Hospital Donation"
This is the load of Baby Hats, Blankies, Teddy's Bears & Dolls we took to
Childrens Hospital In Little Rock today.. There are over 400 Baby hats...

Monday, December 26, 2016

Christmas Bonnet (C)

                        "JMSQ "Copyright 2016 12/25/2016

 H Hook
Read Heart WW 4 ply yarn

READ NOTES as you work this pattern:
...
Row 1.) ch 4, join to form circle, ch 4, *1 dc, ch 1,
*Repeat 10 more times in circle, join to 3rd ch of
ch 4 (12 dc's & ch 1's)

Row 2.) sl st into ch 1 space, ch 2, 1 dc in same st,
ch 1, *2dc, ch 1 in each ch 1 space around, join to top
of ch 2

Row 3.) sl st into ch 1 space, ch 2, 2 dc in same st,
ch 1, *3dc, ch 1 in each ch 1 space around, join to top of ch 2

Row 4.)sl st into ch 1 space, ch 2, 1 dc, ch 1, 2dc, ch 1
in same st, *V st in each ch 1 space around, (2 dc,
ch1, 2 dc, ch 1) in each ch 1 space around.join to top
of ch 2

Row 5.)sl st into ch 1 space, ch 2, 1 dc in same st, ch 1,
*2dc, ch 1 in "each" ch 1 space around, join to top of ch 2

Row 6.)sl st into ch 1 space, ch 2, 2 dc in same st, ch 1,
*3dc, ch 1 in each ch 1 space around, join to top of ch 2

Row 7.) sl st into ch 1 space, 1 dc in each dc (NOT CH SPACES)

 *Repeat around, join

Row's 8 & 10) ch 2, skip 1 dc, 1 dc in next dc, 1 dc in dc just skipped,
[X st just made] *Repeat around until last st, 1 dc in last st, join

Row's 9 & 11:) ch 2, 1 dc in each st aroud, join (72 sts)

Row 12: 1 sc around, join:

NOTE:
For thicker hair & deeper hat repeat row's 8 & 9
1 more time then move on to row 13

Row 13.) sl st into 12 sts, 1 dc in each of next 48 sts, ch 2 turn
(leaving last 12 sts un worked) - [total un-worked sts 24]

Row's 14-17.) 1 dc in each st across, ch 2 turn

Row 18 & 19) 1 sc across, finish off


Tassle - Fringe: Make 2:
Cut 8 strands (about 10" each)
insert hook from inside corner of bonnet brim and grab
loop of yarn, pull through, slip strands into loop and gently pull.

Repeat for other tassle


Saturday, November 12, 2016

Easy Fingerless Gloves

                       "JMSQ "Copyright © Nov.2016

8 Needles

CO 36 - (long tail for sweing side seam)

Row's 1-5: Knit Across

6. K across
7. P across
8-9: Knit across

*Repeat row's 6-9 (6 more times)

34. Knit across
35. P across
36-40. k2, p2

Bind Off (Long Tail for sewing side seam)

NOTE:
There are 7 ribs from rows 8&9. Mark from 3-5 on ribs (this is where your thumb space is and left un-sewn) sew together ends

Also if glove is to wide, co on 4 sts less and follow pattern

Thursday, August 11, 2016

Wrist Gems

                         "JMSQ "Copyright © 2016
{These little gems hanging from the ears on this lovie are quick and so
easy to make, great accessory  to your favorite outfit... Perfect for that
teenager to be hip with her friends}

H Hook

1.) ch 28, join, 1 sc in each st around, join

2.) ch 2, 1 dc to the "right" of ch st, (X st made); now were back to
working towards the left, *skip 1 st, 1 dc in the next st, 1 dc in st
just skipped, *Repeat around, join

3.) 1 sc in each st around, join & fasten off


NOTE:
if you want your Wrist Gems wider, work another row 2, followed
by another row 3

Lacy NeckWarmer -or- Scarf

 "JMSQ "Copyright © 2016
Scarf Measures 4 1/2" x 30"
Neck Warmer Measures 4 1/2" x 34"

10 Needles

Long tail cast on 17 sts
knit 3 rows then follow pattern below

Pattern:
1.) K across

2.) K2, P13, K2

3.) K2, *yo, k2 tog, *Repeat to last st, knit last st

4.) K across

{SCARF: Repeat Pattern row's 1-4 ~ 40 more times}
{NECK WARMER: Repeat Pattern 1-4  ~ 45 more times}

Knit 3 rows and bind off

                              Perfect Neck Warmer

lay out just as I have above and sew around edges on bottom, add buttons for a fashion statement and off you go for that fun day in the winter

Saturday, July 30, 2016

Red -N- Purple Bags

                    "JMSQ "Copyright © 2016

     I belong to several groups. A lot of the ladies are making bags for the little girls and babies to put their little girly things in to carry. This is a great idea of you desired to use these 2 bags for this.

     Winter is quickly coming upon us, I thought I'd use these bags to put a couple sanitary napkins for the homeless ladies (privacy issues), and then place the bags in a gallon size zip-loc bag filled with new socks, winter scarf, gloves, tooth brush, applesauce, TP  etc. Then I thought I keep a few in our van and take the rest to the "House of Hope" for the homeless and Low Income families

~~~~~~~~~~~~~~~~~~~~~~~
H Hook

Red Bag = 6 1/2" X 6 3/4".
Purple Bag = 6 1/2" X 6 1/4 "

~~~~~~~~~~~~~~~~~~~~~~~

RED BAG
Special instructions:

X st:
*skip 1 st, 1 dc in next st, 1 dc in st just skipped *Repeat around, join
NOTE: Row's 5-9

you can work 2 dc, ch 1 around and work in each of
the ch 1 spaces if desired, this bag is down without the
ch 1 space but worked just the same as if done


Purple BAG
Special instructions:

X st:
*skip 1 st, 1 dc in next st, 1 dc in st just skipped *Repeat around, join
NOTE: Row's 5-9
~~~~~~~~~~~~~~~~~~~~~~~~~~~~~

Red Bag:
1.) ch 20, 1 hdc in 2nd ch from hoom, 1 hdc in each st
to end, 3 hdc in last st, 1 hdc in each st along opposite
side of of ch to end, 1 hdc in base of beginning st,
join (40 sts)
2-3.) 1 dc in each st around, join, ch 3 (40 sts)
4.) ch 3, 1 dc in same st, skip next st, 2 dc in next st,
skip next st *Repeat around, join (40 sts)
5-9.) Slip in space between the 2 sets of 2 dc, ch 3,
1 dc in same st, *in each space BETWEEN the 2 dc, work 2 dc,
around, join to top of ch 3 (40 sts

NOTE:
you can work 2 dc, ch 1 around and work in each of
the ch 1 spaces if desired, this bag is down without the
ch 1 space but worked just the same as if done

10.) ch 2, 1 hdc in each of st around, join
11.) *skip 1 st, 1 dc in next st, 1 dc in st just skipped
*Repeat around, join
12.) Repeat row 10

Change colors if desired

13.) Repeat row 10
14.) 1 dc in each of next 5 sts, ch 12, skip 10 sts, 1 dc
in each of next 10 sts, ch 12, skip next 10 sts, 1 dc in
each of next 5 sts, join
15.) Repeat row 10... Fasten off


Flower:
ch 3, join, 10 sc in ring, join, ch 10, sl st in same st,
ch 10, sl st in next st, *ch 10, sl st in same st, ch 10,
sl st in next st, *Repeat around, join ans sew in front of bag
~~~~~~~~~~~~~~~~~~~~~~~~~~~~~~~~~~~

Purple Bag:

1.) ch 20, 1 dc in 2nd ch from hoom, 1 dc in each st
to end, 3 dc in last st, 1 dc in each st along opposite
side of of ch to end, 1 dc in base of beginning st,
join (40 sts)
2-3.) 1 dc in each st around, join, ch 3 (40 sts)
4.) *skip 1 st, 1 dc in next st, 1 dc in st just skipped
*Repeat around, join
5-6.) 1 dc in each st around, join, ch 3 (40 sts)
7.)  *skip 1 st, 1 dc in next st, 1 dc in st just skipped
*Repeat around, join
8-9.) 1 dc in each st around, join, ch 3 (40 sts)

Change color if desired

10.) Repeat row 5
11.) 1 dc in each of next 5 sts, ch 12, skip 10 sts, 1 dc
in each of next 10 sts, ch 12, skip next 10 sts, 1 dc in
each of next 5 sts, join
12.) 1 hdc in each st around, join... Fasten off


Flower:
ch 3, join, 10 sc in ring, join, ch 10, sl st in same st,
ch 10, sl st in next st, *ch 10, sl st in same st, ch 10,
sl st in next st, *Repeat around, join ans sew in front of bag

Thursday, July 28, 2016

Bunny, Bear, & Octopus Lovies

                    "JMSQ "Copyright © 2016

H Hook

 Perfect Head (ALL Lovies):

1.) ch 4, join, ch 2, 11 dc in ring, join (12)
2.), ch 2, 2 dc in each st, Join, (24)
3.) ch 2,1 dc in same st, 2 dc in next st,
*1 dc in next st, 2 dc in next st, *Repeat, join (18)
4-9.) ch 1, 1 hdc in each st, join

{Place face on head now}

10.) ch 1, *1 hdc, 2 hdc 2tog, *Repeat, join (24)
11.) ch 1, *2hdc 2tog *Repeat around, join (12)

{STUFF}

12.) ch 1, *1 sc 2 tog *Repeat (6)

NOTE:
I do this just before attaching to lovie blankie, thus I'm able
to tuck in all ties etc.

FASTEN Off, weave LONG TAIL through last 6 stsm pull
tight to close, sew on blankie (

 ~~~~~~~~~~~~~~~~~~~~~~~~~~~~~
   

                            Bunny Ears: Make 2 (H Hook)

1.) ch 10, 1 dc in 2nd ch from hook, 1 dc in each st to end,
3 dc in last ch, turn and work along opposite side, i dc in
each st, 1 dc in base of beginning, join
2.) ch 2, 2 dc in each of nest 3 sts, 1 dc in next 4 sts,
2 dc in each of next 5 sts, 1 dc in next 4 sts, 2 dc in
last 2 sts. join

Fasten off leaving long tail to sew on bunny head

NOTE:
Ear's are attached over rows 2-3

Add fase as desired, I made sleepy eyes & nose on this bunny
~~~~~~~~~~~~~~~~~~~~~~~~~~~~~~~
Curl Paws For Bunny, &  Bear : Make 2 (G hook)

ch 15, 4 hdc in 2nd ch from hook, 4 hdc in each of
next 3 sts, 3 dhc in each remaining st up to last 2 sts,
1 hdc in each of last 2 sts, fasten off leave long enough
 tail to tie on base of bunny head.

Attach between row's 10-11
~~~~~~~~~~~~~~~~~~~~~~~~~~~~~~~~

Teddy Bear (Face Piece's) - G Hook

Ears  make 2 pieces
 Round1. Make magic ring and 6sc in ring (6)
 Round2. 2sc in each st around (12)
 Round3. *Sc in next st, 2sc in next st* and
 repeat from * around (18)
 Round4-7. sc in each st around (18)

 Then finish of leave long tail for sewing
 and stuffing polyester just a little .

NOTE:
Ear's are attached over rows 2-3 (bend a little)

Nose for bear
 Round1. Make magic ring and 6sc in ring (6)
 Round2. 2Sc in each st around (12)
 Round3. sc in each st around (12)
 Finish of leave and long tail for sewing.

Tail:
1.) ch 2, 6 sc in 2nd ch from hook, join (6)
2.) 2 sc in each st, join
3.) 1 sc in each, join and fasten off leaving long
   tail to sew on bear
~~~~~~~~~~~~~~~~~~~~~~~~~~~~~~~~~~~~~~

Baby Octopus LEG's

Make head as above

Curly Q Legs: Make 8 (G hook)

Make 8:
ch 15, 4 hdc in 2nd ch from hook, 4 hdc in each of next 3 sts,
3 dhc in each remaining st up to last 2 sts, 1 hdc in each of last
2 sts, fasten off leave long enough tail to tie on base of head.


NOTE:
Evenly space legs around bottom of head, sew between row's
10 & 11. Make sure they are laying flat when sewing head to lovie

~~~~~~~~~~~~~~~~~~~~~~~~

                                Lovie Blankie:

NOTE:
ALL ch's at beginning of rows count as a stitch, and from row 3 on,
slip into ch 2 space of V sts

 Color A   Soft White
Color B   Color of choice

 H Hook

 Color A
 1.)ch 4 join, ch 3, 11 dc inring, join to top of ch 3 (12 sts)
 2.) CH 3, 2 dc in each st around, join to top of ch 3 (24 STS)

 3.) ch 5, 1 dc in same st, skip next stitch, *1 dc, ch 2, 1 dc
in next st,
[V st made], skip,next st, *Repeat around, join in 3rd st of ch 5 .
(12 V sts made)
 *** slip into ch 2 space of V sts at the beginning of each row
unless directed to
 do otherwise
 4.) slip into ch 2 space, 2 dc, ch 2, 2 dc in each V st around, join
to top of ch 3
 5.) slip into ch 2 space, 3 dc, ch 2, 3 dc in each V st around, join
to top of ch 3
 6.) slip into ch 2 space, 4 dc, ch 2, 4 dc in each V st around, join
to top of ch 3
 7.) slip into ch 2 space, 4 dc, ch 3, 4 dc, ch 1 in each V st around,
join to top of ch 3
 8.) slip into ch 2 space, 5 dc, ch 2, 5 dc, ch 1 in each V st around,
join to top of ch 3

 Change to Color B

 9.) With color B, **Join in any stitch, 1 dc in each st, 1 dc
in ch 1 space, 1 dc in each st,
 3 dc in ch 2 space. **Repeat around, fasten off

 Change to Color A
 Join in any stitch, *1 sc in each st, 3 sc in center point of of ch 3,
*Repeat around

 Fasten off

Saturday, June 18, 2016

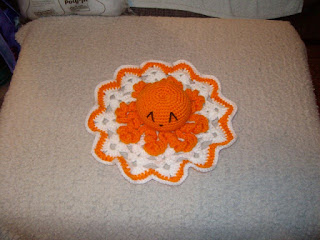
Bunny FuFu N Blankie

                            "JMSQ "Copyright © 2016
I made this with Orange because Bunnies eat carrots... Smile

G & H Hooks

Bunny FuFu:  G Hook

1.) ch 4, join, ch 2, 11 dc in ring, join (12 sts)

2.) ch 2, 2 dc in each st, join (24 sts)

3.) ch 2, *1 dc in st, 2 dc in next st, *Repeat, join (38 sts)

Row's 4-6.) ch 2, 1 dc in each st, join (38 sts)

Begin Decrease:
Row 7.) ch 2, *1 dc in same st, 2 dc tog,*Repeat, join (24 sts)

Row 8.) ch 2, *1 dc 2 tog, *Repeat, join (12 sts)
STUFF Head

9.) ch 1, *2 sc tog *Repeat, join (6 sts)
finish off leaving LONG TAIL to sew on lovie blankie


Ears: Make 2 (H Hook)

1.) ch 10, 1 dc in 2nd ch from hook, 1 dc in each st to end,
3 dc in last ch, turn and work along opposite side, i dc in
each st, 1 dc in base of beginning, join

2.) ch 2, 2 dc in each of nest 3 sts, 1 dc in next 4 sts,
2 dc in each of next 5 sts, 1 dc in next 4 sts, 2 dc in
last 2 sts. join
Fasten off leaving long tail to sew on bunny head


Curl Paws: Make 2 (G hook)
ch 15, 4 hdc in 2nd ch from hook, 4 hdc in each of next 3 sts, 3 hdc
in each remaining st up to last 2 sts, 1 hdc in each of last 2 sts,
fasten off leave long enough tail to tie on base of bunny head.

Add fase as desired, I made sleepy eyes & nose on this bunny


Lovie Blankie:

NOTE:
ALL ch's at beginning of rows count as a stitch, and from row 3 on,
slip into ch 2 space of V sts

 Color A   Soft White
Color B   Orange

 H Hook
Color A

 1.)ch 4 join, ch 3, 11 dc inring, join to top of ch 3 (12 sts)

 2.) CH 3, 2 dc in each st around, join to top of ch 3 (24 STS)

 3.) ch 5, 1 dc in same st, skip next stitch, *1 dc, ch 2, 1 dc in next st,
[V st made], skip,next st, *Repeat around, join in 3rd st of ch 5 .
(12 V sts made)

*** slip into ch 2 space of V sts at the beginning
of each row unless directed to  do otherwise

 4.) slip into ch 2 space, 2 dc, ch 2, 2 dc in each V st around, join
to top of ch 3

 5.) slip into ch 2 space, 3 dc, ch 2, 3 dc in each V st around, join
 to top of ch 3

 6.) slip into ch 2 space, 4 dc, ch 2, 4 dc in each V st around, join
 to top of ch 3

 7.) slip into ch 2 space, 4 dc, ch 3, 4 dc, ch 1 in each V st around,
join to top of ch 3

 8.) slip into ch 2 space, 5 dc, ch 2, 5 dc, ch 1 in each V st around,
join to top of ch 3


 Change to Color B
 9.) With color B, **Join in any stitch, 1 dc in each st, 1 dc in ch 1 space,
1 dc in each  st, 3 dc in ch 2 space. **Repeat around, fasten off


 Change to Color A
 Join in any stitch, *1 sc in each st, 3 sc in center point of of ch 3,
 *Repeat around .Fasten off

Friday, June 3, 2016

Jellyfish Lovie (C)

                    Measures just about 12"- 12 1/2"


As you can see there are many different way to dress up this little cutie, have fun and let your creative juices flow
 
This is the pattern for the Lovie Blankie, the pattern for the Jellyfish is at the bottom of this post...


NOTE:
ALL ch's at beginning of rows count as a stitch, and from row 3 on,
slip into ch 2 space of V sts

Color A   Soft White

Color B   Lime Green

H Hook

Color A

1.)ch 4 join, ch 3, 11 dc inring, join to top of ch 3 (12 sts)

2.) CH 3, 2 dc in each st around, join to top of ch 3 (24 STS)


3.) ch 5, 1 dc in same st, skip next stitch, *1 dc, ch 2, 1 dc in next st,
[V st made], skip,next st, *Repeat around, join in 3rd st of ch 5 . (12 V sts made)
*** slip into ch 2 space of V sts at the beginning of each row unless directed to
do otherwise

4.) slip into ch 2 space, 2 dc, ch 2, 2 dc in each V st around, join to top of ch 3

5.) slip into ch 2 space, 3 dc, ch 2, 3 dc in each V st around, join to top of ch 3

6.) slip into ch 2 space, 4 dc, ch 2, 4 dc in each V st around, join to top of ch 3

7.) slip into ch 2 space, 4 dc, ch 3, 4 dc, ch 1 in each V st around, join to top of ch 3

8.) slip into ch 2 space, 5 dc, ch 2, 5 dc, ch 1 in each V st around, join to top of ch 3

Change to Color B

9.) With color B, **Join in any stitch, 1 dc in each st, 1 dc in ch 1 space, 1 dc in each st,
3 dc in ch 2 space. **Repeat around, fasten off


Change to Color A
Join in any stitch, *1 sc in each st, 3 sc in center point of of ch 3, *Repeat around
Fasten off


Now is time to add your hand made toy to your Lovie... (Ideas - teddy bears, dolls, jelly Fish, etc.)


Find Jelly Fish Pattern Here:
http://www.1dogwoof.com/2016/05/crochet-jellyfish.html

Wednesday, May 25, 2016

Placemats w/ Silverware Pockets

                     Photo is mine (JMSQ 5/25/2016)

This is NOT my idea, a precious lady "Binte Hawa"  shared
this idea and her pattern for constructing it from a group on
facebook: (Yarn Wars FREE Crochet & Knit Community).

Binte's pattern as follows:
ch 50. 1 sc & 2 dc in same st, skip 2 sts *Repeat for 21 rows.
Make pocket separetly and attach to mat

This is just my take on the placemat w/silverware pocket
with my pattern.

J & H Hooks


Placemat: J Hook
1.) ch 57, (1 sc & 1 dc) in 3rd ch from hook, skip 1 st,
*1 sc & 1 dc in next st, skip next st, *Repeat across to last st,
1 sc in last st, ch 2, turn

2.) skip 1st st, *1 sc & 1 dc in nest st, skip next st, *Repeat
across to last stitch, 1 sc, ch 2 turn

Row's 3-30.) Repeat row 2, Fasten off, tuck in tail


Silverware Pocket: H hook
1.) Repeat row 1 from pattern above

2-8.) Repeat row 2 from pattern above,
DO NOT FASTEN OFF

9.) sc across top, finish off leaving LONG TAIL,
place on your mat, sew the 3 sides remaining,
tuck in tail

Tuesday, March 29, 2016

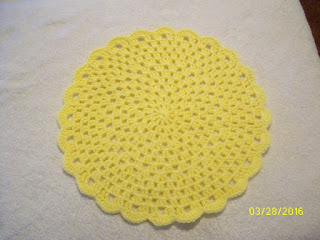
Place Settings

I {JMSQ} don't read charts, so looking at the photo's this is what I came up with as a pattern.


Original pattern is Service Places crochet free pattern at
yarn patterns crochet blog


G hook - 15" around

F hook next time & I'll post measurments


**NOTES:
*Ch 4 on row 1 & ch 2 on each row count as 1st st
**V st - 2 dc, ch 1, 2 dc in same

*** Now I was running out of yellow yarn, so instead of 3 dc's,
ch 1 in each ch 1 space around, I alternated 2 dcs, ch 1 and the
next 3dc's, ch 1 around. Still worked up nicely

Shell Border
(1 dc before ch 1 space, 5 dc's in ch 1 space, 1 dc after ch 1
space for a total of 7 dc's for shell border)
~~~~~~~~~~~~~~~~~~~~~~~~~~~~~~~~~~~~~~~~~~~~~~~~~~

1.) ch 4, join to form circle, ch 4, *1 dc, ch 1,
*Repeat 10 more times in circle, join to 3rd ch of
ch 4  (12 dc's & ch 1's)

2.) sl st into ch 1 space, ch 2, 1 dc in same st,
ch 1, *2dc, ch 1 in each ch 1 space around, join to top
of ch 2

3.) sl st into ch 1 space, ch 2, 2 dc in same st,
ch 1, *3dc, ch 1 in each ch 1 space around, join to top of ch 2

4.)sl st into ch 1 space, ch 2, 1 dc, ch 1, 2dc, ch 1
in same st, *V st in each ch 1 space around, (2 dc,
ch1, 2 dc, ch 1) in each ch 1 space around.join to top
of ch 2

5.)sl st into ch 1 space, ch 2, 1 dc in same st, ch 1,
*2dc, ch 1 in "each" ch 1 space around, join to top of ch 2

6.)sl st into ch 1 space, ch 2, 2 dc in same st, ch 1,
*3dc, ch 1 in each ch 1 space around, join to top of ch 2

7.) Repeat row 6

8.) Repeat row 4

9.) Repeat row 2

10.) Repeat row 2

11.) sl st into ch 1 space, ch 2, 1 dc in same st, ch 1
(2dc's, ch 1 in this space), *3dc, ch 1 in next ch 1 space,
** 2 dc, ch 1 in next ch 1 space, 3 dc, ch 1 in next st,
*Repeat around join to top of ch 2

12.) Repeat row 11 - DO NOT FINISH OFF


Shell Border
13.)sl st to last dc "BEFORE" ch 1 space, 1 dc in this st,
5 dc in ch 1 space, 1 dc next st (7 total for shell), 1 sc
in next ch 1 space, *1 dc in last dc of this group "BEFORE"
ch 1 space, 5 dc in ch 1 space, 1 dc in next st (7dc's total),
1 sc in next ch 1 space *Repeat around, join to top of ch 2,
finish off and tuck in tails

Monday, February 29, 2016

Prayer Shawl Letter


"Comforting Others One Stitch At A Time"

"Wearing a Shawl is like recieving a Hug from God".
This is our opportunity to Bless you who may be Ill,
Hurt, Depressed, Lonely or in need of Spiritual Comfort
with our Prayer Shawls.

“Shawls… made for centuries universal and embracing,
symbolic of an inclusive, unconditionally loving, God.
They wrap, enfold, comfort, cover, give solace, mother,
hug, shelter and beautify. Those who have received these
shawls have been uplifted and affirmed, as if given wings
to fly above their troubles…”
-Written in 1998 by: Janet Bristow 2004

While making this prayer shawl is a spiritual practice which
embodies our thoughts and prayers for you.

Made in prayer, as prayed for durning the making of our
shawls, for prayer is covering you the reciever with GOD,
with our Blessings & Wishes from our hearts to your heart,
our shawls are then passed on hand-to-hand and heart-to-heart.

Our Prayer
May God’s grace be upon this shawl, warming, comforting,
enfolding and embracing. May this shawl be a safe haven…
a sacred place of security and well being sustaining and
embracing in good times as well as difficult ones. May You
be cradled in hope, kept in joy, graced with peace,
and wrapped in love.

Please know that Ron & I are keeping you and your precious
family deep within our prayers

Blessings Ron & Jean OzarkPs_91@yahoo.com


 LAUNDERING: - Machine wash warm, gentle cycle, Tumble
dry low. Do not over dry. For best results on fringe,
hand wash, lay flat to dry, (ALWAYS wash separtly / alone)
never mix with other laundry either washing or drying)

Rita's Shawl


My latest shawl finished and delivered to it's new home (Rita Cole)
 
This is my Open Blind pattern
 
Praying Hands
 
Reverse Single  Cross 
 
When making this pattern, you CO 67 sts and work open blind pattern for 30 rows, then count off 10 sts from each end and place marker, this is where you will place the praying hands (between markers),continue with open blind pattern then work Praying hands between markers, then back to open blind. (** Read Note)  and then do the same for the reverse Cross; count off 15 sts from each end and this is where you will add the reverse cross portion of this shawl pattern
 
**Note
This Shawl has a grand total of 320 rows - 160 is your half way point
 
``````````````````````````````````````
 
 
"Comforting Others One Stitch At A Time"
 
"Wearing a Shawl is like recieving a Hug from God".
This is our opportunity to Bless you who may be Ill,
Hurt, Depressed, Lonely or in need of Spiritual Comfort
with our Prayer Shawls.
 
“Shawls… made for centuries universal and embracing,
symbolic of an inclusive, unconditionally loving, God.
They wrap, enfold, comfort, cover, give solace, mother,
hug, shelter and beautify. Those who have received these
shawls have been uplifted and affirmed, as if given wings
to fly above their troubles…”
-Written in 1998 by: Janet Bristow 2004

While making this prayer shawl is a spiritual practice which
embodies our thoughts and prayers for you.
 

Made in prayer, as prayed for durning the making of our
shawls, for prayer is covering you the reciever with GOD,
with our Blessings & Wishes from our hearts to your heart,
our shawls are then passed on hand-to-hand and heart-to-heart.
 
 
Our Prayer
May God’s grace be upon this shawl, warming, comforting,
enfolding and embracing. May this shawl be a safe haven…
a sacred place of security and well being sustaining and
embracing in good times as well as difficult ones. May You
be cradled in hope, kept in joy, graced with peace,
and wrapped in love.
 
Please know that Ron & I are keeping you and your precious
family deep within our prayers
 
 
Blessings Ron & Jean OzarkPs_91@yahoo.com
 
 
 LAUNDERING: - Machine wash warm, gentle cycle, Tumble
dry low. Do not over dry. For best results on fringe,
hand wash, lay flat to dry, (ALWAYS wash separtly / alone)
never mix with other laundry either washing or drying)

Monday, January 11, 2016

Knitted Gnome

http://plainandjoyfulliving.blogspot.com/2009/02/fun-knitting-gnome.html

This is NOT one of my own patterns but it beyond adorable.
(JMSQ 1/11/2016)

http://plainandjoyfulliving.blogspot.com/2009/02/fun-knitting-gnome.html

To get started:
 Materials: 20 yards of worsted weight wool yarn for the body
 color 5 yards of worsted weight wool yarn for the skin color
 clean carded sheep's wool for stuffing yarn needle size 6
 knitting needles (for worsted weight) or size appropriate
 for weight of yarn
 You can use any size needle and yarn to create different
 size gnome babies!

 First Leg:
 Cast on 10 stitches, leaving about a 10" tail for sewing
 up the leg
 Knit 10 rows (garter stitch).
 Cut yarn leaving a 5" tail.
 Second Leg:
 (push first leg to bottom of needles)
 Cast on 10 stitches on same needle that first leg is on this
 time leaving about a 15" tail.
 Like first leg, knit 10 rows (garter stitch).

 Body:
 Now knit both legs together (all 20 stitches). This will form
 the body.
 Knit (garter stitch) for 16 rows

 Head:
 Now switch to the skin color - and knit 10 rows in the
 stockinette stitch (this is one row garter, one row purl).
 After you have finished the 10th row - bind of all 20 stitches.

 Sew up the Body:
 Start with the shorter piece of yarn on the leg and thread the
 needle. Fold the leg in half to meet in the middle. (Wrong sides
 together - the smooth part of the head will be on the inside)
 Start with a running stitch around the bottom of the leg and
 pull. Then stitch up the side of the leg.

 Finish by making a knot with the other yarn end that is in the
 middle and tuck yarn ends to the outside.

 Now take the longer string at the end of the other leg and
 thread yarn needle. Work just like the first leg except continue
 stitching up the back of the gnome baby. When you reach the skin
 color - tie off with the other colored yarn.
 Turn body right side out.

 Stuff body with wool. Stuff legs first. I use the end of the knitting
 needle or crochet hook to get the wool in firmly. Stuff up to the
 beginning of the head.

 Now take the yarn that you used to knit up the back of the body
 and make a running stitch between the body color and head color
 to form the neck. Tie a knot.

 Now tuck all the loose strings into the head and take the skin
 color hanging yarn and thread needle. Sew up back of the head
 only to the top. Cut body color loose string inside head.
 Stuff head with wool.

 Now use a running stitch around top of head and tie off with
 other yarn string. Cut hanging yarns almost to the knot.

 Arms:
 Cast on 8 stitches and knit 8 rows cast off.
 Sew up cast off edge with a running stitch and then sew up side.
 Stuff Arm . Repeat for Arm 2.

 Hat:
 Cast on 22 stitches. Knit four rows in the stockinette stitch
 (Knit one row, Purl one row) for four rows.
 Now, knit two stitches together at the beginning and end of
 each knit row (every other row).

 Continue this until there is only one stitch left. Cut yarn
 long (about 20") and pull through loop.

 Put yarn in yarn needle and sew up back of hat. Let the bottom
 of the hat roll up a bit for the brim and finish sewing around
 head. and then attach to side of body.


http://plainandjoyfulliving.blogspot.com/2009/02/fun-knitting-gnome.html