Welcome to "Jeanarie's Patterns"- (Blessing others One Stitch at a Time)
"Childrens Hospital Donation"
Childrens Hospital In Little Rock today.. There are over 400 Baby hats...
Tuesday, April 3, 2018
Church Cradles
When our Granddaughters were young we called these cradle purses.
Now I like to call them church cradle's to keep little girls quiet in church. They each hold a 4” teddy bear or doll
Monday, January 8, 2018
Grandmas Mittens (C)
Hook Sizes: {DO NOT JOIN ROUNDS, PLACE MARKER}
E - ages 2-4
G - Ages 4-7
H - Ages 7 -10/12
NOTE: larger size in ( ), I use this size when making G hook 4-7 yrs of age
BODY:
1. ch 2, 5 (6) sc in 2nd chain from hook, (5 sts), (6 sts)
2. 1 sc in next st, PLACE MARKER IN THIS STITCH, now
work another sc in same st, 2 sc in each remaining st (10 sts), (12 sts)
3. 1 sc in next st, PLACE MARKER IN THIS STITCH, now
work another sc in same st, *1 sc in next st, 2 sc in next,
*Repeat around (15 sts) ( 18sts)
4. 1 sc in next st, PLACE MARKER IN THIS STITCH, now
work another sc in same st, *1 sc in each of next 2 sts,
2 sc in next, *Repeat around (20 sts), (24 sts )
5. 1 sc in next st, PLACE MARKER IN THIS STITCH, now
work another sc in same st, *1 sc in each of next 4 sts,
2 sc in next [when working with sts in ( ) 1 sc in last 3 sts]
*Repeat around (24 sts), (29 sts)
6-17. 1 sc in each st, **Remember to keep placing your
marker each row
18. 1 sc in next st, place marker, ch 6, skip next 6 sts,
1 sc in remaining sts to marker
19. 1 sc in each st and each chain (24 sts)**Remember to
keep placing your marker each row
20 - 25. 1 sc in each st, **Remember to keep placing your
marker each row, sl st into next st and fasten off UNLESS
your working your cuff with same color yarn
26-30. Join yarn in same st you sl st into from body of mitten;
*1 hdcfp, 1 hdcbp, *Repeat around sl st and fasten off
This cuff can be folded over body of mitten if reciever is small and will still fit nicely
THUMB:
1. join yarn in 1 sts along bottom, and each st , now work
1 sc in each st along the top. DO NOT JOIN (12 sts)
2-6. 1 sc in each st, remember to place marker each row (12 sts)
7. *1 sc2tog *repeat around, sl st and fasten off, ***leave long
tail to weave in and out along top to close, secure (6sts)
Friday, January 5, 2018
Mitten Lady's Magic Mittens
Children' s Mittens © Mitten Lady
http://mittenlady.com/mittenpattern
NOTE:
I use size 6 & 7 needles when making smaller mitten's, &
NOTE Changes: I omit rows 31 & 32 so this makes a smaller thumb:;
and I omit rows 45, 46, 47 & 48 to make the body smaller for the little mittens,
then I follow pattern below again as written...
LOVE THIS PATTERN!!!!!!!
I use size 8 needles for children up to maybe 12 yrs of age and follow pattern as written below...
~~~~~~~~~~~~~~~~~~~~~~~~~~~~~~
Using size 8 needles, Cast on 28 Stitches
1-10. k1,p1 ribbing (I do - k2, p2)
13. increase one in each of the first two stitches, then
knit to last two stitches, increase one in each of last
two stitches...32 Sts
14. P15 add marker, p2, add marker, p15
15. k15, increase one in each of next two stitches, k15
Row's 16,18,30.22,24. purl
17. K15, increase one in next stitch, k2, increase one
in next stitches, K15
19. K15, increase one in next stitch, k4, increase one
in next stitches, K15
21. K15, increase one in next stitch, k6, increase one
in next stitches, K15
23. K15, increase one in next stitch, k8, increase one
in next stitches, K15
25. remove markers in this row, K15, increase one in next
stitch, k10, increase one in next stitches, K15
26.Purl 26 turn
27.k10 turn
28.purl 10 turn
29.k10 turn
30.purl 10 turn
31.k10 turn
32.purl 10 turn
33.k2tog 5 times, thread needle through remaining 5 stitches, sew thumb
34.join yarn and finish row in purl
Row's 35, 37, 39, 41, 43, 45, 47: Knit all sts
Row's 36, 38, 40, 42, 44, 46, 48, 50, 52: Purl all sts
49.Knit 2 tog, Knit 2, repeat to end
51.Knit2 tog, Knit 1, repeat to end
53.knit 2 tog, repeat to end thread yarn through remaing
stitches and sew side seam of mitten
http://mittenlady.com/mittenpattern
NOTE:
I use size 6 & 7 needles when making smaller mitten's, &
NOTE Changes: I omit rows 31 & 32 so this makes a smaller thumb:;
and I omit rows 45, 46, 47 & 48 to make the body smaller for the little mittens,
then I follow pattern below again as written...
LOVE THIS PATTERN!!!!!!!
I use size 8 needles for children up to maybe 12 yrs of age and follow pattern as written below...
~~~~~~~~~~~~~~~~~~~~~~~~~~~~~~
Using size 8 needles, Cast on 28 Stitches
1-10. k1,p1 ribbing (I do - k2, p2)
13. increase one in each of the first two stitches, then
knit to last two stitches, increase one in each of last
two stitches...32 Sts
14. P15 add marker, p2, add marker, p15
15. k15, increase one in each of next two stitches, k15
Row's 16,18,30.22,24. purl
17. K15, increase one in next stitch, k2, increase one
in next stitches, K15
19. K15, increase one in next stitch, k4, increase one
in next stitches, K15
21. K15, increase one in next stitch, k6, increase one
in next stitches, K15
23. K15, increase one in next stitch, k8, increase one
in next stitches, K15
25. remove markers in this row, K15, increase one in next
stitch, k10, increase one in next stitches, K15
26.Purl 26 turn
27.k10 turn
28.purl 10 turn
29.k10 turn
30.purl 10 turn
31.k10 turn
32.purl 10 turn
33.k2tog 5 times, thread needle through remaining 5 stitches, sew thumb
34.join yarn and finish row in purl
Row's 35, 37, 39, 41, 43, 45, 47: Knit all sts
Row's 36, 38, 40, 42, 44, 46, 48, 50, 52: Purl all sts
49.Knit 2 tog, Knit 2, repeat to end
51.Knit2 tog, Knit 1, repeat to end
53.knit 2 tog, repeat to end thread yarn through remaing
stitches and sew side seam of mitten
http://mittenlady.com/mittenpattern
Saturday, December 16, 2017
Quick Scarf (K)
"JMSQ "Copyright 2017
Quick and simple scarf. Works up quickly
10 1/2 needles
Co 24 sets, knit 4 rows then follow pattern ...
1. Knit across
2. K 2, purl 20, k 2
3 & 4. Knit across
Continue to follow pattern rows 1-4 until desired length, k 4 rows & bind off
10 1/2 needles
Co 24 sets, knit 4 rows then follow pattern ...
1. Knit across
2. K 2, purl 20, k 2
3 & 4. Knit across
Continue to follow pattern rows 1-4 until desired length, k 4 rows & bind off
NOTE: you can co 20 sts and work pattern, I did 24 because this is for a man and I thought it would make it both wider and easier to fold in half
Saturday, June 24, 2017
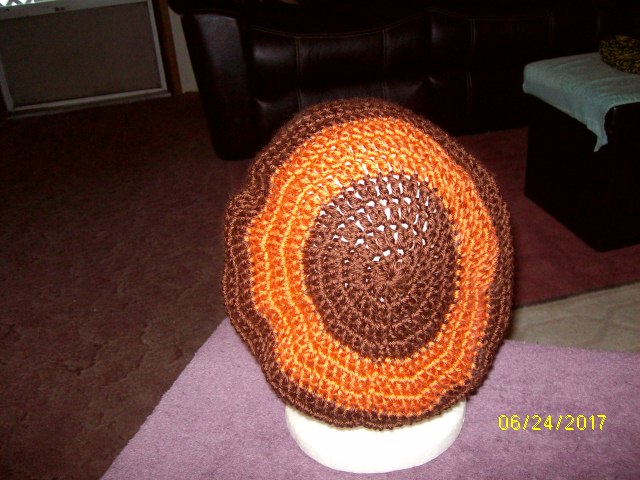
Simple Slouch
"JMSQ "Copyright 2017
J Hook
1.) Ch 3 or 4, join to form ring, ch 3, 11 dc's in ring, join to top of ch 3 (12 dc's)
2.) ch 3, 1 dc in same st, 2 dc iin each st around, join (24 dc's)
3.) ch 3, 2 dc in next st, *1 dc in next st, 2 dc in next st, *Repeat around, join to top of ch 3
4.) ch 3, 1 dc in next st, 2 dc in next st, *1 dc in each of next 2 sts, 2 dc in next st, *Repeat around, join to top of ch 3
5.) ch 3, 1 dc in each of next 2 sts, 2 dc in next st, *1 dc in each of next 3 sts, 2 dc in next st, *Repeat around, join to top of ch
6.) ch 3, 1 dc in each of next 3 sts, 2 dc in next st, *1 dc in each of next 4 sts, 2 dc in next st, *Repeat around, join to top of ch 3
7.) ch 3, 1 dc in each of next 4 sts, 2 dc in next st, *1 dc in each of next 5 sts, 2 dc in next st, *Repeat around, join to top of ch 3
8.) ch 3, 1 dc in each of next 5 sts, 2 dc in next st, *1 dc in each of next 6 sts, 2 dc in next st, *Repeat around, join to top of ch 3
9 & 10.) ch 3, 1 dc in neach st around join
11 & 12) ch 3, 1 dc in next 5 sts, 1 dc decrease over the next 2 sts, *1 dc in next 6 sts, 1 dc dec. over next 2 sts, * Repeat around, join to top of ch 3
13.) ch 3, 1 dc in next 4 sts, 1 dc decrease over the next 2 sts, *1 dc in next 5 sts, 1 dc dec. over next 2 sts, * Repeat around, join to top of ch 3
14.) ch 3, 1 dc in next 5 sts, 1 dc decrease over the next 2 sts, *1 dc in next 5 sts, 1 dc dec. over next 2 sts, * Repeat around, join to top of ch 3
15.) ch 3, 1 dc in next 6 sts, 1 dc decrease over the next 2 sts, *1 dc in next 6 sts, 1 dc dec. over next 2 sts, * Repeat around, join to top of ch 3
16-19.) ch 2, 1 sc in each st around, join & finish off
J Hook
1.) Ch 3 or 4, join to form ring, ch 3, 11 dc's in ring, join to top of ch 3 (12 dc's)
2.) ch 3, 1 dc in same st, 2 dc iin each st around, join (24 dc's)
3.) ch 3, 2 dc in next st, *1 dc in next st, 2 dc in next st, *Repeat around, join to top of ch 3
4.) ch 3, 1 dc in next st, 2 dc in next st, *1 dc in each of next 2 sts, 2 dc in next st, *Repeat around, join to top of ch 3
5.) ch 3, 1 dc in each of next 2 sts, 2 dc in next st, *1 dc in each of next 3 sts, 2 dc in next st, *Repeat around, join to top of ch
6.) ch 3, 1 dc in each of next 3 sts, 2 dc in next st, *1 dc in each of next 4 sts, 2 dc in next st, *Repeat around, join to top of ch 3
7.) ch 3, 1 dc in each of next 4 sts, 2 dc in next st, *1 dc in each of next 5 sts, 2 dc in next st, *Repeat around, join to top of ch 3
8.) ch 3, 1 dc in each of next 5 sts, 2 dc in next st, *1 dc in each of next 6 sts, 2 dc in next st, *Repeat around, join to top of ch 3
9 & 10.) ch 3, 1 dc in neach st around join
11 & 12) ch 3, 1 dc in next 5 sts, 1 dc decrease over the next 2 sts, *1 dc in next 6 sts, 1 dc dec. over next 2 sts, * Repeat around, join to top of ch 3
13.) ch 3, 1 dc in next 4 sts, 1 dc decrease over the next 2 sts, *1 dc in next 5 sts, 1 dc dec. over next 2 sts, * Repeat around, join to top of ch 3
14.) ch 3, 1 dc in next 5 sts, 1 dc decrease over the next 2 sts, *1 dc in next 5 sts, 1 dc dec. over next 2 sts, * Repeat around, join to top of ch 3
15.) ch 3, 1 dc in next 6 sts, 1 dc decrease over the next 2 sts, *1 dc in next 6 sts, 1 dc dec. over next 2 sts, * Repeat around, join to top of ch 3
16-19.) ch 2, 1 sc in each st around, join & finish off
Sunday, May 14, 2017
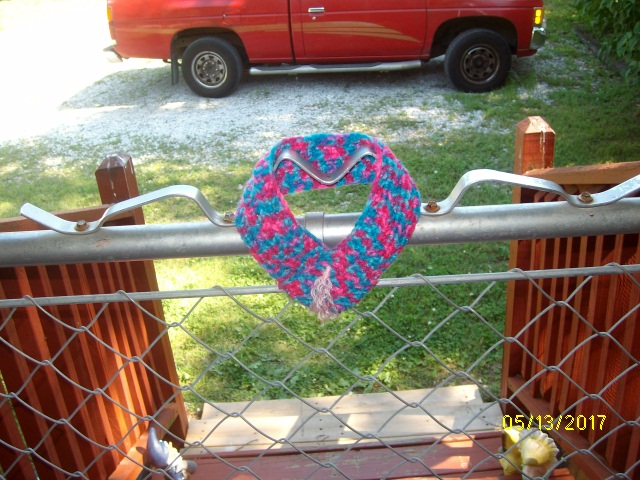
Pet Collar's (C)
"JMSQ "Copyright © 2017
How about dressing up your little 4 legged friend with one of our new pet collars.
Using 2 hooks G & H will make them different sizes to fit your pet,
Get creative and see what you can do & have fun
#1 - Pink Collar
G Hook,
1.) ch 60, 1 dc in 2 ch frok hook and in each ch across, ch 2 turn
2-6.) 1 fpdc in first st, 1 bpdc in next st, *1 fpdc in next st,
1 bpdc in next st, *Repeat across, ch 2 turn.. ...
.at end of row 6, Finish off leaving long tail to sew bottom front
corners together
#2 - Multi colored collar
H Hook
1.) ch 60, 1 hdc in 2ned ch from hook and in each st across, ch 2 turn
2-6.) 1 hdc in each st across, ch 2 turn after row 6, Finish off leaving
long tail to sew bottom front corners together
#3- another easy pattern to follow,
Follow pattern #2 only instead of working with hdc, use dc and see
how that works for you, ..... or maybe 1 row hdc, next 2 rows dc, then
1 row hdc, next 2 rows dc
NOTE:
You can add 2 buttons on top of each side of where you joined the 2
ends of your work together, or like I did, made a tassel on the top to
join the 2 ends together
Using 2 hooks G & H will make them different sizes to fit your pet,
Get creative and see what you can do & have fun
#1 - Pink Collar
G Hook,
1.) ch 60, 1 dc in 2 ch frok hook and in each ch across, ch 2 turn
2-6.) 1 fpdc in first st, 1 bpdc in next st, *1 fpdc in next st,
1 bpdc in next st, *Repeat across, ch 2 turn.. ...
.at end of row 6, Finish off leaving long tail to sew bottom front
corners together
#2 - Multi colored collar
H Hook
1.) ch 60, 1 hdc in 2ned ch from hook and in each st across, ch 2 turn
2-6.) 1 hdc in each st across, ch 2 turn after row 6, Finish off leaving
long tail to sew bottom front corners together
#3- another easy pattern to follow,
Follow pattern #2 only instead of working with hdc, use dc and see
how that works for you, ..... or maybe 1 row hdc, next 2 rows dc, then
1 row hdc, next 2 rows dc
NOTE:
You can add 2 buttons on top of each side of where you joined the 2
ends of your work together, or like I did, made a tassel on the top to
join the 2 ends together
Sunday, May 7, 2017
4 Wonderful Pocket Prayer Cloths
Cross Pocket Prayer Cross (K)
http://jeanariespatterns.blogspot.com/2010/11/cross-pocket-prayer-cloth.html
Before you begin, say a prayer for the person who will receive the prayer cloth.
Angel Prayer Cloth {Children} (C)
http://jeanariespatterns.blogspot.com/2010/11/angel-prayer-cloth.html
Before you begin, say a prayer for the person who will receive the prayer cloth.
Granny Pocket Prayer Cloth (C)
http://howcraftyismarge.blogspot.com/2015/10/pocket-prayer-shawls-aka-pocket-prayer.html
Before you begin, say a prayer for the person who will receive the prayer cloth.
Scrap Cross Prayer Cross (C)
http://scrapyarncrochet.blogspot.com/2011/06/free-yarn-cross-crochet-pattern.html
Before you begin, say a prayer for the person who will receive the prayer cloth.
Monday, January 16, 2017
Sharing Heart Prints
This is our oppornuty to share a little happiness in someone's life. Your loving gesture could make such a difference in someone's life
I'm making Crocheted hearts and attaching tags with an up-lifting message and placing them (on hooks, stones, pathways, park benches door nobs etc) in a place where they will be found. My Prayer is that it will brighten
someone's life even of only for a moment in time
My CHALLENGUE to you is to make some hearts and Bless those in your world around you. You'll be surprised at the difference it makes in both your lives
Heart Prints are always FREE. Freely you have received, Freely you give
~~~~~~~~~~~~~~~~~~~~~~~~~~~~~
Heart pattern of your choice.
1 strand of yarn works, but using 2 makes your heart more stable for
hanging
This is the pattern I use. NO it's not my own pattern and I can't remember where I actually got it, but here goes:
2 strands of yarn held together
WW yarn
H hook
1.) (Long Tail to tie tags to) ch 5, join, ch 3, work 10 dc in ring, join, ch 3 (11 sts)
2.) work 3 trc in same st, 3 trc in next st, 1 dc & 1 hdc in next st, 1 sc in each of next 2 sts, 1 sc, 1 dc, 1 sc in next st, 1 sc in each of next 2 sts, 1 hdc & 1 dc in next st, 3 trc in next st, 3 trc & 1 dc in last st, join to center or beginning of original ch 3, fasten off
(With Long Tail to tie tags )
fasten both long tails up the back and through TOP center st and attach tags, trim excess yarn as mine and share in your world
~~~~{Some tags your welcome to use}~~~~
{Sharing "Heart-Prints" with the world}
1. To Believe in love, is loving yourself
2. Collect beautiful memories
3. Lead me beside the Still Waters
4. Become the sunshine in someone's life
5. Share your smile with the world
6. Have Faith, think Positive, and Forgive
Yourself, an others
7. Shed the past and believe in the future
8. Count your Blessings
9. Where there is Peace, God is there also.
10. Where Love is found, God is there also.
{ GOD IS LOVE }
Saturday, January 7, 2017
JMSQ - Baby CC
My {JMSQ} version of the CC cap for babies...
8 Needles
CO 48
Row's 1-6: k2, p2
Row's 7 & 9: k across
Row's 8 & 10: p across
Row's 11-14: p across
Row's 15 & 17: k across
Row's 16 & 18: p across
Row's 19: *k1, p1 *Across
Row's 20 - 22: k the purls & p the knits
Row's 23 & 25: k across
Row's 24 & 26: p across
Row's 27 -30: p across
Row 31: *k3, k2tog, *Across
Row's 32, 34, 36, 38: p across
Row 33: *k2, k2tog *Across
Row 35: *k1, k2tog *Across
Row 37: *k2 tog *Across
Cut long tail, with darning needle, sew through
loops left on needle, secure, sew along seam,
tuck in tails... enjoy
8 Needles
CO 48
Row's 1-6: k2, p2
Row's 7 & 9: k across
Row's 8 & 10: p across
Row's 11-14: p across
Row's 15 & 17: k across
Row's 16 & 18: p across
Row's 19: *k1, p1 *Across
Row's 20 - 22: k the purls & p the knits
Row's 23 & 25: k across
Row's 24 & 26: p across
Row's 27 -30: p across
Row 31: *k3, k2tog, *Across
Row's 32, 34, 36, 38: p across
Row 33: *k2, k2tog *Across
Row 35: *k1, k2tog *Across
Row 37: *k2 tog *Across
Cut long tail, with darning needle, sew through
loops left on needle, secure, sew along seam,
tuck in tails... enjoy
Monday, December 26, 2016
Christmas Bonnet (C)
"JMSQ "Copyright 2016 12/25/2016
H Hook
Read Heart WW 4 ply yarn
READ NOTES as you work this pattern:
...
H Hook
Read Heart WW 4 ply yarn
READ NOTES as you work this pattern:
...
Row 1.) ch 4, join to form circle, ch 4, *1 dc, ch 1,
*Repeat 10 more times in circle, join to 3rd ch of
ch 4 (12 dc's & ch 1's)
Row 2.) sl st into ch 1 space, ch 2, 1 dc in same st,
ch 1, *2dc, ch 1 in each ch 1 space around, join to top
of ch 2
Row 3.) sl st into ch 1 space, ch 2, 2 dc in same st,
ch 1, *3dc, ch 1 in each ch 1 space around, join to top of ch 2
Row 4.)sl st into ch 1 space, ch 2, 1 dc, ch 1, 2dc, ch 1
in same st, *V st in each ch 1 space around, (2 dc,
ch1, 2 dc, ch 1) in each ch 1 space around.join to top
of ch 2
Row 5.)sl st into ch 1 space, ch 2, 1 dc in same st, ch 1,
*2dc, ch 1 in "each" ch 1 space around, join to top of ch 2
Row 6.)sl st into ch 1 space, ch 2, 2 dc in same st, ch 1,
*3dc, ch 1 in each ch 1 space around, join to top of ch 2
Row 7.) sl st into ch 1 space, 1 dc in each dc (NOT CH SPACES)
*Repeat around, join
Row's 8 & 10) ch 2, skip 1 dc, 1 dc in next dc, 1 dc in dc just skipped,
[X st just made] *Repeat around until last st, 1 dc in last st, join
Row's 9 & 11:) ch 2, 1 dc in each st aroud, join (72 sts)
Row 12: 1 sc around, join:
NOTE:
For thicker hair & deeper hat repeat row's 8 & 9
1 more time then move on to row 13
Row 13.) sl st into 12 sts, 1 dc in each of next 48 sts, ch 2 turn
(leaving last 12 sts un worked) - [total un-worked sts 24]
Row's 14-17.) 1 dc in each st across, ch 2 turn
Row 18 & 19) 1 sc across, finish off
Tassle - Fringe: Make 2:
Cut 8 strands (about 10" each)
insert hook from inside corner of bonnet brim and grab
loop of yarn, pull through, slip strands into loop and gently pull.
Repeat for other tassle
*Repeat 10 more times in circle, join to 3rd ch of
ch 4 (12 dc's & ch 1's)
Row 2.) sl st into ch 1 space, ch 2, 1 dc in same st,
ch 1, *2dc, ch 1 in each ch 1 space around, join to top
of ch 2
Row 3.) sl st into ch 1 space, ch 2, 2 dc in same st,
ch 1, *3dc, ch 1 in each ch 1 space around, join to top of ch 2
Row 4.)sl st into ch 1 space, ch 2, 1 dc, ch 1, 2dc, ch 1
in same st, *V st in each ch 1 space around, (2 dc,
ch1, 2 dc, ch 1) in each ch 1 space around.join to top
of ch 2
Row 5.)sl st into ch 1 space, ch 2, 1 dc in same st, ch 1,
*2dc, ch 1 in "each" ch 1 space around, join to top of ch 2
Row 6.)sl st into ch 1 space, ch 2, 2 dc in same st, ch 1,
*3dc, ch 1 in each ch 1 space around, join to top of ch 2
Row 7.) sl st into ch 1 space, 1 dc in each dc (NOT CH SPACES)
*Repeat around, join
Row's 8 & 10) ch 2, skip 1 dc, 1 dc in next dc, 1 dc in dc just skipped,
[X st just made] *Repeat around until last st, 1 dc in last st, join
Row's 9 & 11:) ch 2, 1 dc in each st aroud, join (72 sts)
Row 12: 1 sc around, join:
NOTE:
For thicker hair & deeper hat repeat row's 8 & 9
1 more time then move on to row 13
Row 13.) sl st into 12 sts, 1 dc in each of next 48 sts, ch 2 turn
(leaving last 12 sts un worked) - [total un-worked sts 24]
Row's 14-17.) 1 dc in each st across, ch 2 turn
Row 18 & 19) 1 sc across, finish off
Tassle - Fringe: Make 2:
Cut 8 strands (about 10" each)
insert hook from inside corner of bonnet brim and grab
loop of yarn, pull through, slip strands into loop and gently pull.
Repeat for other tassle
Saturday, November 12, 2016
Easy Fingerless Gloves
"JMSQ "Copyright © Nov.2016
8 Needles
CO 36 - (long tail for sweing side seam)
Row's 1-5: Knit Across
6. K across
7. P across
8-9: Knit across
*Repeat row's 6-9 (6 more times)
34. Knit across
35. P across
36-40. k2, p2
Bind Off (Long Tail for sewing side seam)
NOTE:
There are 7 ribs from rows 8&9. Mark from 3-5 on ribs (this is where your thumb space is and left un-sewn) sew together ends
Also if glove is to wide, co on 4 sts less and follow pattern
8 Needles
CO 36 - (long tail for sweing side seam)
Row's 1-5: Knit Across
6. K across
7. P across
8-9: Knit across
*Repeat row's 6-9 (6 more times)
34. Knit across
35. P across
36-40. k2, p2
Bind Off (Long Tail for sewing side seam)
NOTE:
There are 7 ribs from rows 8&9. Mark from 3-5 on ribs (this is where your thumb space is and left un-sewn) sew together ends
Also if glove is to wide, co on 4 sts less and follow pattern
Thursday, August 11, 2016
Wrist Gems
"JMSQ "Copyright © 2016
{These little gems hanging from the ears on this lovie are quick and so
easy to make, great accessory to your favorite outfit... Perfect for that
teenager to be hip with her friends}
H Hook
1.) ch 28, join, 1 sc in each st around, join
2.) ch 2, 1 dc to the "right" of ch st, (X st made); now were back to
working towards the left, *skip 1 st, 1 dc in the next st, 1 dc in st
just skipped, *Repeat around, join
3.) 1 sc in each st around, join & fasten off
NOTE:
if you want your Wrist Gems wider, work another row 2, followed
by another row 3
{These little gems hanging from the ears on this lovie are quick and so
easy to make, great accessory to your favorite outfit... Perfect for that
teenager to be hip with her friends}
H Hook
1.) ch 28, join, 1 sc in each st around, join
2.) ch 2, 1 dc to the "right" of ch st, (X st made); now were back to
working towards the left, *skip 1 st, 1 dc in the next st, 1 dc in st
just skipped, *Repeat around, join
3.) 1 sc in each st around, join & fasten off
NOTE:
if you want your Wrist Gems wider, work another row 2, followed
by another row 3
Lacy NeckWarmer -or- Scarf
"JMSQ "Copyright © 2016
Scarf Measures 4 1/2" x 30"
Neck Warmer Measures 4 1/2" x 34"
10 Needles
Long tail cast on 17 sts
knit 3 rows then follow pattern below
Pattern:
1.) K across
2.) K2, P13, K2
3.) K2, *yo, k2 tog, *Repeat to last st, knit last st
4.) K across
{SCARF: Repeat Pattern row's 1-4 ~ 40 more times}
{NECK WARMER: Repeat Pattern 1-4 ~ 45 more times}
Knit 3 rows and bind off
Perfect Neck Warmer
lay out just as I have above and sew around edges on bottom, add buttons for a fashion statement and off you go for that fun day in the winter
Saturday, July 30, 2016
Red -N- Purple Bags
"JMSQ "Copyright © 2016
I belong to several groups. A lot of the ladies are making bags for the little girls and babies to put their little girly things in to carry. This is a great idea of you desired to use these 2 bags for this.
Winter is quickly coming upon us, I thought I'd use these bags to put a couple sanitary napkins for the homeless ladies (privacy issues), and then place the bags in a gallon size zip-loc bag filled with new socks, winter scarf, gloves, tooth brush, applesauce, TP etc. Then I thought I keep a few in our van and take the rest to the "House of Hope" for the homeless and Low Income families
~~~~~~~~~~~~~~~~~~~~~~~
H Hook
Red Bag = 6 1/2" X 6 3/4".
Purple Bag = 6 1/2" X 6 1/4 "
~~~~~~~~~~~~~~~~~~~~~~~
RED BAG
Special instructions:
X st:
*skip 1 st, 1 dc in next st, 1 dc in st just skipped *Repeat around, join
NOTE: Row's 5-9
you can work 2 dc, ch 1 around and work in each of
the ch 1 spaces if desired, this bag is down without the
ch 1 space but worked just the same as if done
Purple BAG
Special instructions:
X st:
*skip 1 st, 1 dc in next st, 1 dc in st just skipped *Repeat around, join
NOTE: Row's 5-9
~~~~~~~~~~~~~~~~~~~~~~~~~~~~~
Red Bag:
1.) ch 20, 1 hdc in 2nd ch from hoom, 1 hdc in each st
to end, 3 hdc in last st, 1 hdc in each st along opposite
side of of ch to end, 1 hdc in base of beginning st,
join (40 sts)
2-3.) 1 dc in each st around, join, ch 3 (40 sts)
4.) ch 3, 1 dc in same st, skip next st, 2 dc in next st,
skip next st *Repeat around, join (40 sts)
5-9.) Slip in space between the 2 sets of 2 dc, ch 3,
1 dc in same st, *in each space BETWEEN the 2 dc, work 2 dc,
around, join to top of ch 3 (40 sts
NOTE:
you can work 2 dc, ch 1 around and work in each of
the ch 1 spaces if desired, this bag is down without the
ch 1 space but worked just the same as if done
10.) ch 2, 1 hdc in each of st around, join
11.) *skip 1 st, 1 dc in next st, 1 dc in st just skipped
*Repeat around, join
12.) Repeat row 10
Change colors if desired
13.) Repeat row 10
14.) 1 dc in each of next 5 sts, ch 12, skip 10 sts, 1 dc
in each of next 10 sts, ch 12, skip next 10 sts, 1 dc in
each of next 5 sts, join
15.) Repeat row 10... Fasten off
Flower:
ch 3, join, 10 sc in ring, join, ch 10, sl st in same st,
ch 10, sl st in next st, *ch 10, sl st in same st, ch 10,
sl st in next st, *Repeat around, join ans sew in front of bag
~~~~~~~~~~~~~~~~~~~~~~~~~~~~~~~~~~~
Purple Bag:
1.) ch 20, 1 dc in 2nd ch from hoom, 1 dc in each st
to end, 3 dc in last st, 1 dc in each st along opposite
side of of ch to end, 1 dc in base of beginning st,
join (40 sts)
2-3.) 1 dc in each st around, join, ch 3 (40 sts)
4.) *skip 1 st, 1 dc in next st, 1 dc in st just skipped
*Repeat around, join
5-6.) 1 dc in each st around, join, ch 3 (40 sts)
7.) *skip 1 st, 1 dc in next st, 1 dc in st just skipped
*Repeat around, join
8-9.) 1 dc in each st around, join, ch 3 (40 sts)
Change color if desired
10.) Repeat row 5
11.) 1 dc in each of next 5 sts, ch 12, skip 10 sts, 1 dc
in each of next 10 sts, ch 12, skip next 10 sts, 1 dc in
each of next 5 sts, join
12.) 1 hdc in each st around, join... Fasten off
Flower:
ch 3, join, 10 sc in ring, join, ch 10, sl st in same st,
ch 10, sl st in next st, *ch 10, sl st in same st, ch 10,
sl st in next st, *Repeat around, join ans sew in front of bag
I belong to several groups. A lot of the ladies are making bags for the little girls and babies to put their little girly things in to carry. This is a great idea of you desired to use these 2 bags for this.
Winter is quickly coming upon us, I thought I'd use these bags to put a couple sanitary napkins for the homeless ladies (privacy issues), and then place the bags in a gallon size zip-loc bag filled with new socks, winter scarf, gloves, tooth brush, applesauce, TP etc. Then I thought I keep a few in our van and take the rest to the "House of Hope" for the homeless and Low Income families
~~~~~~~~~~~~~~~~~~~~~~~
H Hook
Red Bag = 6 1/2" X 6 3/4".
Purple Bag = 6 1/2" X 6 1/4 "
~~~~~~~~~~~~~~~~~~~~~~~
RED BAG
Special instructions:
X st:
*skip 1 st, 1 dc in next st, 1 dc in st just skipped *Repeat around, join
NOTE: Row's 5-9
you can work 2 dc, ch 1 around and work in each of
the ch 1 spaces if desired, this bag is down without the
ch 1 space but worked just the same as if done
Purple BAG
Special instructions:
X st:
*skip 1 st, 1 dc in next st, 1 dc in st just skipped *Repeat around, join
NOTE: Row's 5-9
~~~~~~~~~~~~~~~~~~~~~~~~~~~~~
Red Bag:
1.) ch 20, 1 hdc in 2nd ch from hoom, 1 hdc in each st
to end, 3 hdc in last st, 1 hdc in each st along opposite
side of of ch to end, 1 hdc in base of beginning st,
join (40 sts)
2-3.) 1 dc in each st around, join, ch 3 (40 sts)
4.) ch 3, 1 dc in same st, skip next st, 2 dc in next st,
skip next st *Repeat around, join (40 sts)
5-9.) Slip in space between the 2 sets of 2 dc, ch 3,
1 dc in same st, *in each space BETWEEN the 2 dc, work 2 dc,
around, join to top of ch 3 (40 sts
NOTE:
you can work 2 dc, ch 1 around and work in each of
the ch 1 spaces if desired, this bag is down without the
ch 1 space but worked just the same as if done
10.) ch 2, 1 hdc in each of st around, join
11.) *skip 1 st, 1 dc in next st, 1 dc in st just skipped
*Repeat around, join
12.) Repeat row 10
Change colors if desired
13.) Repeat row 10
14.) 1 dc in each of next 5 sts, ch 12, skip 10 sts, 1 dc
in each of next 10 sts, ch 12, skip next 10 sts, 1 dc in
each of next 5 sts, join
15.) Repeat row 10... Fasten off
Flower:
ch 3, join, 10 sc in ring, join, ch 10, sl st in same st,
ch 10, sl st in next st, *ch 10, sl st in same st, ch 10,
sl st in next st, *Repeat around, join ans sew in front of bag
~~~~~~~~~~~~~~~~~~~~~~~~~~~~~~~~~~~
Purple Bag:
1.) ch 20, 1 dc in 2nd ch from hoom, 1 dc in each st
to end, 3 dc in last st, 1 dc in each st along opposite
side of of ch to end, 1 dc in base of beginning st,
join (40 sts)
2-3.) 1 dc in each st around, join, ch 3 (40 sts)
4.) *skip 1 st, 1 dc in next st, 1 dc in st just skipped
*Repeat around, join
5-6.) 1 dc in each st around, join, ch 3 (40 sts)
7.) *skip 1 st, 1 dc in next st, 1 dc in st just skipped
*Repeat around, join
8-9.) 1 dc in each st around, join, ch 3 (40 sts)
Change color if desired
10.) Repeat row 5
11.) 1 dc in each of next 5 sts, ch 12, skip 10 sts, 1 dc
in each of next 10 sts, ch 12, skip next 10 sts, 1 dc in
each of next 5 sts, join
12.) 1 hdc in each st around, join... Fasten off
Flower:
ch 3, join, 10 sc in ring, join, ch 10, sl st in same st,
ch 10, sl st in next st, *ch 10, sl st in same st, ch 10,
sl st in next st, *Repeat around, join ans sew in front of bag
Thursday, July 28, 2016
Bunny, Bear, & Octopus Lovies
"JMSQ "Copyright © 2016
H Hook
Perfect Head (ALL Lovies):
1.) ch 4, join, ch 2, 11 dc in ring, join (12)
2.), ch 2, 2 dc in each st, Join, (24)
3.) ch 2,1 dc in same st, 2 dc in next st,
*1 dc in next st, 2 dc in next st, *Repeat, join (18)
4-9.) ch 1, 1 hdc in each st, join
{Place face on head now}
10.) ch 1, *1 hdc, 2 hdc 2tog, *Repeat, join (24)
11.) ch 1, *2hdc 2tog *Repeat around, join (12)
{STUFF}
12.) ch 1, *1 sc 2 tog *Repeat (6)
NOTE:
I do this just before attaching to lovie blankie, thus I'm able
to tuck in all ties etc.
FASTEN Off, weave LONG TAIL through last 6 stsm pull
tight to close, sew on blankie (
~~~~~~~~~~~~~~~~~~~~~~~~~~~~~
Bunny Ears: Make 2 (H Hook)
1.) ch 10, 1 dc in 2nd ch from hook, 1 dc in each st to end,
3 dc in last ch, turn and work along opposite side, i dc in
each st, 1 dc in base of beginning, join
2.) ch 2, 2 dc in each of nest 3 sts, 1 dc in next 4 sts,
2 dc in each of next 5 sts, 1 dc in next 4 sts, 2 dc in
last 2 sts. join
Fasten off leaving long tail to sew on bunny head
NOTE:
Ear's are attached over rows 2-3
Add fase as desired, I made sleepy eyes & nose on this bunny
~~~~~~~~~~~~~~~~~~~~~~~~~~~~~~~
Curl Paws For Bunny, & Bear : Make 2 (G hook)
ch 15, 4 hdc in 2nd ch from hook, 4 hdc in each of
next 3 sts, 3 dhc in each remaining st up to last 2 sts,
1 hdc in each of last 2 sts, fasten off leave long enough
tail to tie on base of bunny head.
Attach between row's 10-11
~~~~~~~~~~~~~~~~~~~~~~~~~~~~~~~~
Ears make 2 pieces
Round1. Make magic ring and 6sc in ring (6)
Round2. 2sc in each st around (12)
Round3. *Sc in next st, 2sc in next st* and
repeat from * around (18)
Round4-7. sc in each st around (18)
Then finish of leave long tail for sewing
and stuffing polyester just a little .
NOTE:
Ear's are attached over rows 2-3 (bend a little)
Nose for bear
Round1. Make magic ring and 6sc in ring (6)
Round2. 2Sc in each st around (12)
Round3. sc in each st around (12)
Finish of leave and long tail for sewing.
Tail:
1.) ch 2, 6 sc in 2nd ch from hook, join (6)
2.) 2 sc in each st, join
3.) 1 sc in each, join and fasten off leaving long
tail to sew on bear
~~~~~~~~~~~~~~~~~~~~~~~~~~~~~~~~~~~~~~
Baby Octopus LEG's
Make head as above
Curly Q Legs: Make 8 (G hook)
Make 8:
ch 15, 4 hdc in 2nd ch from hook, 4 hdc in each of next 3 sts,
3 dhc in each remaining st up to last 2 sts, 1 hdc in each of last
2 sts, fasten off leave long enough tail to tie on base of head.
NOTE:
Evenly space legs around bottom of head, sew between row's
10 & 11. Make sure they are laying flat when sewing head to lovie
~~~~~~~~~~~~~~~~~~~~~~~~
Lovie Blankie:
NOTE:
ALL ch's at beginning of rows count as a stitch, and from row 3 on,
slip into ch 2 space of V sts
Color A Soft White
Color B Color of choice
H Hook
Color A
1.)ch 4 join, ch 3, 11 dc inring, join to top of ch 3 (12 sts)
2.) CH 3, 2 dc in each st around, join to top of ch 3 (24 STS)
3.) ch 5, 1 dc in same st, skip next stitch, *1 dc, ch 2, 1 dc
in next st,
[V st made], skip,next st, *Repeat around, join in 3rd st of ch 5 .
(12 V sts made)
*** slip into ch 2 space of V sts at the beginning of each row
unless directed to
do otherwise
4.) slip into ch 2 space, 2 dc, ch 2, 2 dc in each V st around, join
to top of ch 3
5.) slip into ch 2 space, 3 dc, ch 2, 3 dc in each V st around, join
to top of ch 3
6.) slip into ch 2 space, 4 dc, ch 2, 4 dc in each V st around, join
to top of ch 3
7.) slip into ch 2 space, 4 dc, ch 3, 4 dc, ch 1 in each V st around,
join to top of ch 3
8.) slip into ch 2 space, 5 dc, ch 2, 5 dc, ch 1 in each V st around,
join to top of ch 3
Change to Color B
9.) With color B, **Join in any stitch, 1 dc in each st, 1 dc
in ch 1 space, 1 dc in each st,
3 dc in ch 2 space. **Repeat around, fasten off
Change to Color A
Join in any stitch, *1 sc in each st, 3 sc in center point of of ch 3,
*Repeat around
Fasten off
H Hook
Perfect Head (ALL Lovies):
1.) ch 4, join, ch 2, 11 dc in ring, join (12)
2.), ch 2, 2 dc in each st, Join, (24)
3.) ch 2,1 dc in same st, 2 dc in next st,
*1 dc in next st, 2 dc in next st, *Repeat, join (18)
4-9.) ch 1, 1 hdc in each st, join
{Place face on head now}
10.) ch 1, *1 hdc, 2 hdc 2tog, *Repeat, join (24)
11.) ch 1, *2hdc 2tog *Repeat around, join (12)
{STUFF}
12.) ch 1, *1 sc 2 tog *Repeat (6)
NOTE:
I do this just before attaching to lovie blankie, thus I'm able
to tuck in all ties etc.
FASTEN Off, weave LONG TAIL through last 6 stsm pull
tight to close, sew on blankie (
~~~~~~~~~~~~~~~~~~~~~~~~~~~~~
1.) ch 10, 1 dc in 2nd ch from hook, 1 dc in each st to end,
3 dc in last ch, turn and work along opposite side, i dc in
each st, 1 dc in base of beginning, join
2.) ch 2, 2 dc in each of nest 3 sts, 1 dc in next 4 sts,
2 dc in each of next 5 sts, 1 dc in next 4 sts, 2 dc in
last 2 sts. join
Fasten off leaving long tail to sew on bunny head
NOTE:
Ear's are attached over rows 2-3
Add fase as desired, I made sleepy eyes & nose on this bunny
~~~~~~~~~~~~~~~~~~~~~~~~~~~~~~~
Curl Paws For Bunny, & Bear : Make 2 (G hook)
ch 15, 4 hdc in 2nd ch from hook, 4 hdc in each of
next 3 sts, 3 dhc in each remaining st up to last 2 sts,
1 hdc in each of last 2 sts, fasten off leave long enough
tail to tie on base of bunny head.
Attach between row's 10-11
~~~~~~~~~~~~~~~~~~~~~~~~~~~~~~~~
Teddy Bear (Face Piece's) - G Hook
Ears make 2 pieces
Round1. Make magic ring and 6sc in ring (6)
Round2. 2sc in each st around (12)
Round3. *Sc in next st, 2sc in next st* and
repeat from * around (18)
Round4-7. sc in each st around (18)
Then finish of leave long tail for sewing
and stuffing polyester just a little .
NOTE:
Ear's are attached over rows 2-3 (bend a little)
Nose for bear
Round1. Make magic ring and 6sc in ring (6)
Round2. 2Sc in each st around (12)
Round3. sc in each st around (12)
Finish of leave and long tail for sewing.
Tail:
1.) ch 2, 6 sc in 2nd ch from hook, join (6)
2.) 2 sc in each st, join
3.) 1 sc in each, join and fasten off leaving long
tail to sew on bear
~~~~~~~~~~~~~~~~~~~~~~~~~~~~~~~~~~~~~~
Baby Octopus LEG's
Make head as above
Curly Q Legs: Make 8 (G hook)
Make 8:
ch 15, 4 hdc in 2nd ch from hook, 4 hdc in each of next 3 sts,
3 dhc in each remaining st up to last 2 sts, 1 hdc in each of last
2 sts, fasten off leave long enough tail to tie on base of head.
NOTE:
Evenly space legs around bottom of head, sew between row's
10 & 11. Make sure they are laying flat when sewing head to lovie
~~~~~~~~~~~~~~~~~~~~~~~~
Lovie Blankie:
NOTE:
ALL ch's at beginning of rows count as a stitch, and from row 3 on,
slip into ch 2 space of V sts
Color A Soft White
Color B Color of choice
H Hook
Color A
1.)ch 4 join, ch 3, 11 dc inring, join to top of ch 3 (12 sts)
2.) CH 3, 2 dc in each st around, join to top of ch 3 (24 STS)
3.) ch 5, 1 dc in same st, skip next stitch, *1 dc, ch 2, 1 dc
in next st,
[V st made], skip,next st, *Repeat around, join in 3rd st of ch 5 .
(12 V sts made)
*** slip into ch 2 space of V sts at the beginning of each row
unless directed to
do otherwise
4.) slip into ch 2 space, 2 dc, ch 2, 2 dc in each V st around, join
to top of ch 3
5.) slip into ch 2 space, 3 dc, ch 2, 3 dc in each V st around, join
to top of ch 3
6.) slip into ch 2 space, 4 dc, ch 2, 4 dc in each V st around, join
to top of ch 3
7.) slip into ch 2 space, 4 dc, ch 3, 4 dc, ch 1 in each V st around,
join to top of ch 3
8.) slip into ch 2 space, 5 dc, ch 2, 5 dc, ch 1 in each V st around,
join to top of ch 3
Change to Color B
9.) With color B, **Join in any stitch, 1 dc in each st, 1 dc
in ch 1 space, 1 dc in each st,
3 dc in ch 2 space. **Repeat around, fasten off
Change to Color A
Join in any stitch, *1 sc in each st, 3 sc in center point of of ch 3,
*Repeat around
Fasten off
Subscribe to:
Posts (Atom)